Say you want to setup a command to reach out to an external service. Sure you can use arguments to gather multiple pieces of info, but if the user doesn’t properly put in all the required info, how can you make sure they do? That’s where Collectors come in. Collectors are a way that you can setup your bot to gather additional input from a user in Discord.
Whenever a command is triggered that creates a new collector, the collector will wait for additional messages and “collect” them for processing once its done. After the collector has ended, you can do what you need to with the necessary messages.
Creating a Collector
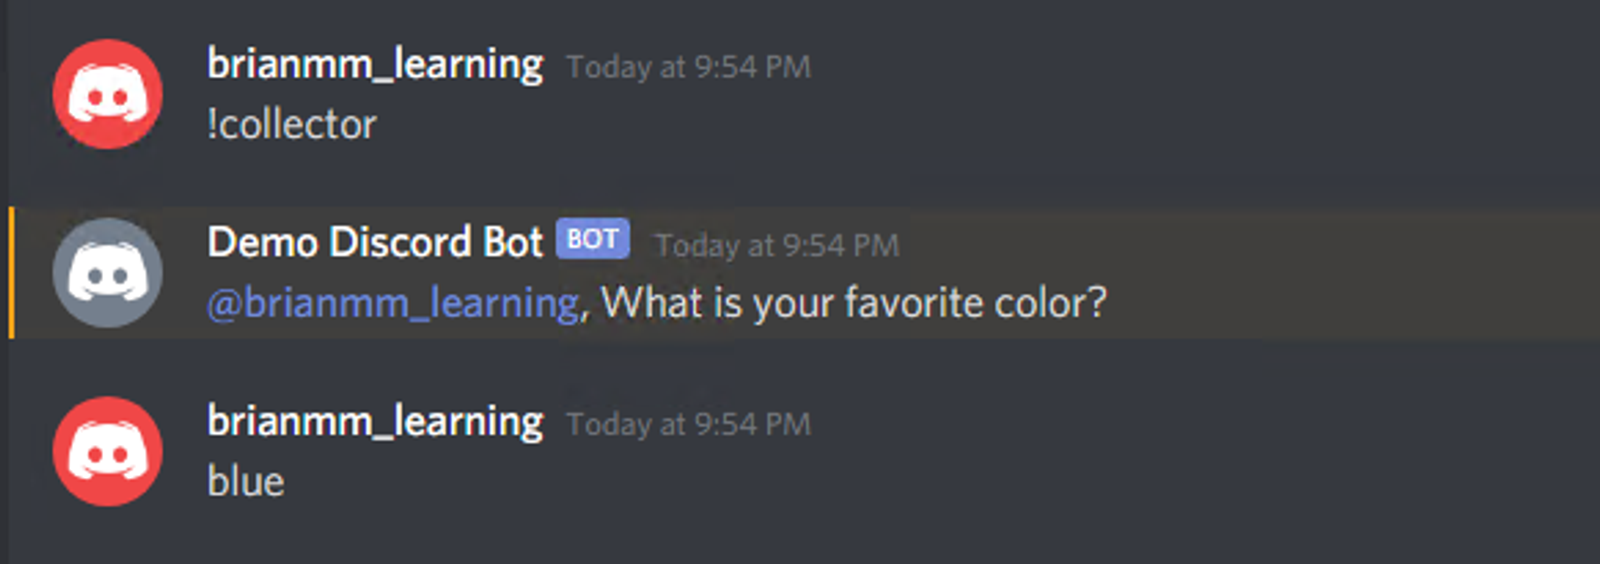
To get started, we need to setup yet another command prefix so our bot knows to prompt the user. Lets go with !collector. Add the following code into your “message” event handler;
if (msg.content.startsWith('!collector')) {
  // Filters define what kinds of messages should be collected
  let filter = (msg) => !msg.author.bot;
  // Options define how long the collector should remain open
  //    or the max number of messages it will collect
  let options = {
    max: 2,
    time: 15000
  };
  let collector = msg.channel.createMessageCollector(filter, options);

  // The 'collect' event will fire whenever the collector receives input
  collector.on('collect', (m) => {
    console.log(`Collected ${m.content}`);
  });

  // The 'end' event will fire when the collector is finished.
  collector.on('end', (collected) => {
    console.log(`Collected ${collected.size} items`);
  });

  msg.reply('What is your favorite color?');
}
The createMessageCollector() function accepts two parameters; a filter and the collector options.
Filters are a way to inform the collector what kinds of messages it should take in. You can create a filter around almost anything. The filter should return either true or false, depending on what your requirements are.
One thing worth noting about collectors is they are outside the standard flow of the way our bot receives messages. Meaning that it will collect messages from bots, so we used our filter to prevent it from collecting responses even from our bot.
The collector options tell the collector how to behave. In the options, you’ll generally specify either how long the collector should remain open (time) or how many messages it should take in before ending (max).
Here’s how the code behaves in our server.
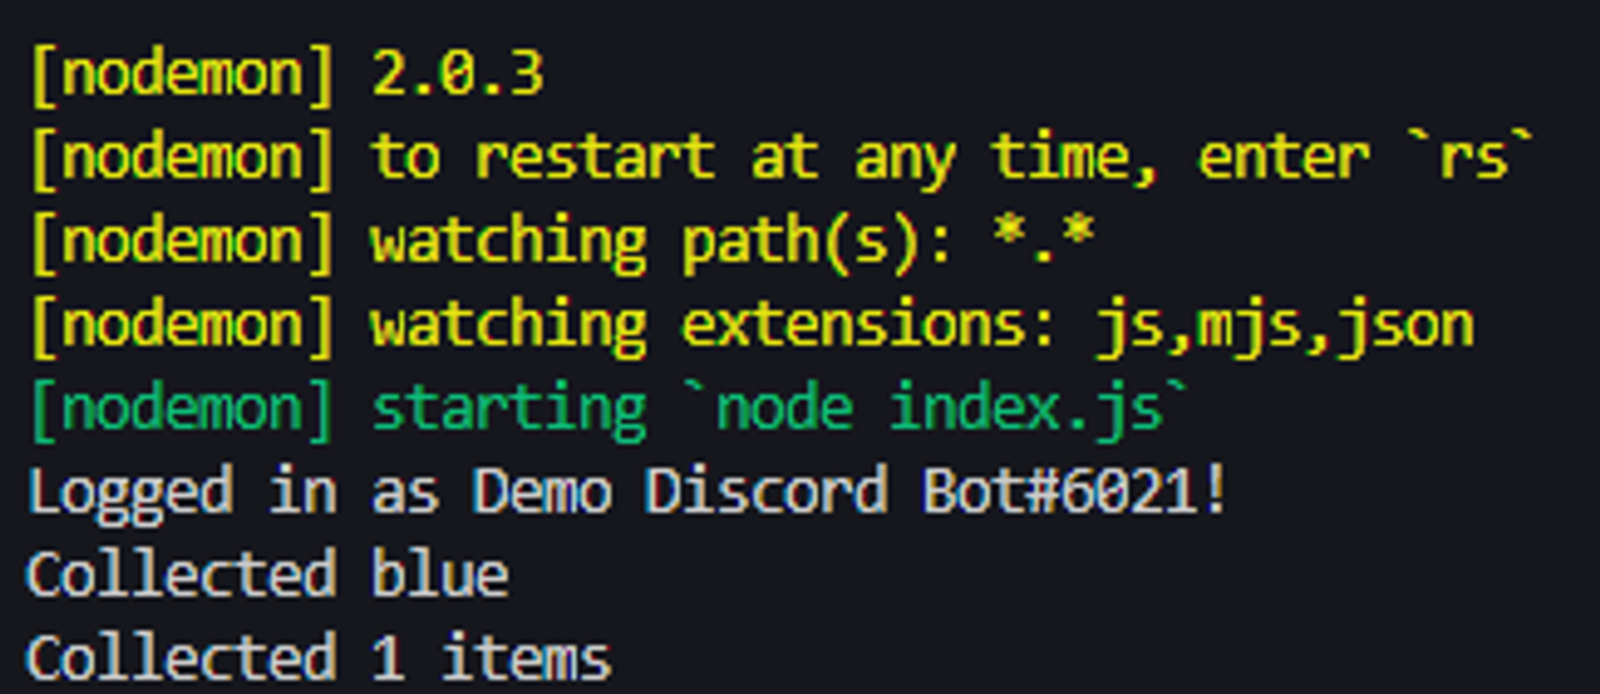
And you can see it will log out the collected message in the terminal, as well as the number of collected messages when the “end” event is fired.
Arguments with Collectors
You see how Collectors can be very powerful in helping our bot guide a user through how to use a particular command. We’re going to expand upon this a bit to show how you can use Arguments and Collectors together.
Lets say we’re working on a bot that requires 2 pieces of input per command. What happens if the user only enters one? This is where we can add a collector to prompt a user for the additional input required.
Add the following code to your message event handler.
if (msg.content.startsWith('!gimme')) {
  // Split the arguments
  const args = msg.content.split(' ');

  // Check the first argument (skipping the command itself)
  if (args[1] === 'smiley') {
    if (args.length < 3) {
      // Filter out any bot messages
      let filter = (msg) => !msg.author.bot;
      // Set our options to expect 1 message, and timeout after 15 seconds
      let options = {
        max: 1,
        time: 15000
      };
      let collector = msg.channel.createMessageCollector(filter, options);

      collector.on('end', (collected, reason) => {
        // If the collector ends for 'time', display a message to the user
        if (reason === 'time') {
          msg.reply('Ran out of time ☹...');
        } else {
          // Convert the collection to an array and check the content of the message.
          //   Repsond accordingly
          switch (collected.array()[0].content) {
            case 'happy':
              msg.reply('😀');
              break;
            case 'sad':
              msg.reply('😢');
              break;
            default:
              msg.reply('I dont know that smiley...');
              break;
          }
        }
      });

      msg.reply('What kind of smiley do you like? (happy or sad)');
    } else {
      // If all arguments are already there, respond with the requested item
      switch (args[2]) {
        case 'happy':
          msg.reply('😀');
          break;
        case 'sad':
          msg.reply('😢');
          break;
        default:
          msg.reply('I dont know that smiley...');
          break;
      }
    }
  }

  if (args[1] === 'circle') {
    if (args.length < 3) {
      let filter = (msg) => !msg.author.bot;
      let options = {
        max: 1,
        time: 15000
      };
      let collector = msg.channel.createMessageCollector(filter, options);

      collector.on('end', (collected, reason) => {
        if (reason === 'time') {
          msg.reply('Ran out of time ☹...');
        } else {
          switch (collected.array()[0].content) {
            case 'red':
              msg.reply('🔴');
              break;
            case 'blue':
              msg.reply('🔵');
              break;
            default:
              msg.reply('I dont know that color...');
              break;
          }
        }
      });

      msg.reply('What color circle would you like? (blue or red)');
    } else {
      switch (args[2]) {
        case 'red':
          msg.reply('🔴');
          break;
        case 'blue':
          msg.reply('🔵');
          break;
        default:
          msg.reply('I dont know that color...');
          break;
      }
    }
  }
}
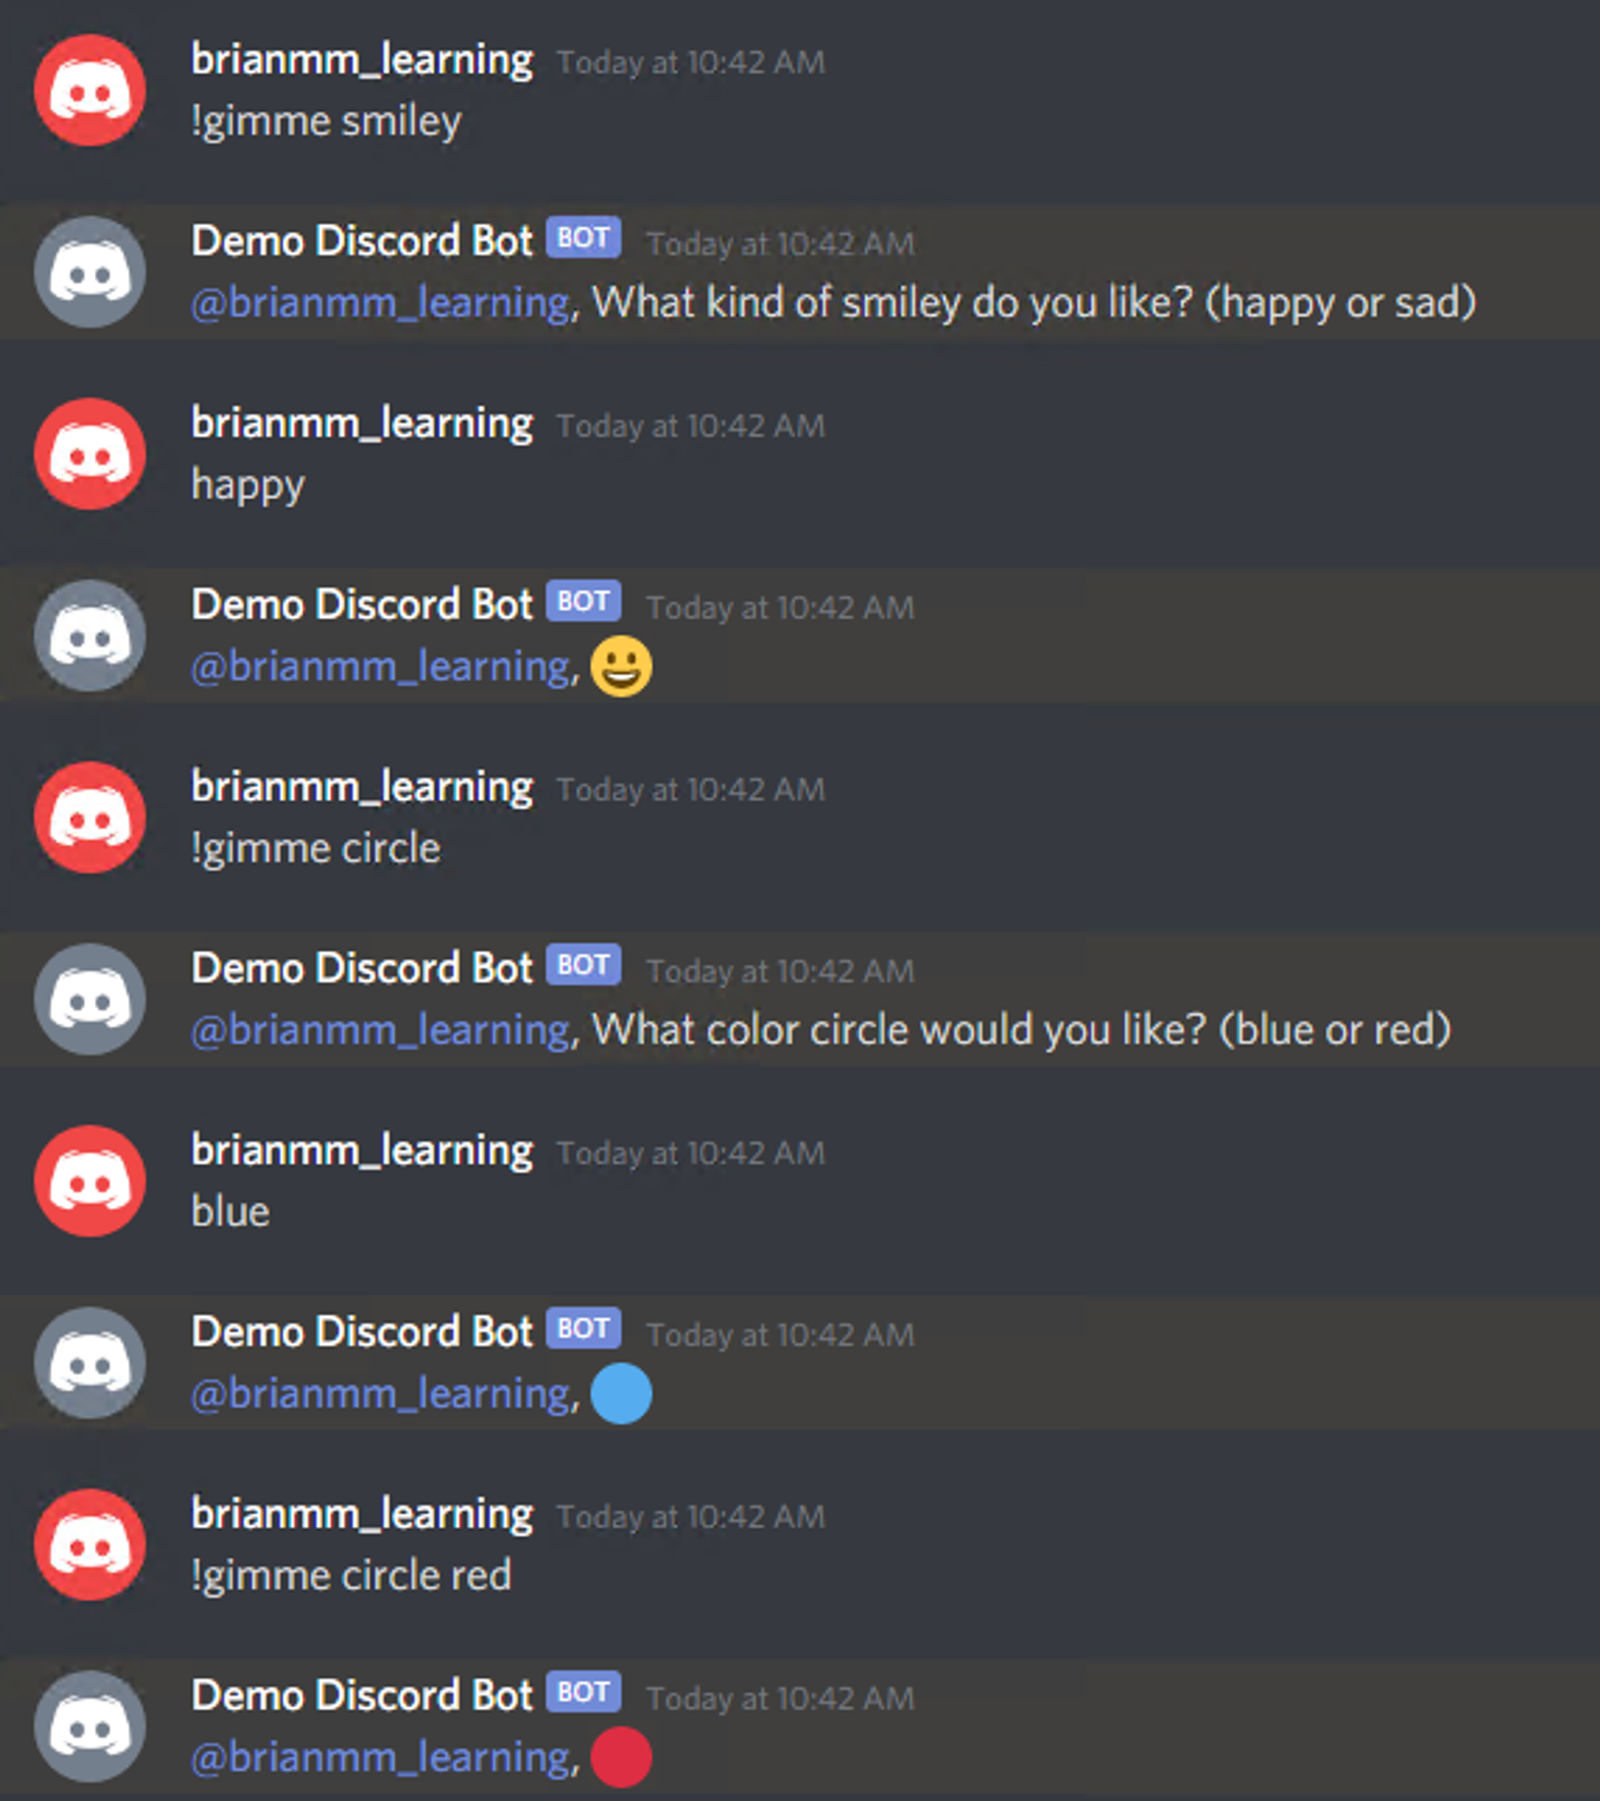
Each section is commented to explain what exactly it does. Essentially, the !gimme command does the following though;
- The user has two different paths the code can follow, either a smiley or a circle.
- For each path, there are two options available.
- If the user enters both pieces of input, the bot will respond accordingly. If not, the bot will prompt the user to add the second piece.
- Finally, we’ve also added some additional code to inform the user in case the collector times out.
Let’s see how it behaves now;
Our next article will outline how to use reactions and collectors together.