Up until this point, all of the code we’ve written has been for our bot has been used within Discord itself. Bots themselves have no way of persisting data, so what do you do if you need to save data for a later time? You need a place to store data. In this article, we’re going to create a application to collect information from a user and store it in AWS using DynamoDB.
Fair warning, this is going to be a long one 🙂
Setting up Dynamo DB
DynamoDB is a low cost and highly available nosql solution from AWS. It is covered by a fairly generous free tier which makes it perfect for development. I’ll give a brief overview on how to configure AWS & DynamoDB for this example, but this will not be an in-depth article on DynamoDB. More on that at another time.
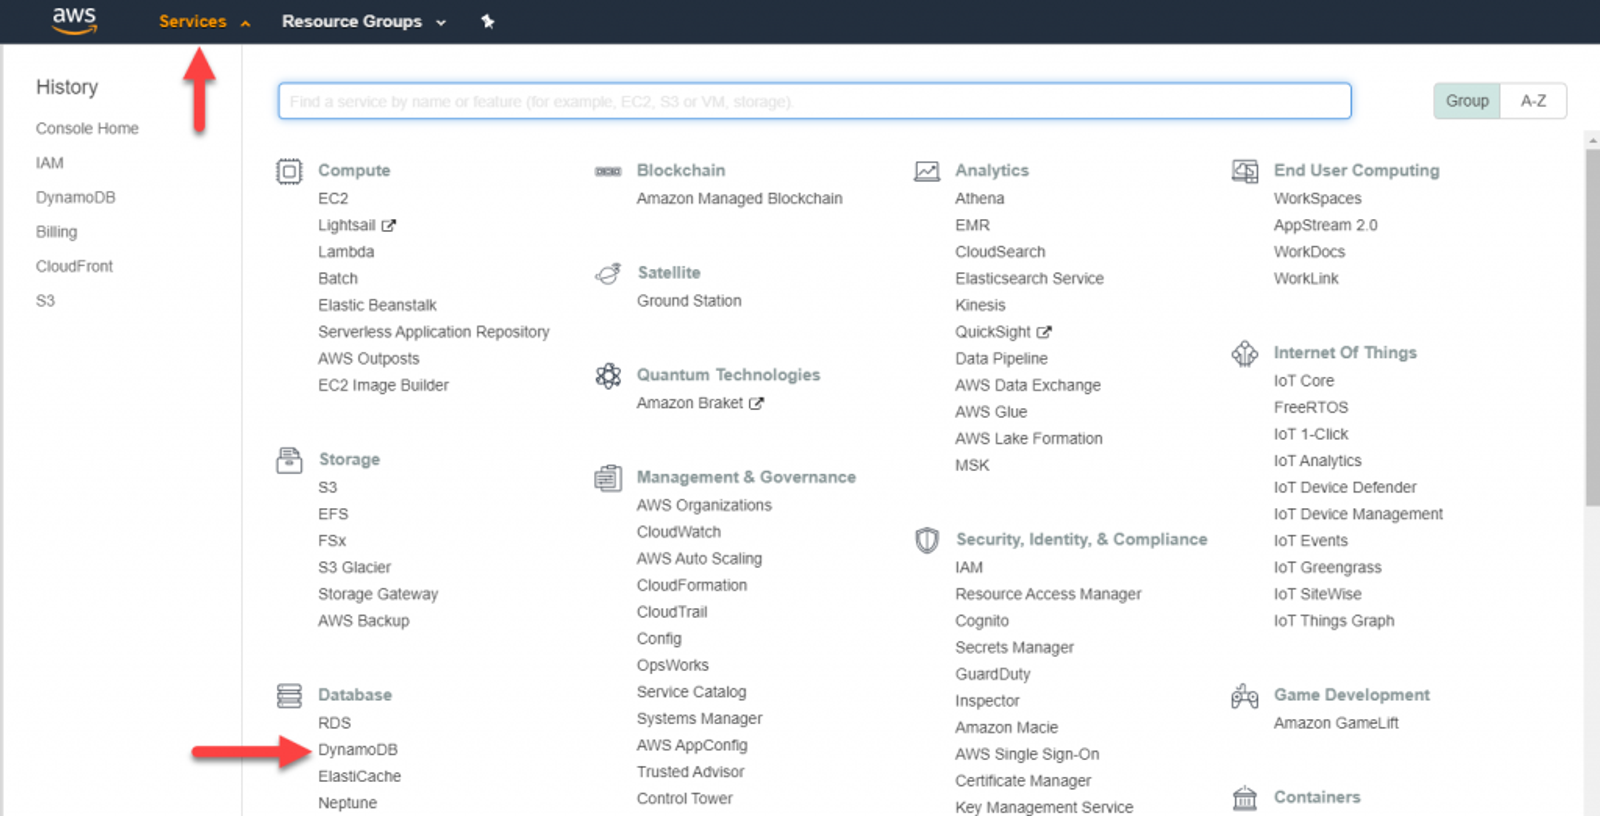
From the AWS Console, drop down Services then select DynamoDB under Database. If this is your first time accessing the DynamoDB service, you’ll be presented with an intro screen with a button that says Create table in the middle. If not, it will be towards the top of the screen. Regardless of where it is, go ahead and click that button.

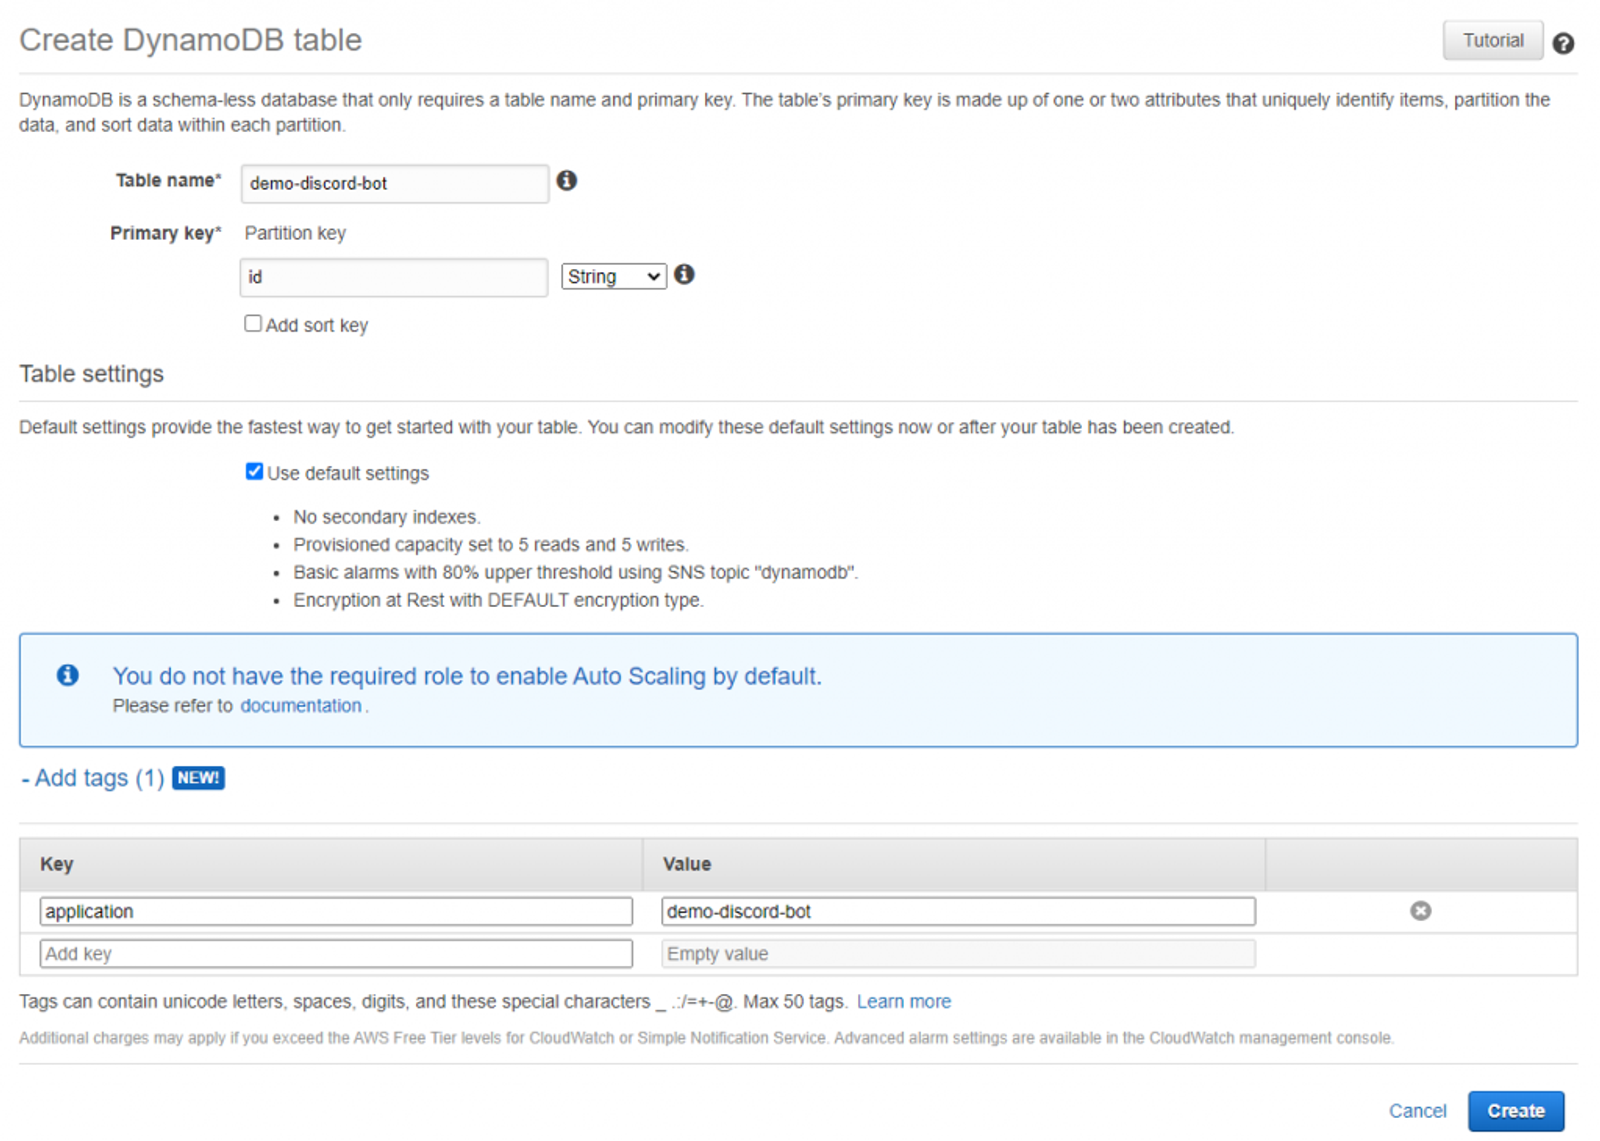
Specify the name for the table and a primary key. I chose ‘demo-discord-bot’ and ‘id’ respectively. I’m also going to create a tag called ‘application’ and set the value to ‘demo-discord-bot’. Tags can be used for organization in whatever way you see fit, but they are ultimately optional. Once done, click Create.
Creating the table should only take a few moments. Once it’s done, we’ll need to create the service account and assign the permissions to access the table.
Creating the Service Account
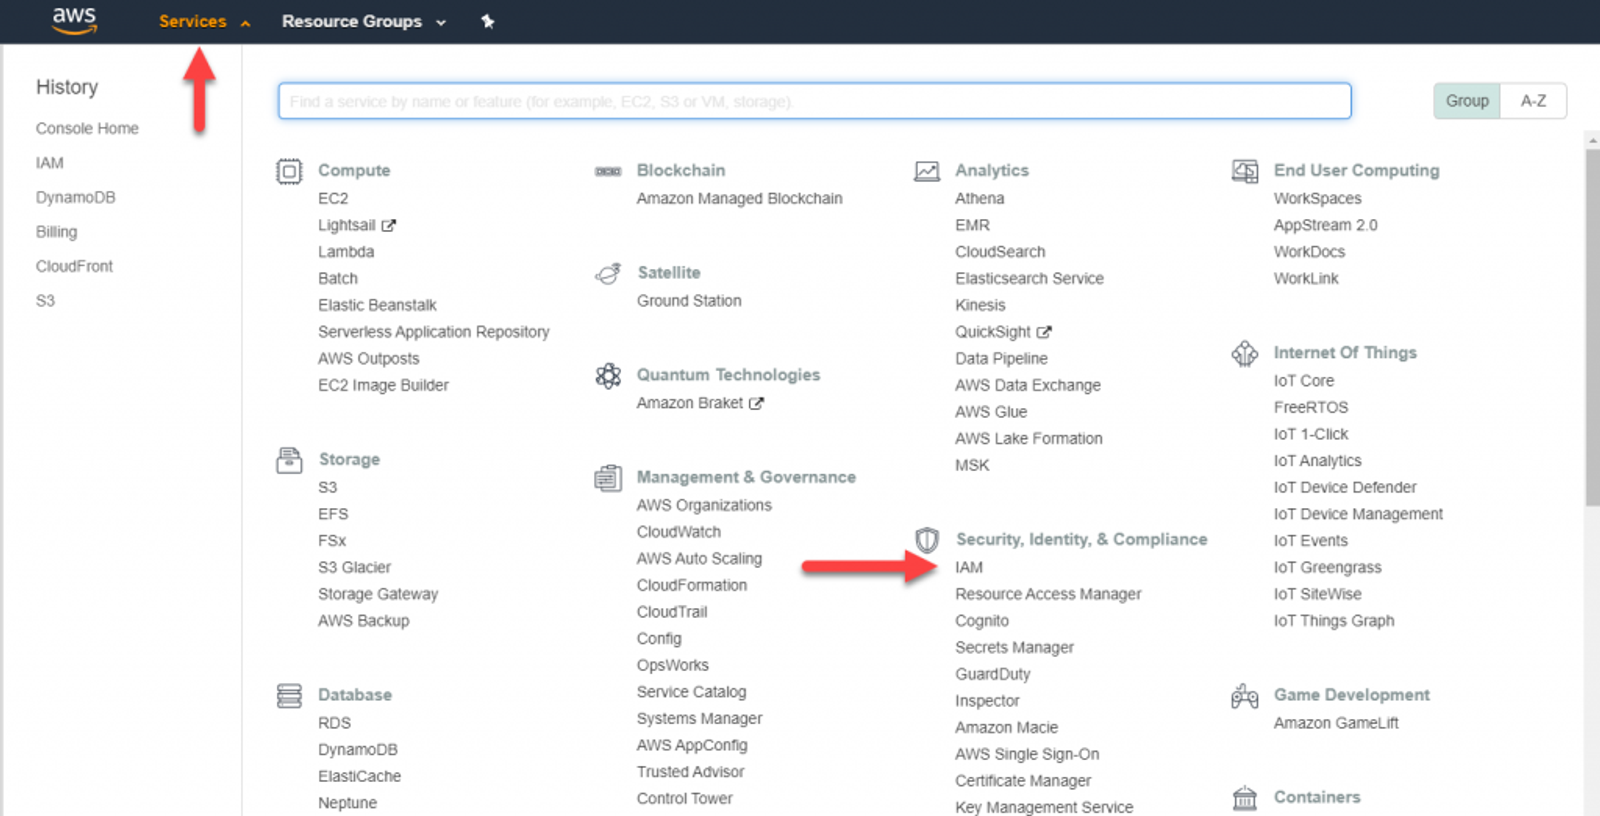
Now we need to setup an account we can use to connect to our DynamoDB Table. AWS technically doesn’t have a ‘Service Account’ (they are just standard user accounts) but I’ll be using the term since the account is ONLY going to be used to access our table we created. From the AWS console, drop down Service & select IAM under Security, Identity, & Compliance.
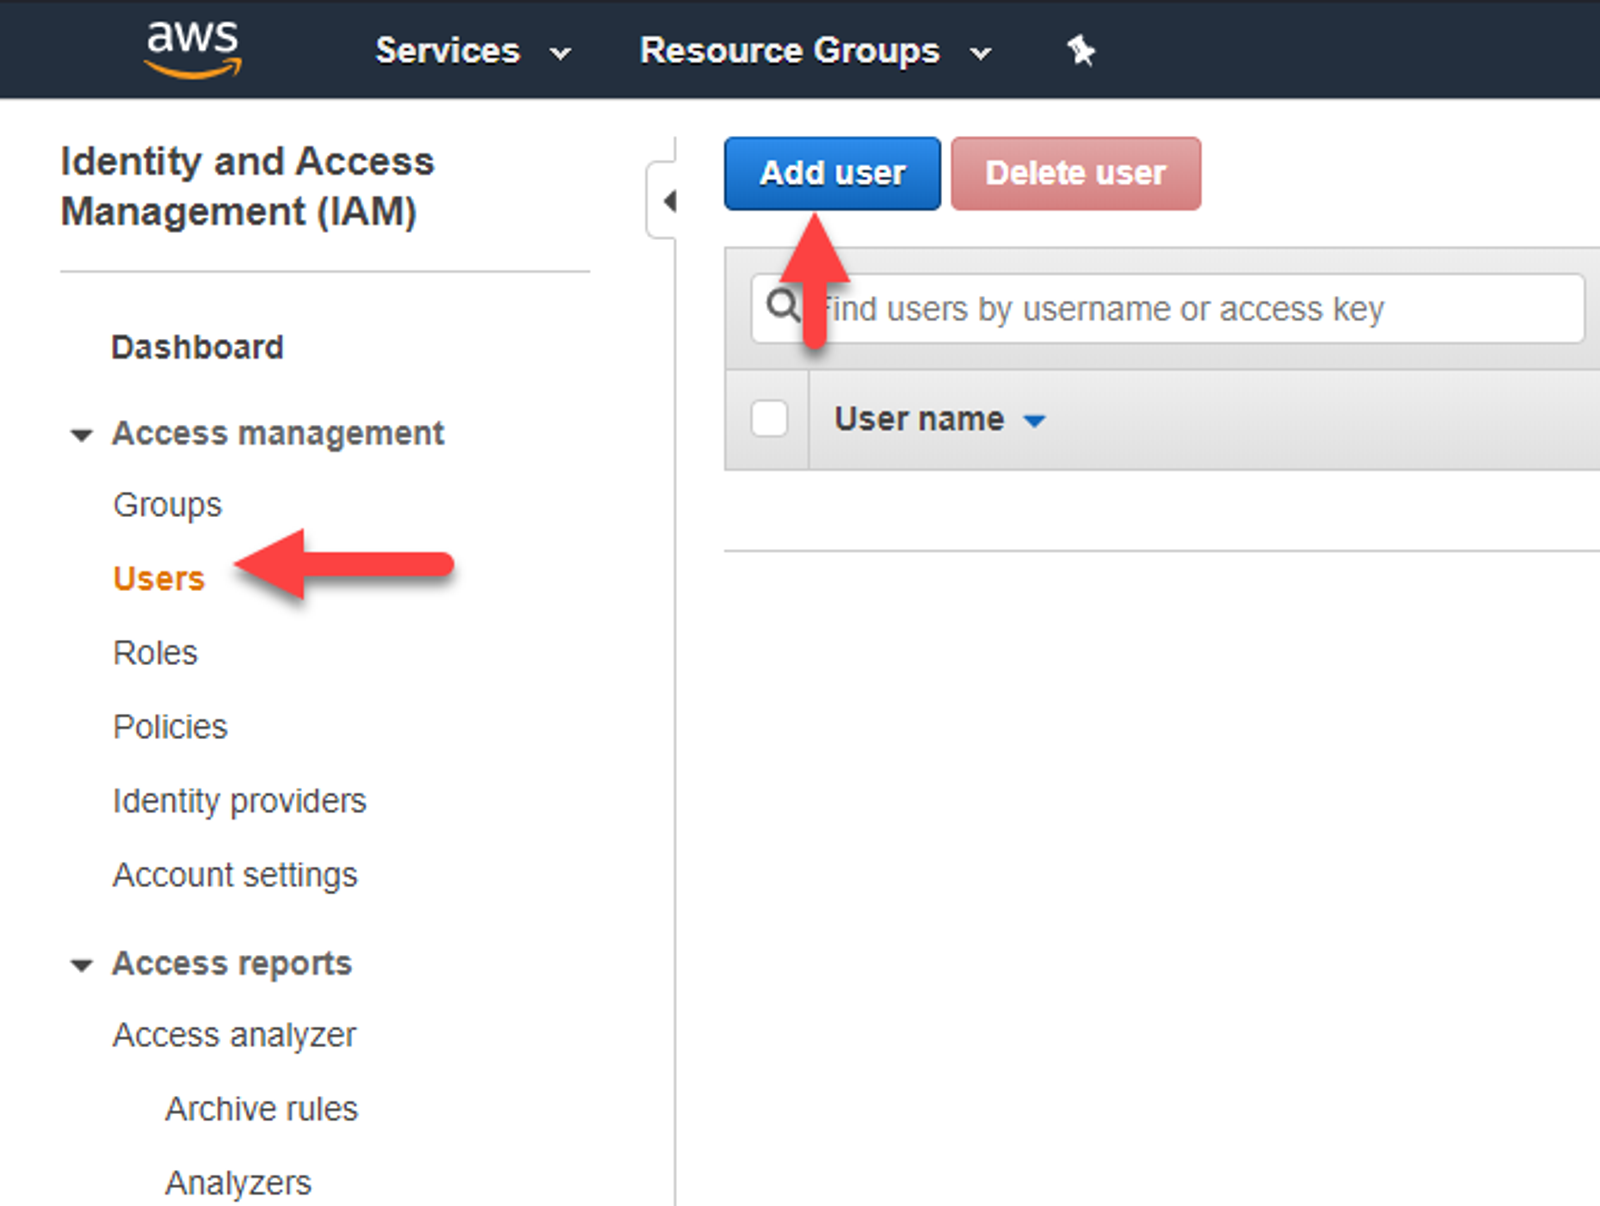
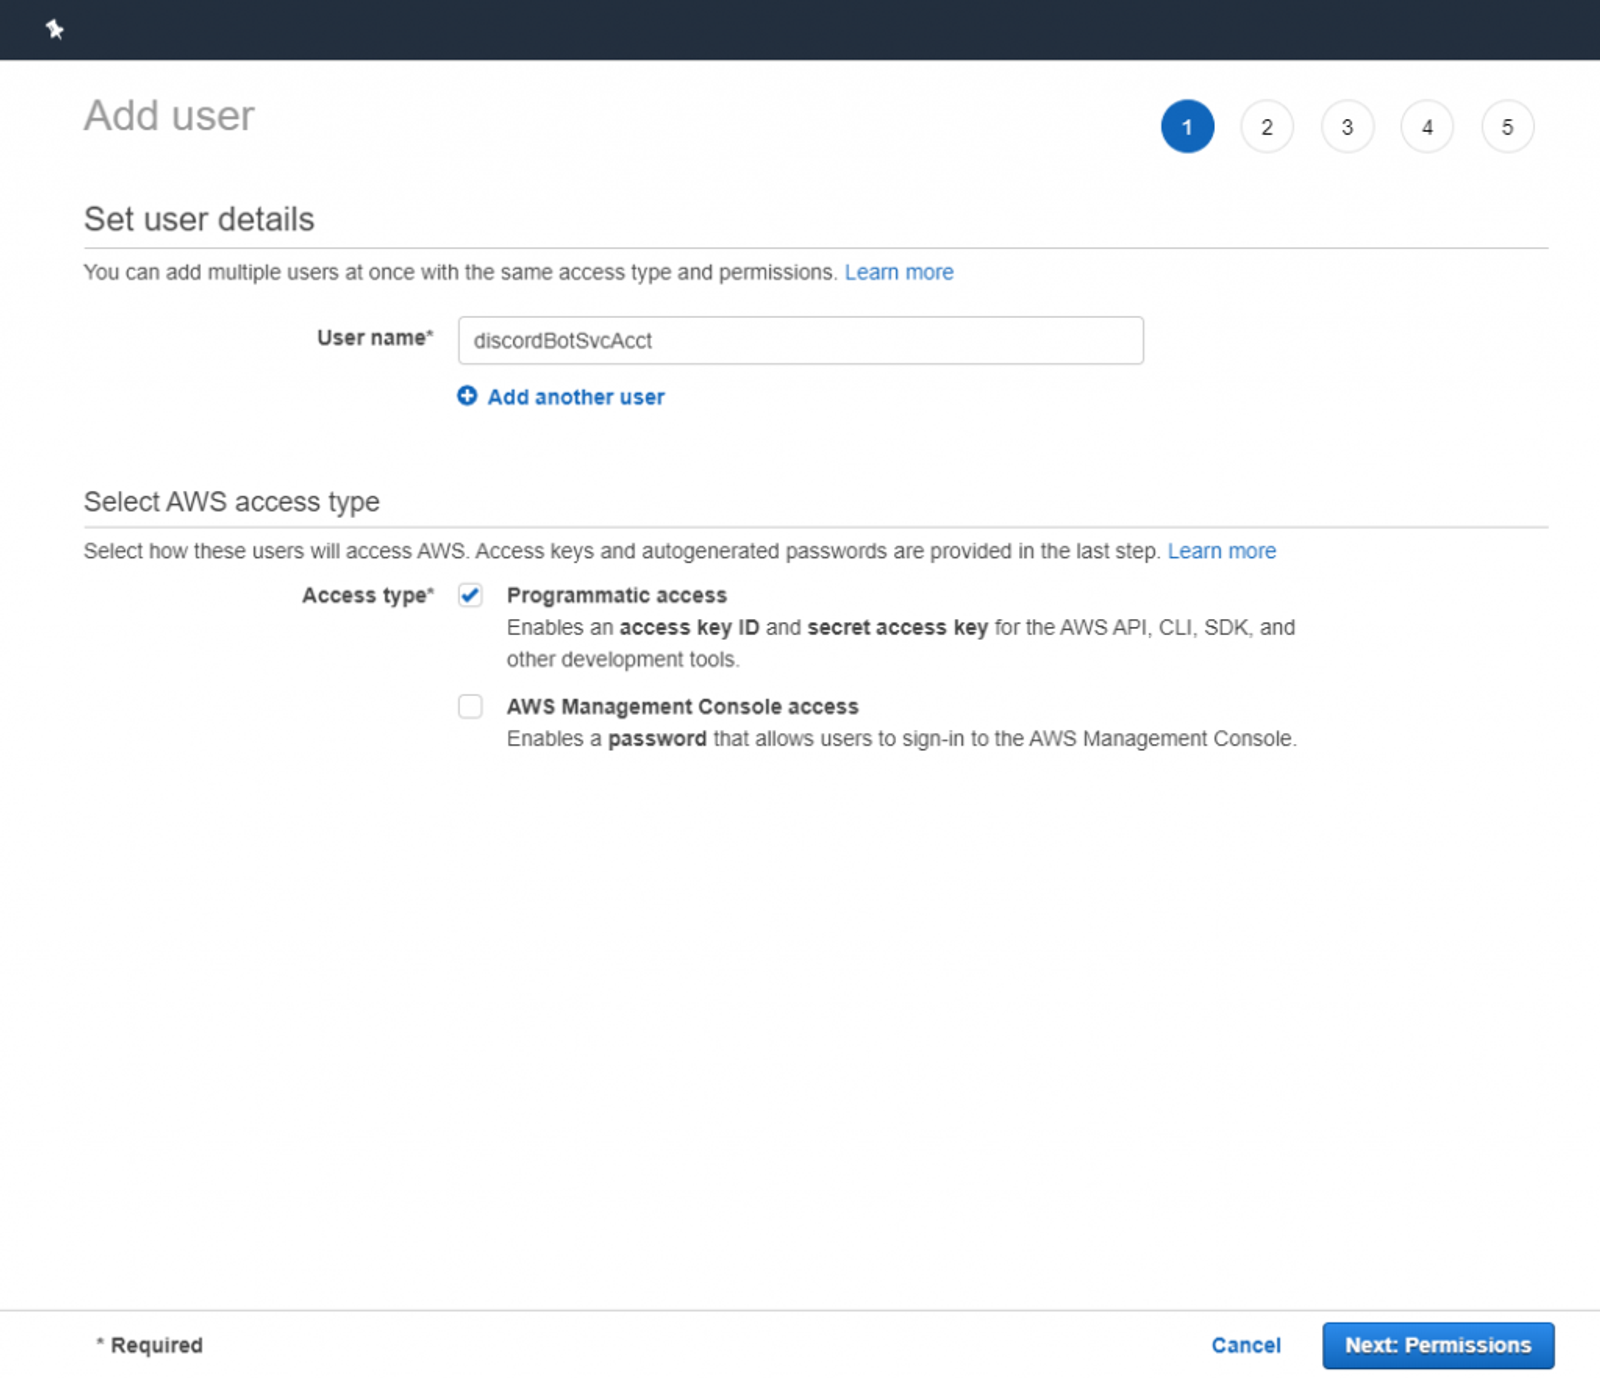
Select Users from the sidebar and then Add User. In the next screen, give your user a name. I used ‘demoDiscordBotSvc’ in this example. Make sure you check Programmatic access & leave AWS Management Console access unchecked. Click Next:Permissions.
It’s generally best practice to assign permissions to a group and add users to those groups so they receive the proper permissions. HOWEVER, since this isn’t a standard user, I’m going to assign the policy directly to the user. So click on Attach existing policies directly and then Create policy.
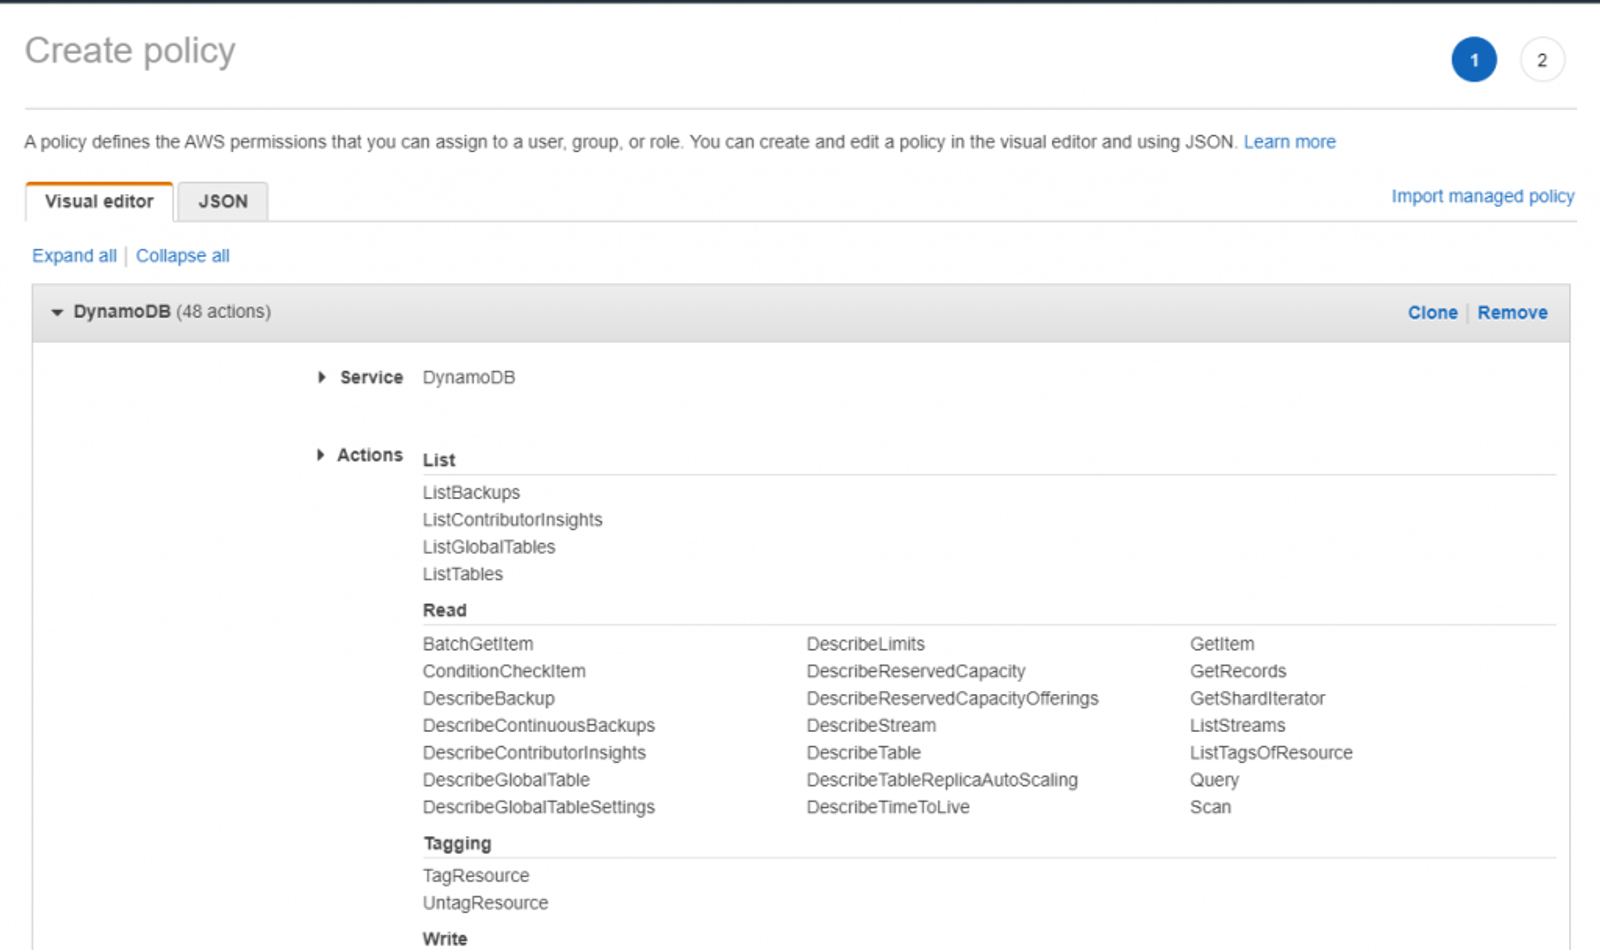
Under Service, search for DyanmoDB and select it. In the Actions section, check all boxes under the Access Level. We’re going to give our bot full permissions to the table we just created. Finally, we’ll need to specify the resource (which is our table) we want this policy to access.
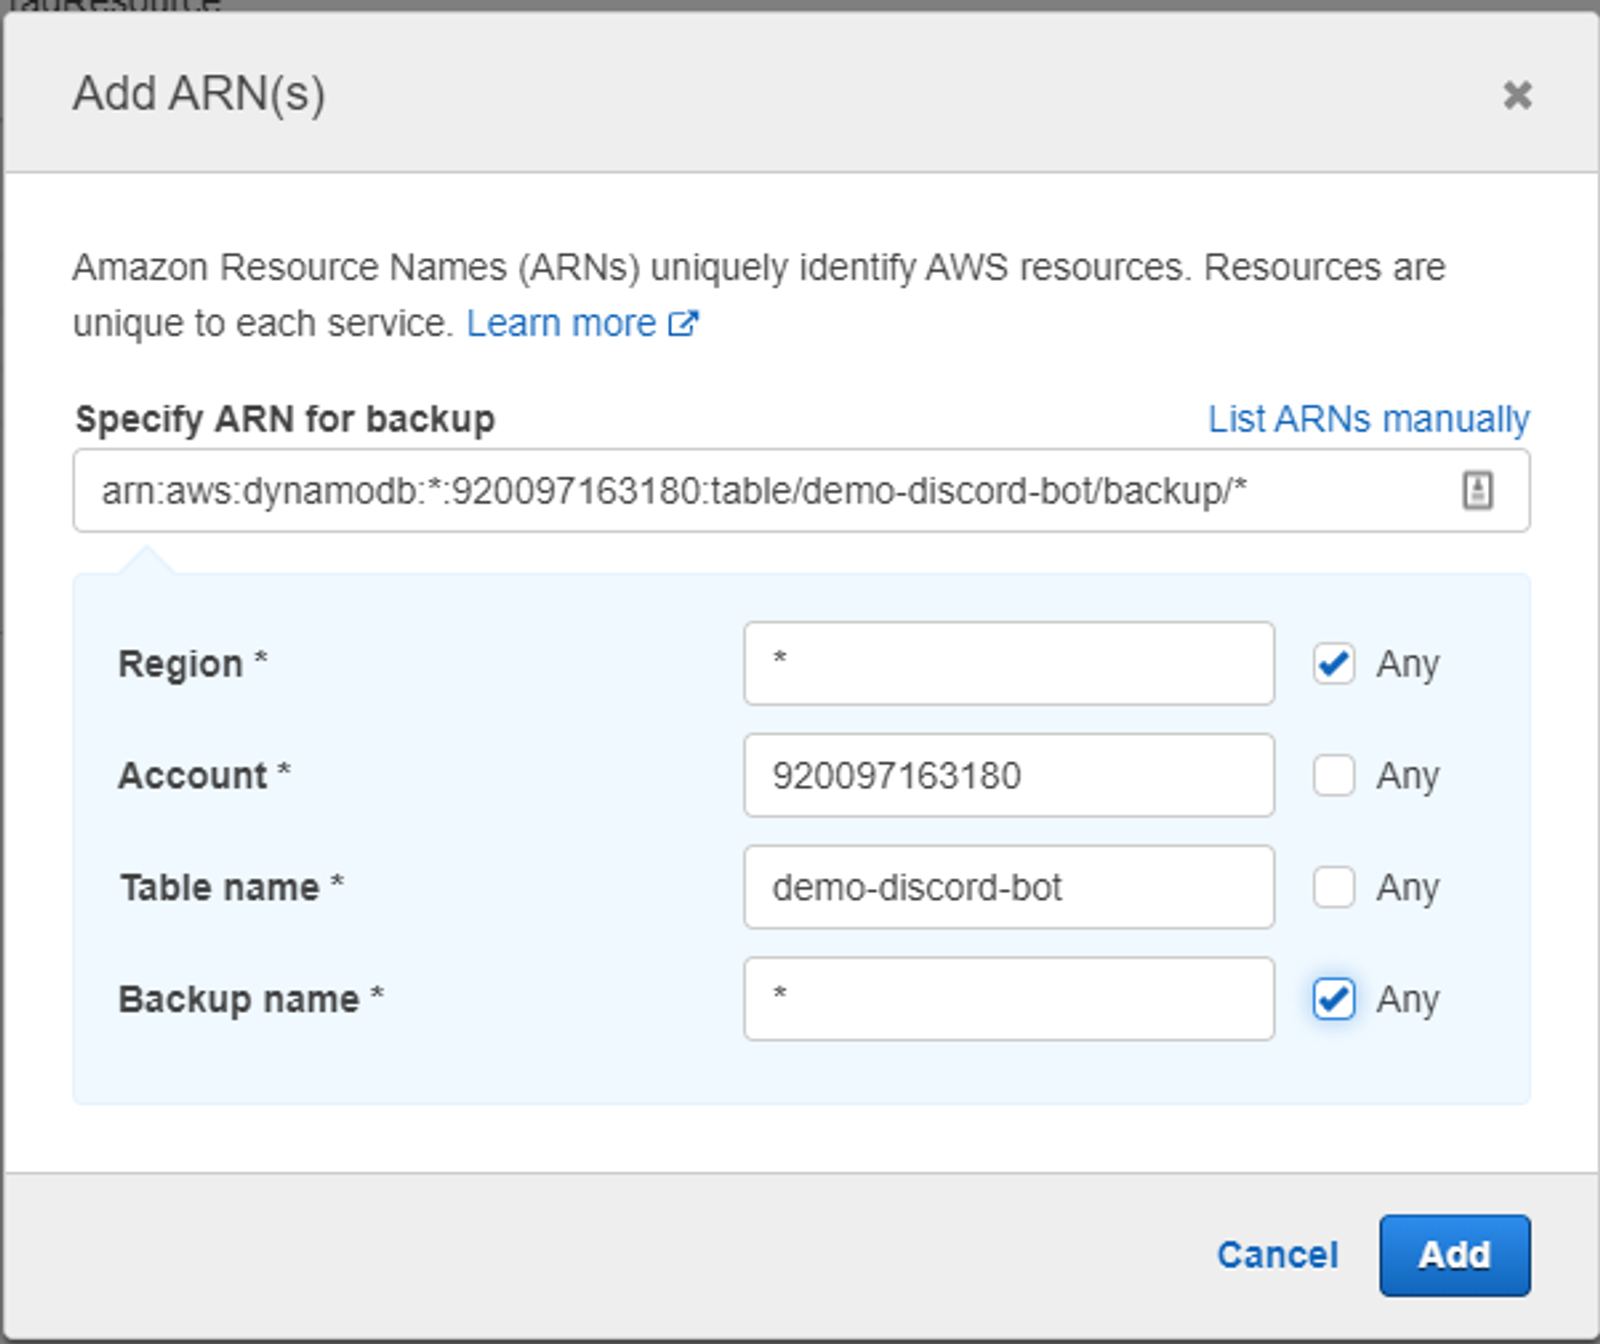
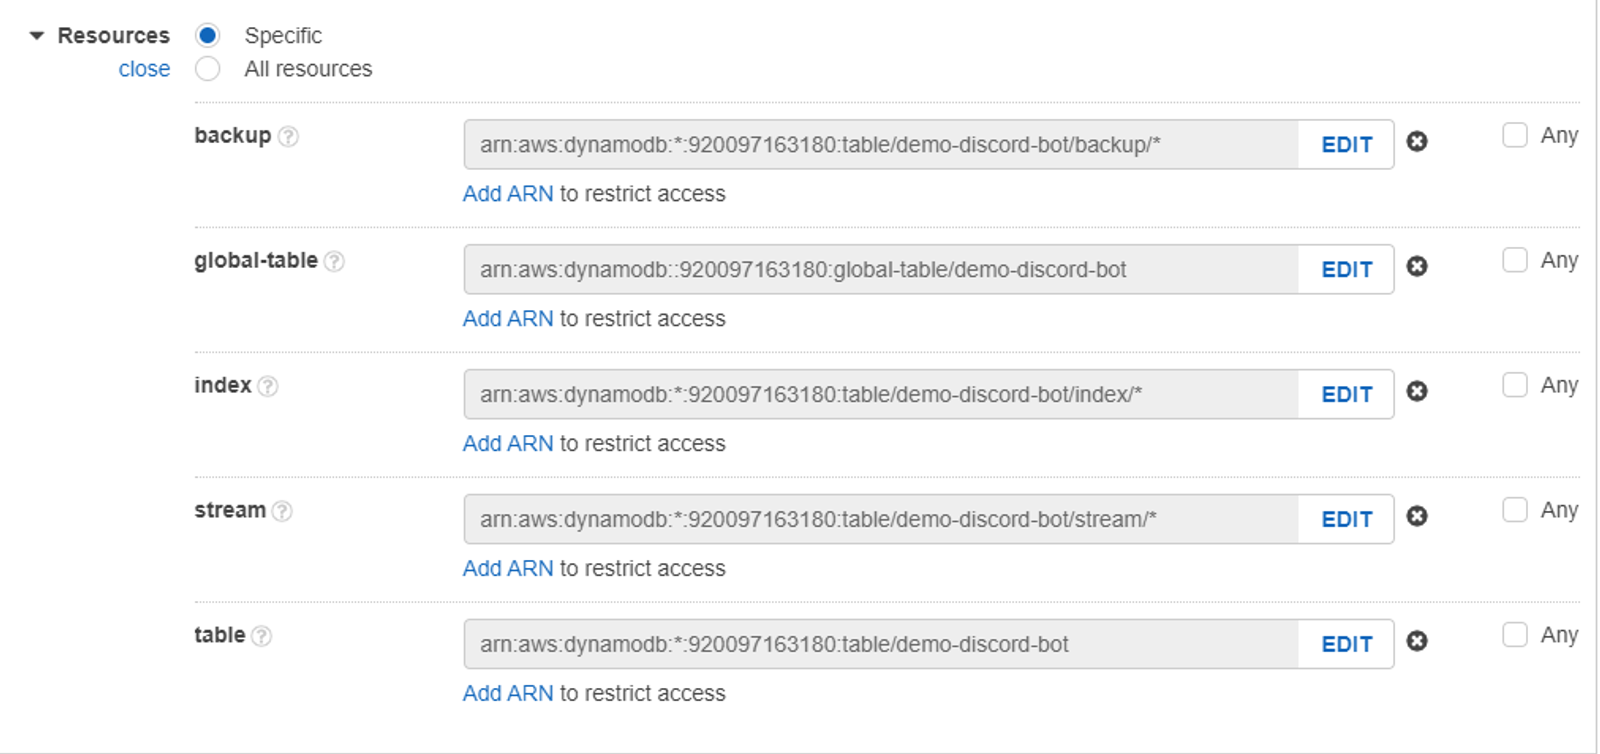
For each of the 5 items listed under Resources, click on Add ARN and populate the table name with the name of the DynamoDB table you created earlier, leave the account number as is, and set the other fields to ‘*’. Your resources should look something like this, albeit with a different account number.
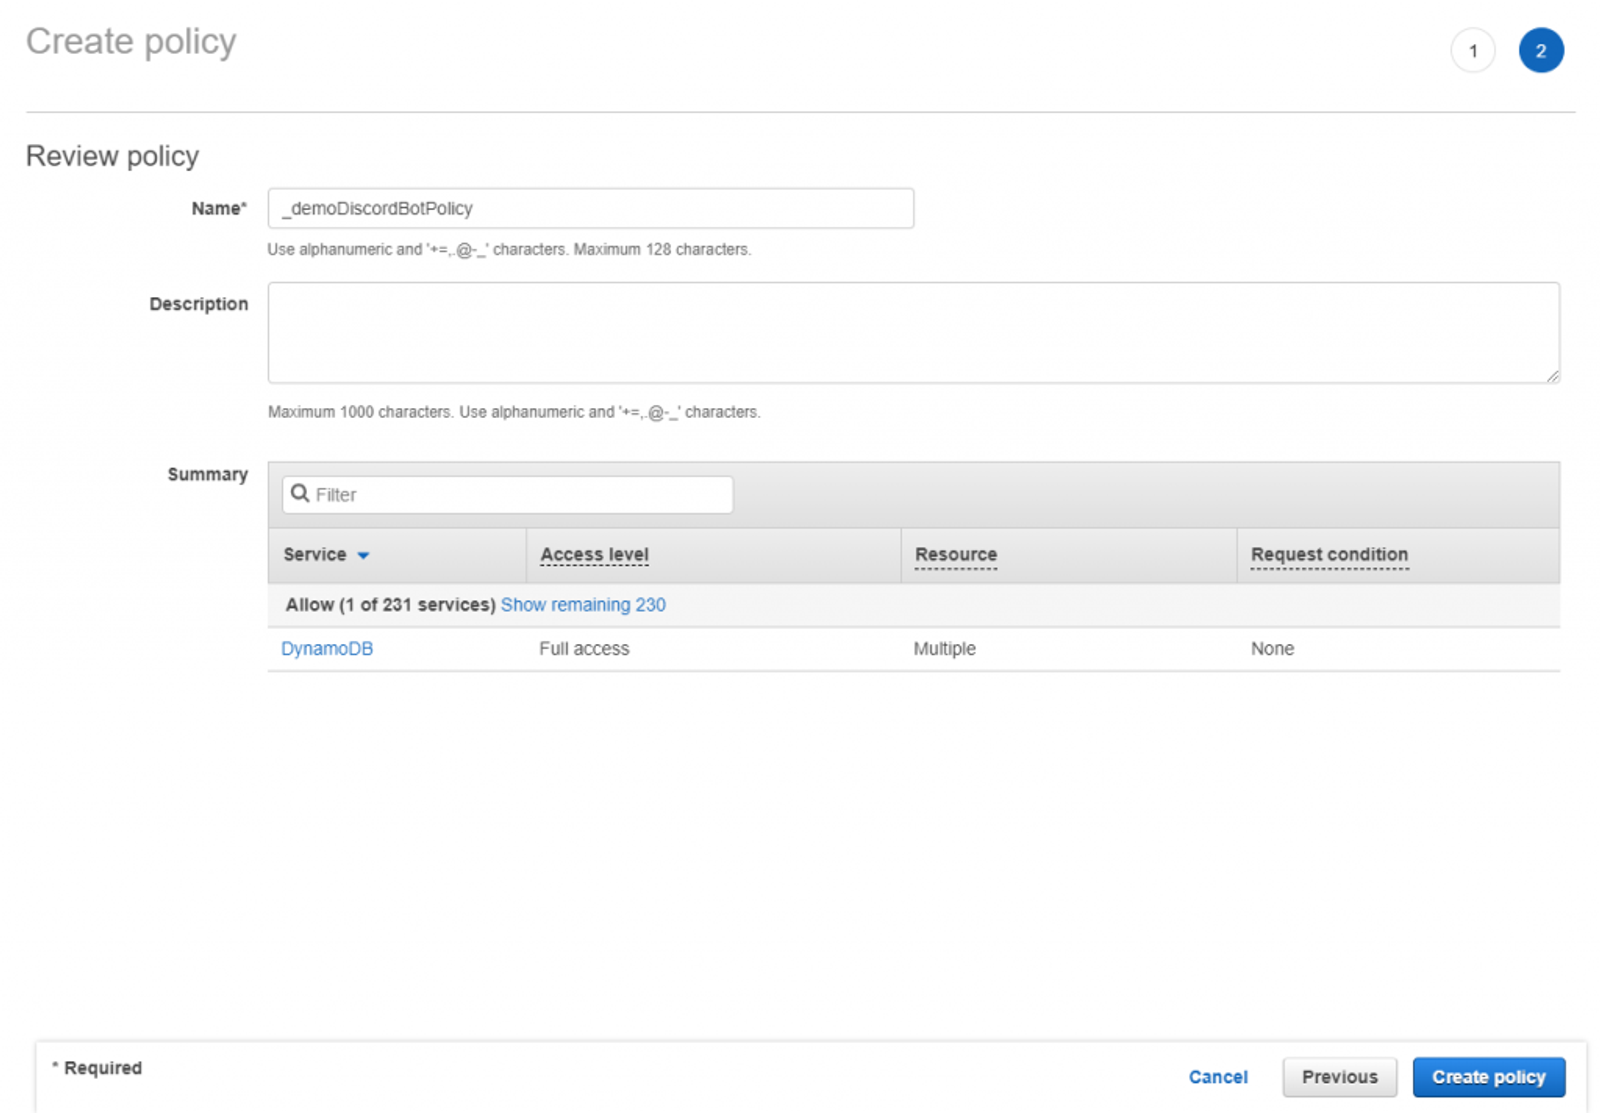
Once finished, click Review Policy, then give your policy a name.
Quick Tip: Naming custom IAM policies in AWS with an underscore (_) in the beginning will bring them to the top of the list 😉
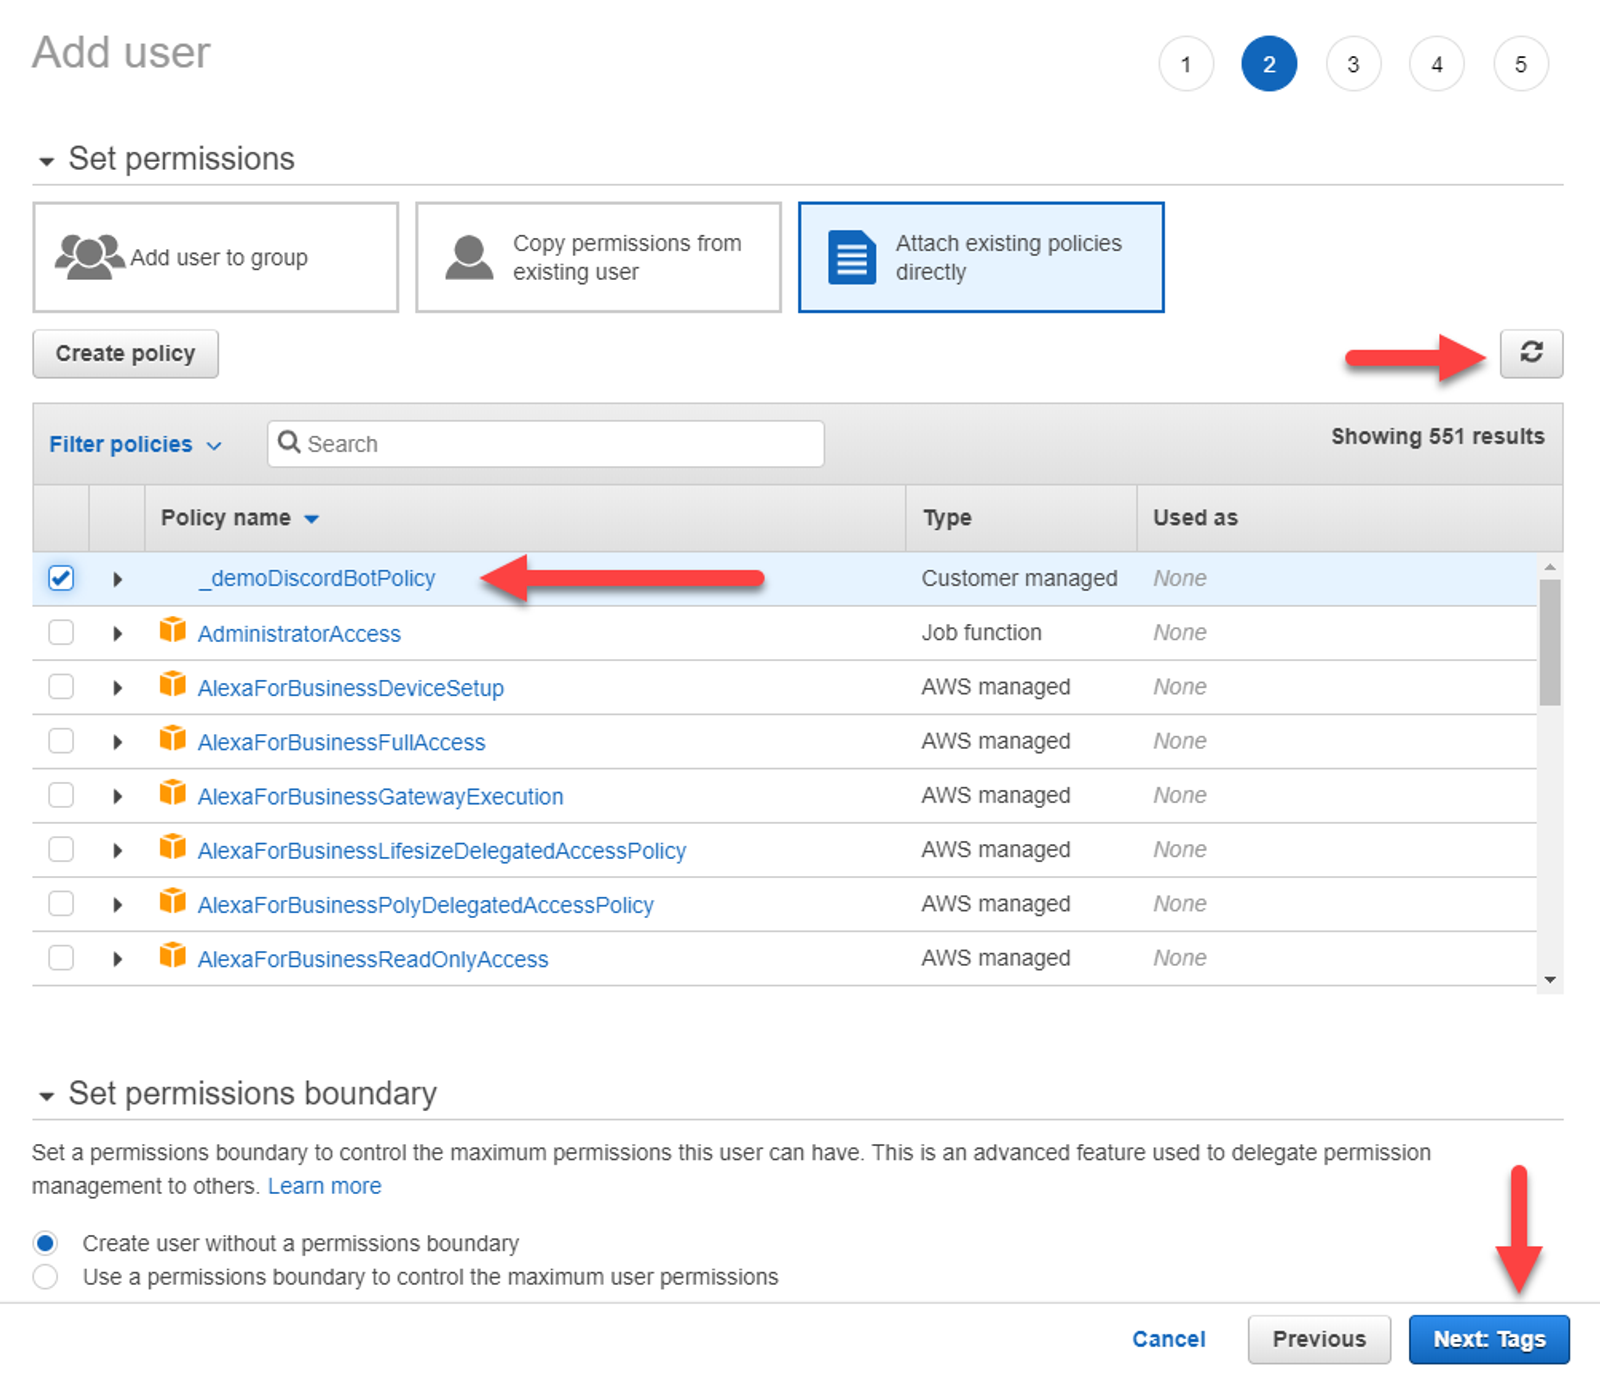
I’ll name mine _demoDiscordBotPolicy. Add a description if desired and click Create policy. Once completed, you can close this tab and head back to the tab we were using to create the user. Click the refresh button on screen to refresh the policies and select the newly created policy. Then click Next: Tags.
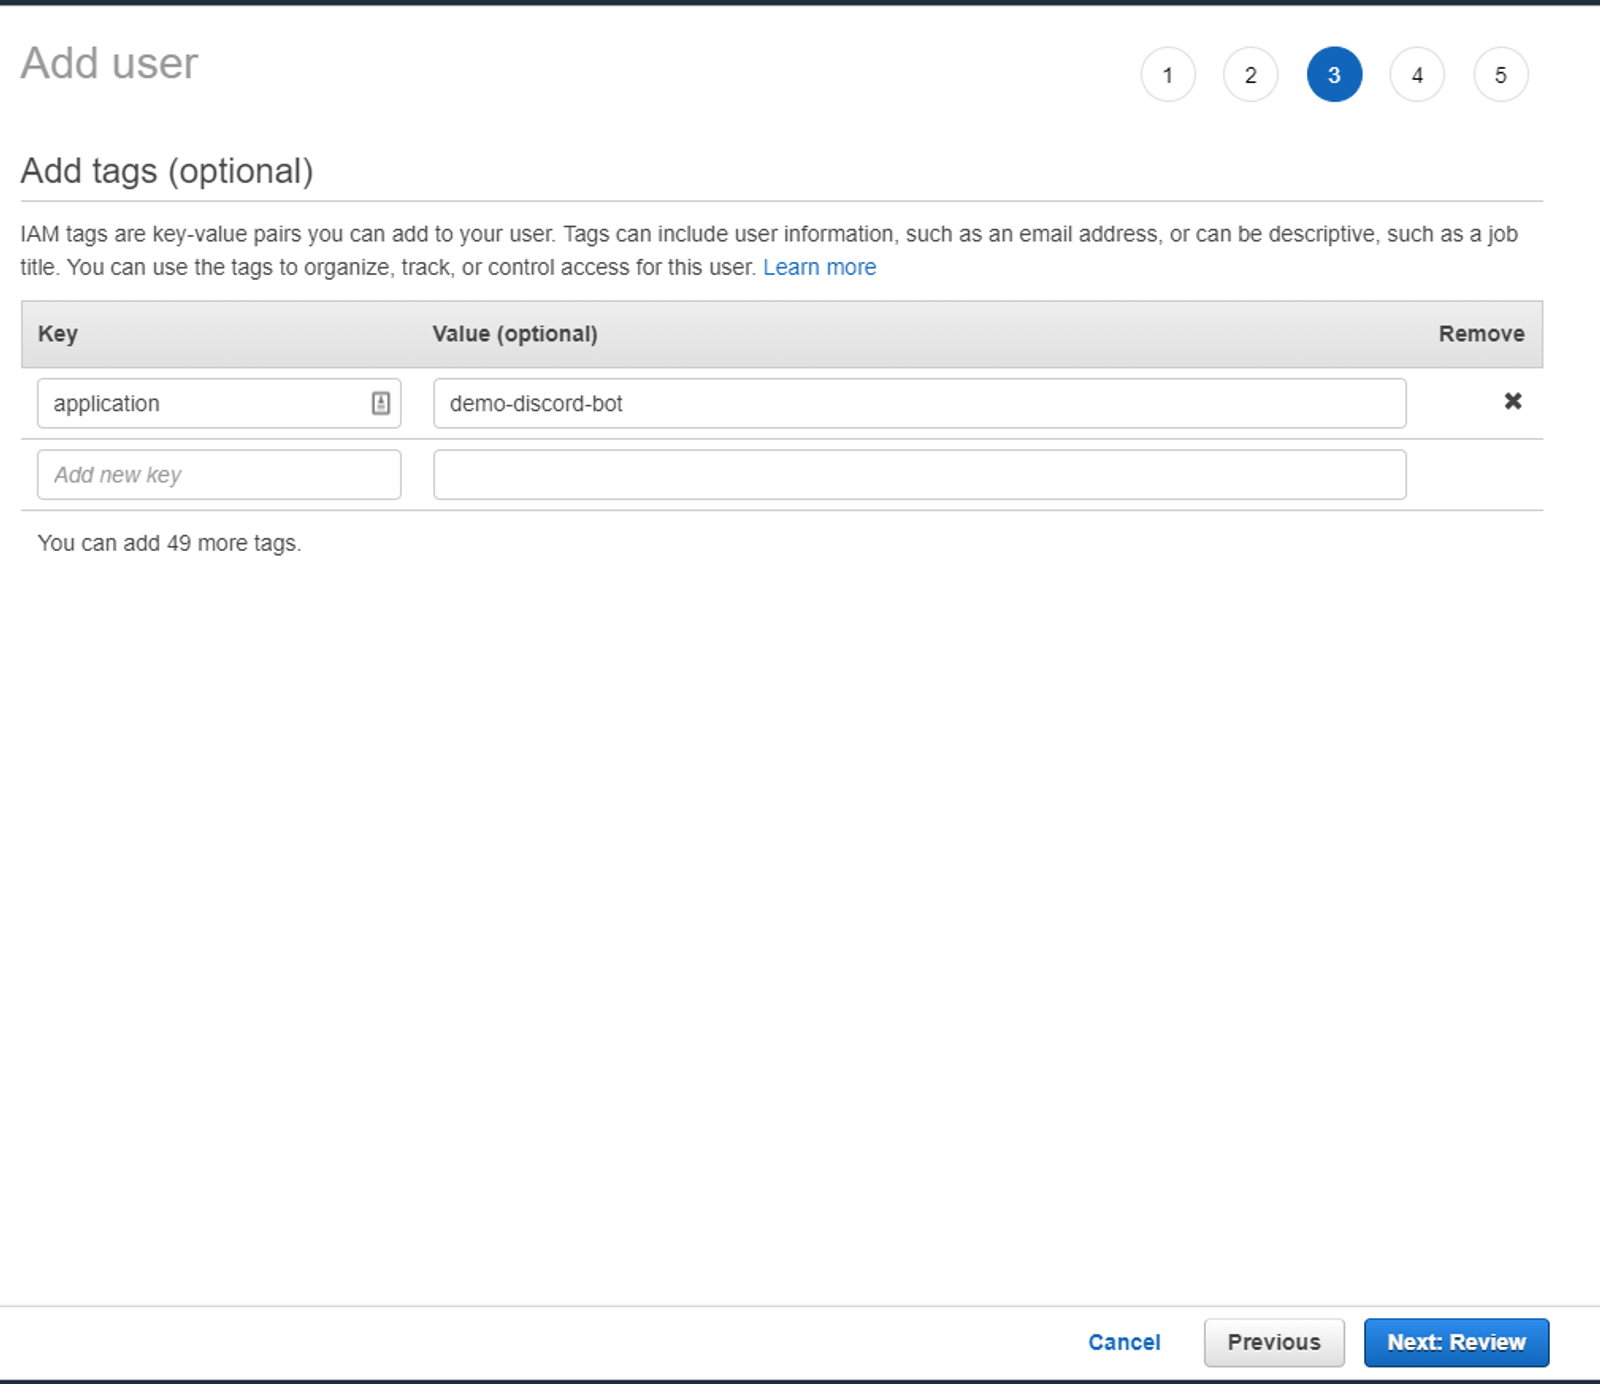
I’m going to tag this user just as I did the DynamoDB table.
Click Next: Review, then Create user. Once the user is created, copy the Access key ID and Secret access key for the user into another file. NOTE: You cannot get these values again, so make sure to take them down now otherwise you’ll need to create another set of keys. Once done, go ahead and click Close.
Building the Command
We’re going to use similar techniques we used to build our survey (Read more here: https://brianmorrison.me/blog/building-a-survey-discord-bot). Most of the code below is similar to what we have so far. Let’s use the command of !apply in a new command file apply.js;
  module.exports = {
    // Define the prefix
    prefix: "!apply",
    // Define a function to pass the message to
    fn: (msg) => {
      let application = {}
      let filter = (msg) => !msg.author.bot;
      let options = {
        max: 1,
        time: 15000
      };

      msg.member.send("Thanks for your interest in the position! First, what is your name?")
        .then(dm => {
          // After each question, we'll setup a collector on the DM channel
          return dm.channel.awaitMessages(filter, options)
        })
        .then(collected => {
          // Convert the collection to an array & get the content from the first element
          application.name = collected.array()[0].content;
          // Ask the next question
          return msg.member.send("Got it, now what's your email address?")
        })
        .then(dm => {
          return dm.channel.awaitMessages(filter, options)
        })
        .then(collected => {
          application.emailAddress = collected.array()[0].content;
          return msg.member.send("Excellent. Finally, tell us why you'd be a good fit.")
        })
        .then(dm => {
          return dm.channel.awaitMessages(filter, options)
        })
        .then(collected => {
          application.pitch = collected.array()[0].content;
          console.log(application)
        })
    }
  }
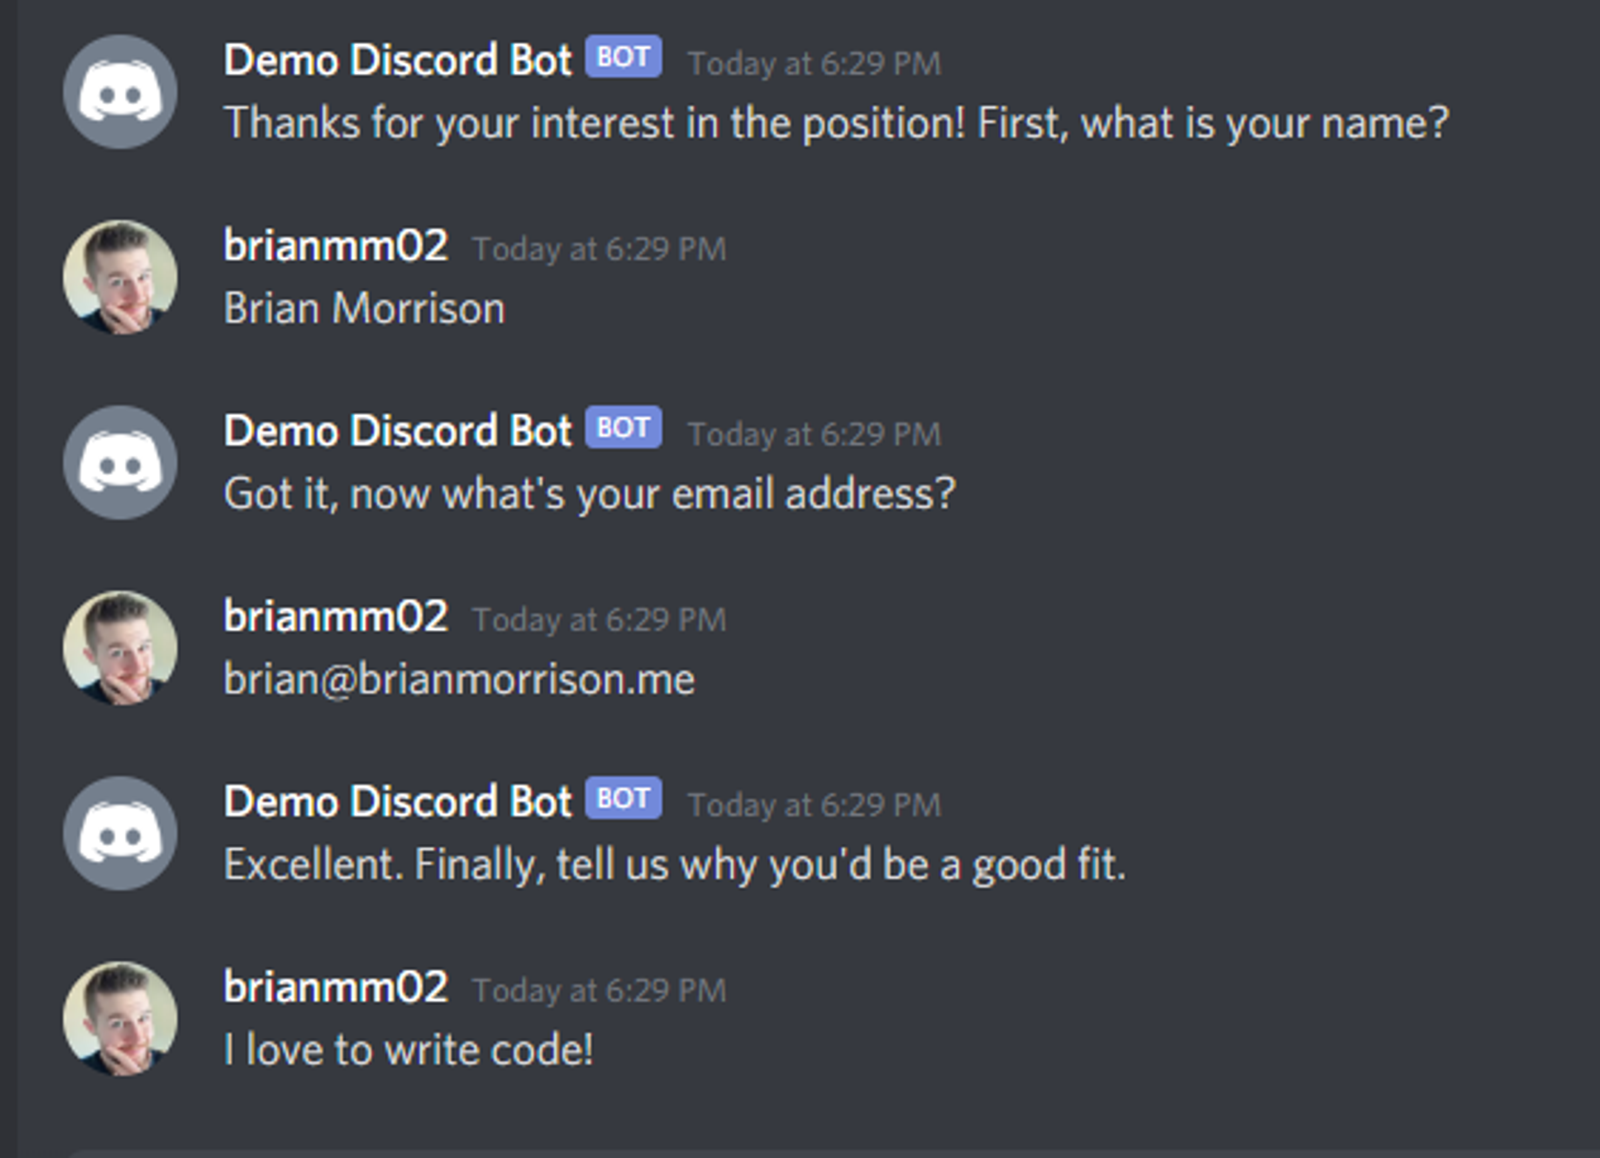
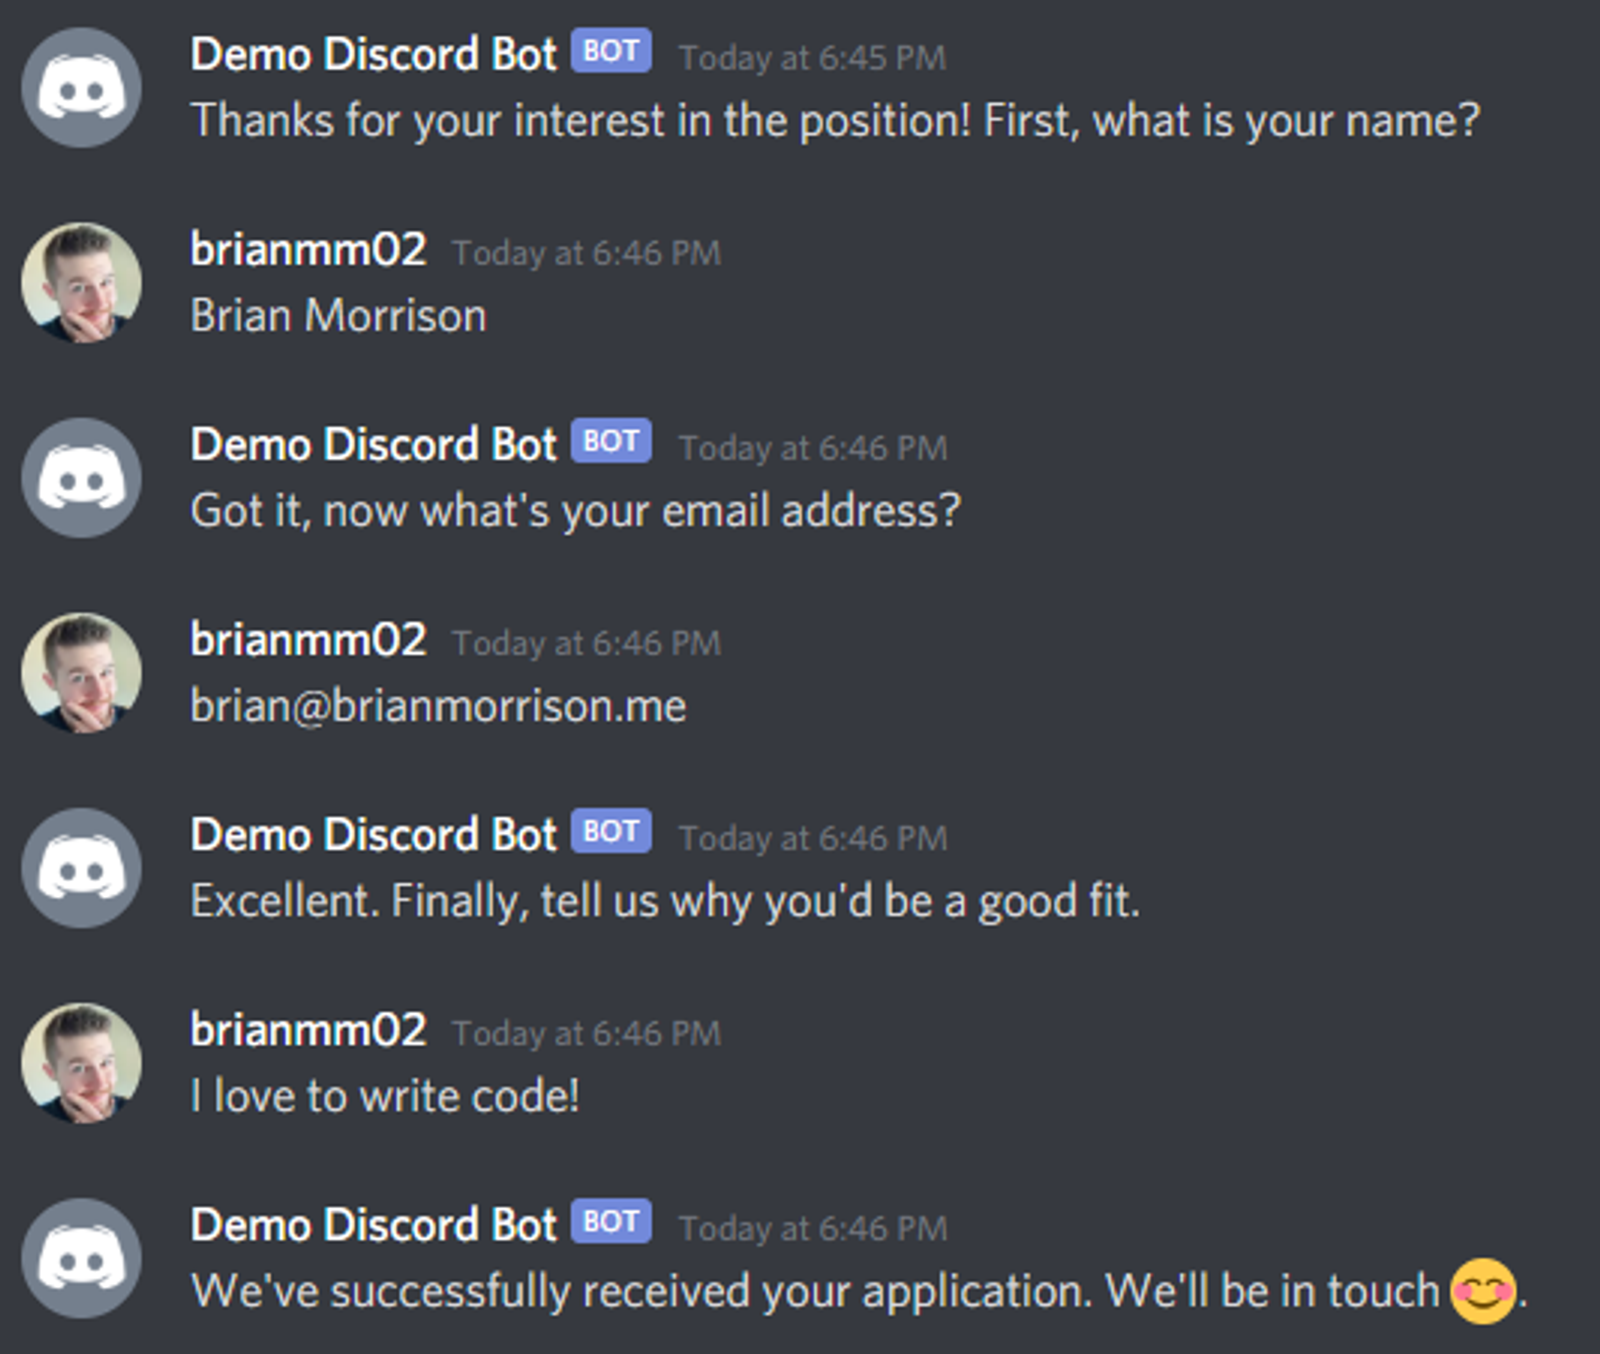
You’ll notice one main difference is that we’re actually sending a DM to the user to keep their information private. Here’s what the survey looks like in action so far.
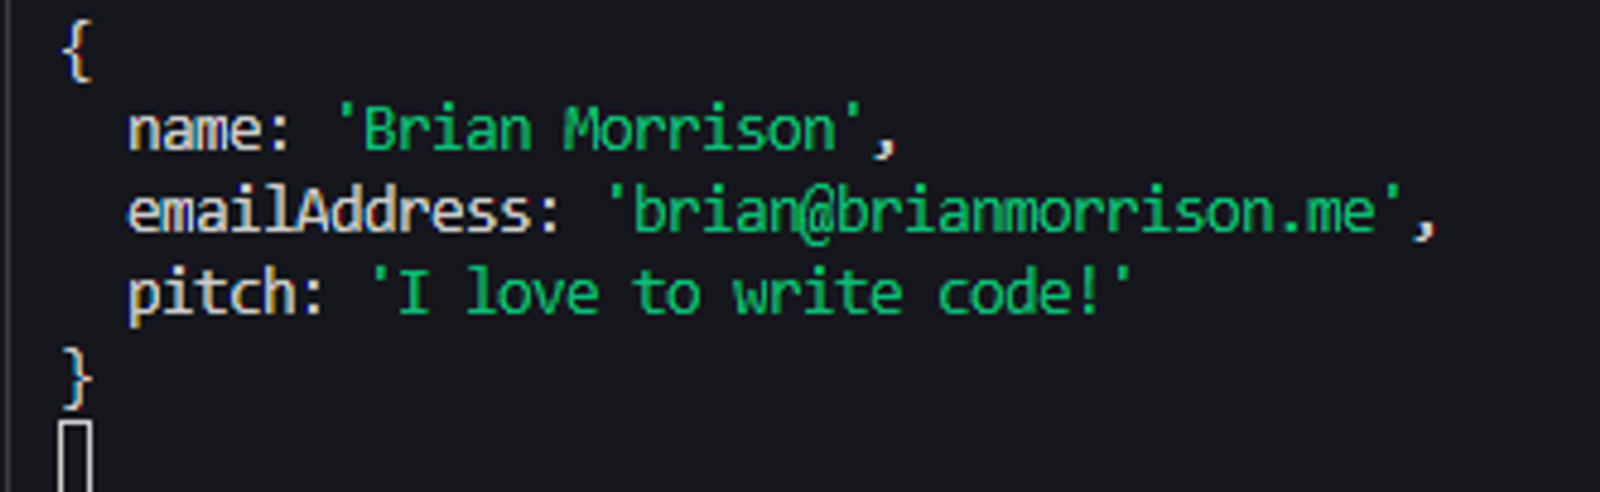
And to confirm the data looks they way we expect, we’re just logging out to the console.
Saving to the DynamoDB Table
Now that we confirmed our data looks good, we need to setup the code to store that data in the DynamoDB table. We’re going to use an npm package called aws-sdk which contains the framework to access AWS resources with NodeJS. Open the terminal and issue the command npm install aws-sdk to add the package to our bot.
In the previous step, we saved off the our service account access key id & secret. Since this is private info, we’re going to add these values into our .env file, along with the default AWS region.
AWS_ACCESS_KEY_ID = "your_access_key_id"
AWS_SECRET_ACCESS_KEY = "your_secret_key"
AWS_DEFAULT_REGION = "us-east-1"
Now we need to add some additional imports to our apply.js file. Add the following lines to the top of the file, before the module.exports;
require('dotenv').config();
const AWS = require('aws-sdk');
// Update our AWS Connection Details
AWS.config.update({
  region: process.env.AWS_DEFAULT_REGION,
  accessKeyId: process.env.AWS_ACCESS_KEY_ID,
  secretAccessKey: process.env.AWS_SECRET_ACCESS_KEY
})
// Create the service used to connect to DynamoDB
const docClient = new AWS.DynamoDB.DocumentClient();
Next, we’re going to replace the console.log() line in the last promise with the following code to save the data to the table.
// Setup the parameters required to save to Dynamo
const params = {
  TableName: 'demo-discord-bot',
  Item: {
    // Use Date.now().toString() just to generate a unique value
    id: Date.now().toString(),
    // `info` is used to save the actual data
    info: application
  }
}

docClient.put(params, (error) => {
  if (!error) {
    // Finally, return a message to the user stating that the app was saved
    return msg.member.send("We've successfully received your application. We'll be in touch 😊.")
  } else {
    throw "Unable to save record, err" + error
  }
})
Now lets test that application form one more time with !apply;
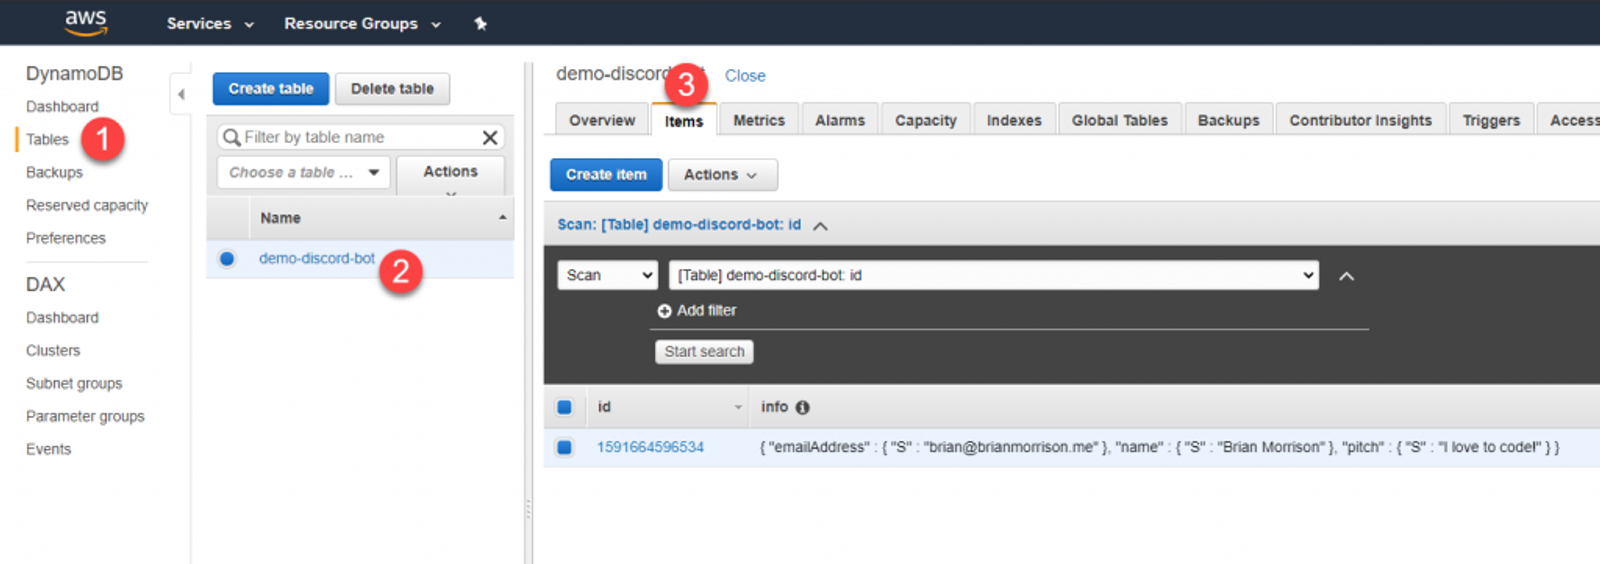
Now lets check to make sure our application was stored in DynamoDB. You can do this by heading back into the DynamoDB service in AWS going to Tables, select your table, then Items.
We’re coming down to the last article in the series! The next one will show you how we can host our code in AWS.