
Back in the early days of the web, guestbooks were everywhere on the internet.
Many sites had this feature where random visitors could leave a note for the person running the site or for other visitors to read. I was looking for an interesting way to add Clerk’s authentication components to something I maintained, something that isn’t a demo app that I’m going to scrap after using it a few times. So I figure why not let friends and visitors add a note, just like the good ol’ days.
The guestbook is back!
Project requirements
My website is built with Gatsby (yes, I’m a hold out) and hosted on Netlify. I have two GitHub Action workflows that deploy the site, one to a dev environment and one to production. I do this instead of relying on Netlify to automatically deploy because there are some post build tools I want to run after a successful deploy. All of the content is stored in my Notion workspace and the build process uses a custom adapter I wrote to generate the static site.
The following outlines what I needed in order to make this happen:
- I wanted to require users to sign in to leave a message.
- I didn’t want to rebuild the site every time a message was added, so I needed a database.
- I need to manually approve the messages so nothing bad ends up on the site.
As a TLDR, here is what I used to pull this off:
- Clerk was added to authenticate users.
- Three views were added - the public list of entries, a gated view to add an entry, and a page to approve/disapprove entries that only I could access.
- Three Netlify functions were created, one to accommodate each of the views above.
- Neon and Drizzle were added to store data, manage the schema, and render the pages.
Building the functionality
There were a surprising number of things I needed to add and update to make this work.
Setting up the database
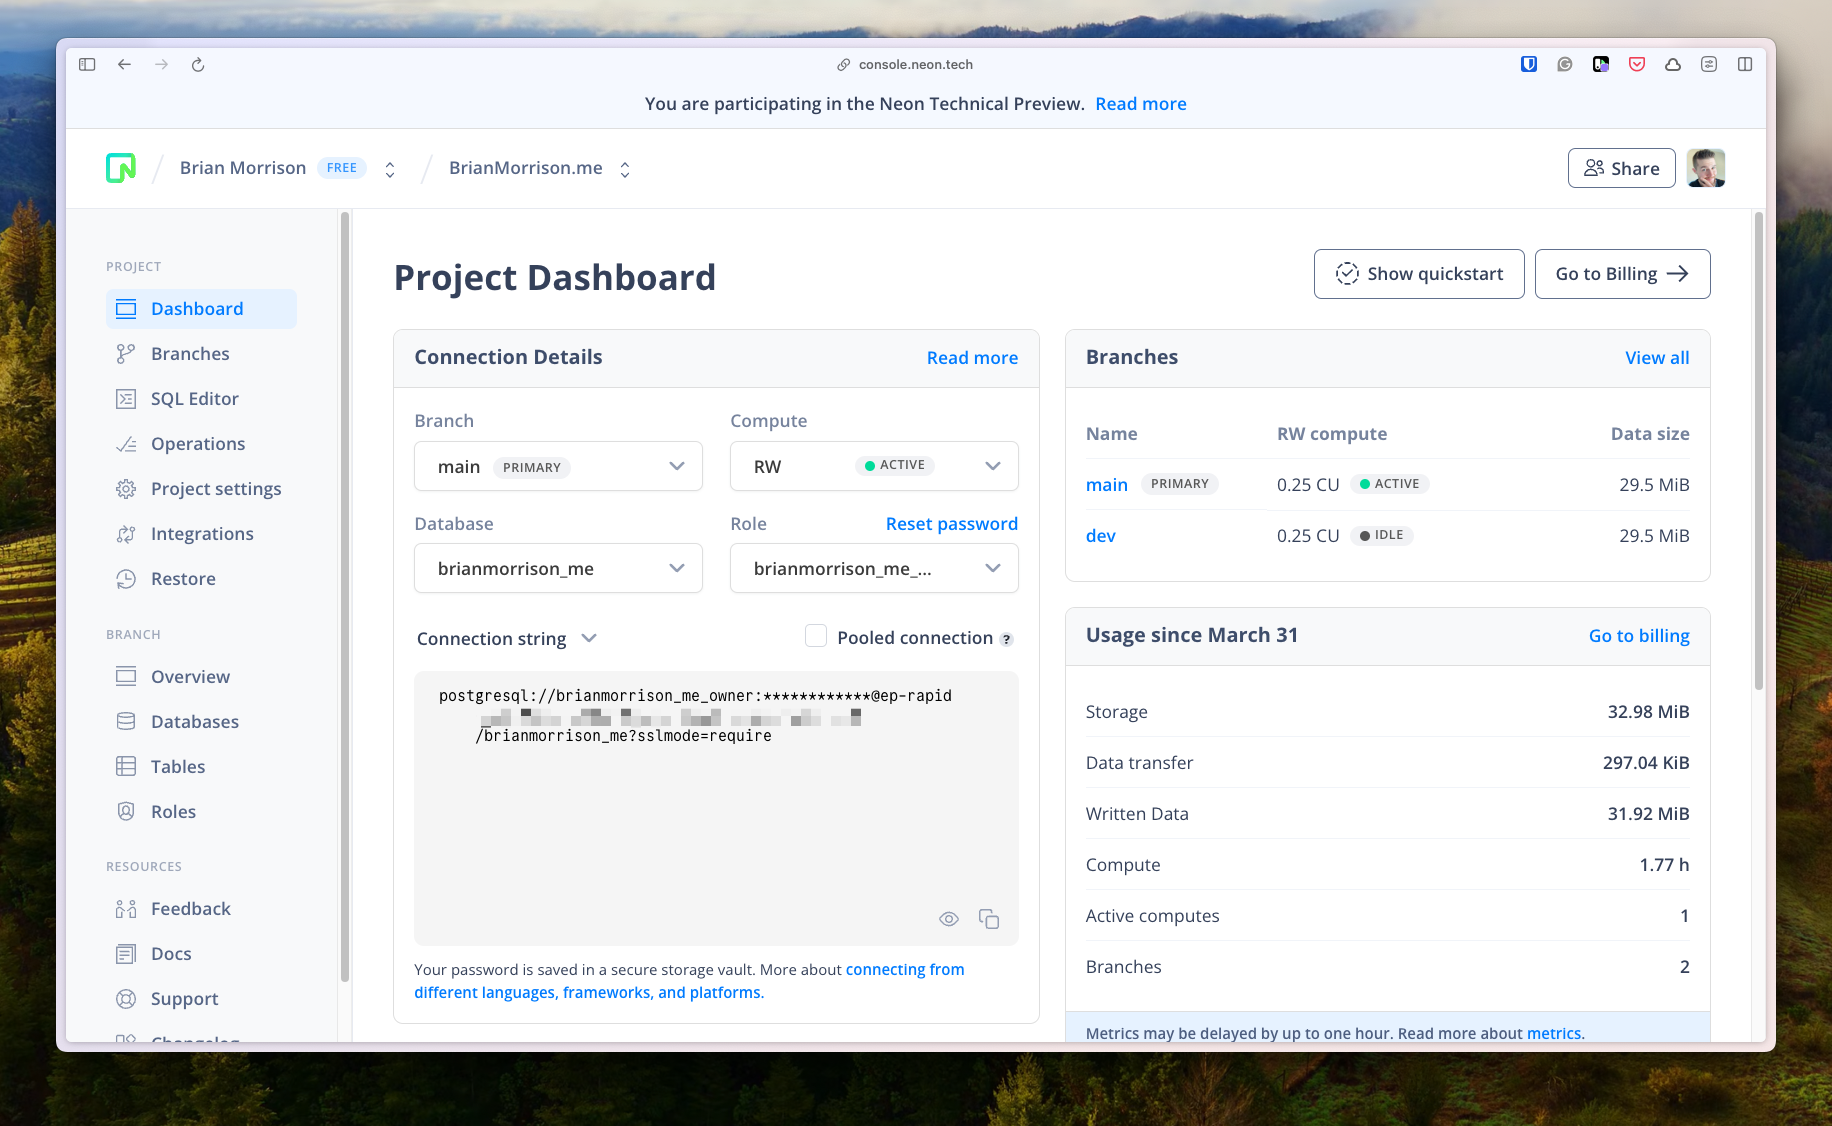
I started by creating a database on Neon. I also immediately created a dev branch that I could use as an environment to experiment with. Database branches on Neon work a bit differently then I’m used to, so I was not able to merge my changes from dev into main, but I’ll show how I tackled that a bit later using my GitHub Actions workflows.
I added the connection string to my .env file to be used locally. I then added Drizzle to the project, not only to use as an ORM, but also as a schema change management tool. I really only needed one table with a few fields:
// functions/db/schema.ts

import { boolean, integer, pgEnum, pgTable, serial, timestamp, uniqueIndex, varchar } from 'drizzle-orm/pg-core';

export const guestbookEntries = pgTable('guestbook_entries', {
  id: serial('id').primaryKey(),
  userId: varchar('user_id', { length: 256 }).notNull(),
  name: varchar('name', { length: 256 }).notNull(),
  imageUrl: varchar('image_url', { length: 256 }).notNull(),
  message: varchar('message', { length: 5000 }).notNull(),
  createdOn: timestamp('created_on').notNull().defaultNow(),
  isApproved: boolean('is_approved').notNull().default(false),
  notifiedOn: timestamp('notified_on'),
});
For change management, I’ve got a drizzle.config.ts file in the root of my project that contains the configuration needed by drizzle-kit.
// drizzle.config.ts

import type { Config } from "drizzle-kit";
import * as dotenv from 'dotenv'

dotenv.config({ path: '.env' })

console.log(process.env.DATABASE_URL)

export default {
  schema: "./functions/db/schema.ts",
  out: "./drizzle",
  driver: 'pg',
  dbCredentials: {
    connectionString: process.env.DATABASE_URL as string,
  },
  verbose: true,
  strict: false,
} satisfies Config;
And finally, I updated my package.json file to have a script I can use to push changes:
// package.json

"db:push": "drizzle-kit push:pg --config drizzle.config.ts"
This lets me run npm run db:push to apply changes, which will also be handy when updating my deployment scripts.
Updating the app
Before getting into the views and functions that were built, I wanted to start by showing the component that’s used to render the entries, in both the public and secured views. This component lets me decide to display the button to change approval status using a callback to the parent page when clicked.
// src/components/GuestbookEntryRow.tsx

import React from 'react'
import { GuestbookEntry } from '../models'
import Box from './ui/Box'
import Button from './Button'

type Props = {
  entry: GuestbookEntry
  allowToggleApproval?: boolean
  onToggleApproval?: (entry: GuestbookEntry) => void
}

function GuestbookEntryRow({ entry, allowToggleApproval, onToggleApproval }: Props) {
  return (
    <Box className="flex md:flex-row gap-4">
      <img src={entry.imageUrl} alt={entry.name} className="w-8 h-8 rounded-full mt-1" />
      <div className='flex mb-2 gap-2 md:gap-6 md:flex-row flex-col'>
        <div className="flex-1 flex flex-col">
          <span className="flex-1">{entry.name}</span>
          <span className="italic text-gray-700">{new Date(entry.createdOn).toLocaleDateString()}</span>
          {allowToggleApproval && onToggleApproval && (
            <>
              <span>{entry.isApproved ? "✅ Approved" : "⛔️ Not approved"} </span>
              <div>
                <Button onClick={() => onToggleApproval(entry)}>
                  {entry.isApproved ? "Unapprove" : "Approve"}
                </Button>
              </div>
            </>
          )}
        </div>
        <div>
          "{entry.message}"
        </div>
      </div>
    </Box>
  )
}

export default GuestbookEntryRow
Here is the GuestbookEntry model that will be passed around as well:
// src/models.ts

export type GuestbookEntry = {
  id: number
  userId: string
  name: string
  imageUrl: string
  message: string
  createdOn: Date
  isApproved?: boolean
}
As stated above, I needed three views. The first is pretty straightforward, a public listing of approved entries. This view calls a serverless function to get the list of entries to display
// src/pages/guestbook/index.tsx

import React, { useEffect, useState } from 'react'
import DefaultLayout from '../../layouts/DefaultLayout'
import Container from '../../components/Container'
import Button from '../../components/Button'
import { GuestbookEntry } from '../../models'
import { navigate } from 'gatsby'
import GuestbookEntryRow from '../../components/GuestbookEntryRow'

function Guestbook({ location }) {
  const [entries, setEntries] = useState<GuestbookEntry[]>([])

  useEffect(() => {
    async function init() {
      let res = await fetch('/.netlify/functions/get-guestbook-entries')
      let json = await res.json()
      setEntries(json)
    }
    init()
  }, [])

  return (
    <DefaultLayout location={location} pageTitle="Guestbook">
      <Container>
        <div className="flex justify-between mb-2">
          <h1>Guestbook</h1>
          <div className="flex items-center">
            <Button onClick={() => navigate("/guestbook/add")}>
              Add a message
            </Button>
          </div>
        </div>
        <div className="flex flex-col gap-2">
          {entries.map((entry, i) => <GuestbookEntryRow key={i} entry={entry} />)}
        </div>
      </Container>
    </DefaultLayout>
  )
}

export default Guestbook
The associated serverless function uses Drizzle to query any approved entries and sorts them in reverse chronological order.
// functions/get-guestbook-entries.ts

import { guestbookEntries } from './db/schema';
import { neon } from '@neondatabase/serverless';
import { drizzle } from 'drizzle-orm/neon-http';
import { desc, eq } from 'drizzle-orm';

const sql = neon(process.env.DATABASE_URL!);
const db = drizzle(sql);

export const handler = async () => {
  try {
    let entries = await db.select()
      .from(guestbookEntries)
      .where(eq(guestbookEntries.isApproved, true))
      .orderBy(desc(guestbookEntries.createdOn))
      .execute();
    return {
      statusCode: 200,
      headers: {
        'Content-Type': 'application/json',
      },
      body: JSON.stringify(entries),
    };
  } catch (error) {
    console.log(error)
    return {
      statusCode: 500,
      body: JSON.stringify({ message: 'Internal Server Error' }),
    };
  }
};
The next view is to allow users to add an entry. It’s a simple form that calls a serverless function to add a record to the database. Note that the main part of the page is wrapped in either SignedIn or SignedOut. These are Clerk components that render the page differently if the user is signed in or not. If the user is not signed in, the RedirectToSignIn component will send them to the sign in page using Clerk’s Account Portal (which I didn’t have to build at all).
// src/pages/guestbook/add.tsx

import React, { useState } from 'react'
import DefaultLayout from '../../layouts/DefaultLayout'
import Container from '../../components/Container'
import { SignedIn, RedirectToSignIn, SignedOut, UserButton, } from 'gatsby-plugin-clerk'
import Button from '../../components/Button';
import Box from '../../components/ui/Box';

function AddToGuestbook({ location }) {
  const [message, setMessage] = useState('')
  const [isMessageSubmitted, setIsMessageSubmitted] = useState(false)
  const [isLoading, setIsLoading] = useState(false)

  const onSubmit = async () => {
    setIsLoading(true)
    await fetch('/.netlify/functions/submit-guestbook-entry', {
      method: 'POST',
      body: JSON.stringify({ message }),
    })

    setIsLoading(false)
    setIsMessageSubmitted(true)
  }

  return (
    <DefaultLayout location={location}>
      <Container>
        <SignedIn>
          <h1 className='mb-2'>Sign the guestbook</h1>
          <Box>
            <div>
              <label className="block text-gray-700 text-sm font-bold mb-2">
                Message
              </label>
              <textarea
                className="shadow-sm appearance-none border rounded w-full py-2 px-3 text-gray-700 mb-3 leading-tight focus:outline-none focus:shadow-outline"
                value={message}
                onChange={e => setMessage(e.target.value)}
                rows={4}  />
            </div>
            <div className="flex justify-between">
              <Button onClick={() => onSubmit()} disabled={isLoading}>
                Submit
              </Button>
              <UserButton />
            </div>
          </Box>
          {isMessageSubmitted && (
            <Box className='mt-2'>
              <span className="font-extrabold">✅ You've signed the guestbook!</span> I'll review and approve it when I have a free moment. Thanks!
            </Box>
          )}
        </SignedIn>
        <SignedOut>
          <RedirectToSignIn />
        </SignedOut>
      </Container>
    </DefaultLayout>
  )
}

export default AddToGuestbook
And here is the serverless function for this one. Notice that I’m calling validateSession. That is a custom function that ensures that the request that’s sent in is authenticated. It checks the session cookie against the JWKS endpoint for my Clerk instance, as well as parsing the claims so I can use the embedded information about the user.
// functions/submit-guestbook-entry.ts

import { guestbookEntries } from './db/schema';
import { neon } from '@neondatabase/serverless';
import { drizzle } from 'drizzle-orm/neon-http';
import { eq } from 'drizzle-orm';
import { validateSession } from './shared/auth';

const sql = neon(process.env.DATABASE_URL!);
const db = drizzle(sql);

export const handler = async (event) => {
  try {
    let validateTokenResponse = await validateSession(event);
    if(!validateTokenResponse.isValid || !validateTokenResponse.claims) {
      return {
        statusCode: 401,
        body: JSON.stringify({ message: 'Unauthorized' }),
      };
    }

    const { message } = JSON.parse(event.body);

    await db.insert(guestbookEntries).values({
      userId: validateTokenResponse.claims.sub as string,
      name: validateTokenResponse.claims.name,
      imageUrl: validateTokenResponse.claims.image_url,
      message,
    }).execute();

    return {
      statusCode: 200
    };
  } catch (error) {
    return {
      statusCode: 500,
      body: JSON.stringify({ message: 'Internal Server Error' }),
    };
  }
};
The final view allows me to toggle the approval status of each entry. This is actually very similar to the guestbook/index.tsx page, but calls a different functions AND adds the props to GuestbookEntryRow to show the necessary elements to manage entries.
// src/pages/guestbook/manage.tsx

import React, { useEffect, useState } from 'react'
import DefaultLayout from '../../layouts/DefaultLayout'
import Container from '../../components/Container'
import { GuestbookEntry } from '../../models'
import GuestbookEntryRow from '../../components/GuestbookEntryRow'

function ManageGuestbookEntries({ location }) {
  const [entries, setEntries] = useState<GuestbookEntry[]>([])

  useEffect(() => {
    async function init() {
      let res = await fetch('/.netlify/functions/get-all-guestbook-entries')
      let json = await res.json()
      setEntries(json)
    }
    init()
  }, [])

  async function toggleApprovalStatus(entry: GuestbookEntry) {
    await fetch('/.netlify/functions/update-guestbook-entry', {
      method: 'POST',
      body: JSON.stringify({ id: entry.id, isApproved: !entry.isApproved }),
    })

    let newEntries = entries.map(e => {
      if (e.id === entry.id) {
        e.isApproved = !e.isApproved
      }
      return e
    })
    setEntries(newEntries)
  }

  return (
    <DefaultLayout location={location}>
      <Container>
        <h1>Manage Guestbook Entries</h1>
        <div className="flex flex-col gap-2">
          {entries.map((entry, i) => (
            <GuestbookEntryRow
              key={i}
              entry={entry}
              allowToggleApproval
              onToggleApproval={toggleApprovalStatus} />
          ))}
        </div>
      </Container>
    </DefaultLayout>
  )
}

export default ManageGuestbookEntries
The serverless function to render this page is also slightly modified from get-guestbook-entries.ts. The key difference is the filters on the query have changed, but also I’m checking validateTokenResponse.isAdmin before proceeding.
import { guestbookEntries } from './db/schema';
import { neon } from '@neondatabase/serverless';
import { drizzle } from 'drizzle-orm/neon-http';
import { desc, eq } from 'drizzle-orm';
import { validateSession } from './shared/auth';

const sql = neon(process.env.DATABASE_URL!);
const db = drizzle(sql);

export const handler = async (event) => {
  try {
    let validateTokenResponse = await validateSession(event);
    if(!validateTokenResponse.isValid || !validateTokenResponse.claims || !validateTokenResponse.isAdmin) {
      return {
        statusCode: 401,
        body: JSON.stringify({ message: 'Unauthorized' }),
      };
    }

    let entries = await db.select()
      .from(guestbookEntries)
      .orderBy(desc(guestbookEntries.createdOn))
      .execute();
    return {
      statusCode: 200,
      headers: {
        'Content-Type': 'application/json',
      },
      body: JSON.stringify(entries),
    };
  } catch (error) {
    console.log(error)
    return {
      statusCode: 500,
      body: JSON.stringify({ message: 'Internal Server Error' }),
    };
  }
};
Also, the update-guestbook-entry.ts function simply sets the isApproved value based on the entry ID:
import { guestbookEntries } from './db/schema';
import { neon } from '@neondatabase/serverless';
import { drizzle } from 'drizzle-orm/neon-http';
import { desc, eq } from 'drizzle-orm';
import { validateSession } from './shared/auth';

const sql = neon(process.env.DATABASE_URL!);
const db = drizzle(sql);

export const handler = async (event) => {
  try {
    let validateTokenResponse = await validateSession(event);
    if(!validateTokenResponse.isValid || !validateTokenResponse.claims || !validateTokenResponse.isAdmin) {
      return {
        statusCode: 401,
        body: JSON.stringify({ message: 'Unauthorized' }),
      };
    }

    let { id, isApproved } = JSON.parse(event.body);

    await db.update(guestbookEntries)
      .set({ isApproved: isApproved })
      .where(eq(guestbookEntries.id, id))
      .execute();

    return {
      statusCode: 200
    };
  } catch (error) {
    console.log(error)
    return {
      statusCode: 500,
      body: JSON.stringify({ message: 'Internal Server Error' }),
    };
  }
};
Finally, here is the code for validateSession. It uses the JWKS endpoint from Clerk to validate the token and extract the claims. For checking admin status, I’m looking at claims["metadata"]["is_admin"] which is set on a per-user basis in Clerk. More of this will be shown in the next section.
import jwt from "jsonwebtoken";
import jwksClient from 'jwks-rsa';

type ValidateTokenResponse = {
  isValid: boolean
  isAdmin?: boolean
  claims?: jwt.JwtPayload
}

export async function validateSession(event): Promise<ValidateTokenResponse> {
  const cookies = {}
  event.headers.cookie.split(';').forEach(c => {
    const [key, value] = c.split('=');
    cookies[key.trim()] = value;
  });
  const token = cookies["__session"];

  return new Promise((resolve, reject) => {
    var client = jwksClient({
      jwksUri: process.env.JWKS_URI as string
    });

    function getKey(header, callback){
      client.getSigningKey(header.kid, function(err, key) {
        // @ts-ignore
        var signingKey = key.publicKey || key.rsaPublicKey;
        callback(null, signingKey);
      });
    }

    jwt.verify(token, getKey, function(err, decoded) {
      if(err) reject({
        isValid: false
      })
      let claims: jwt.JwtPayload = decoded as jwt.JwtPayload;
      let isAdmin = false
      if(claims["metadata"] && claims["metadata"]["is_admin"] === "true") {
        isAdmin = true
      }

      resolve({
        isValid: true,
        isAdmin,
        claims
      })
    });
  })
}
Configure Clerk
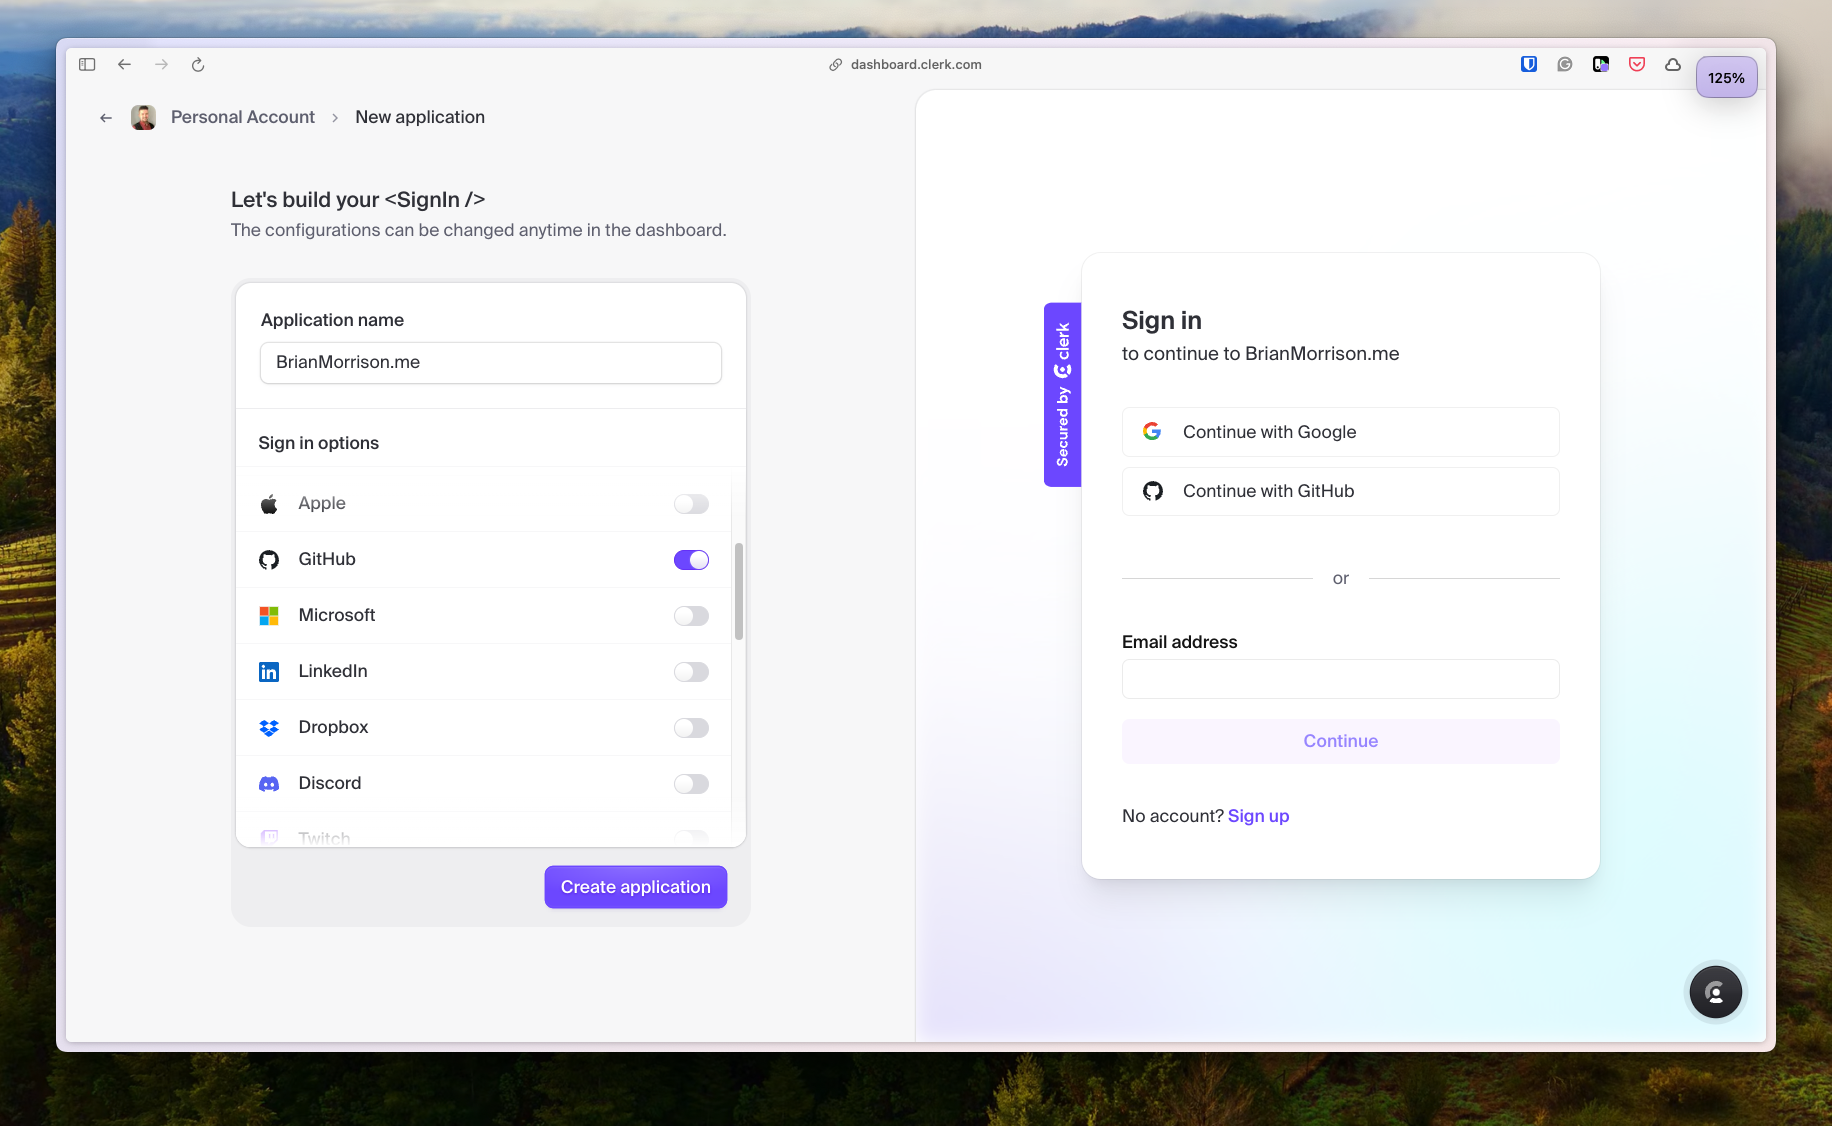
I started with configuring a new application in Clerk and enabled Google and GitHub social login options. Thankfully Clerk has preconfigured OAuth apps set up with these services while running locally, so social sign in works out of the box.
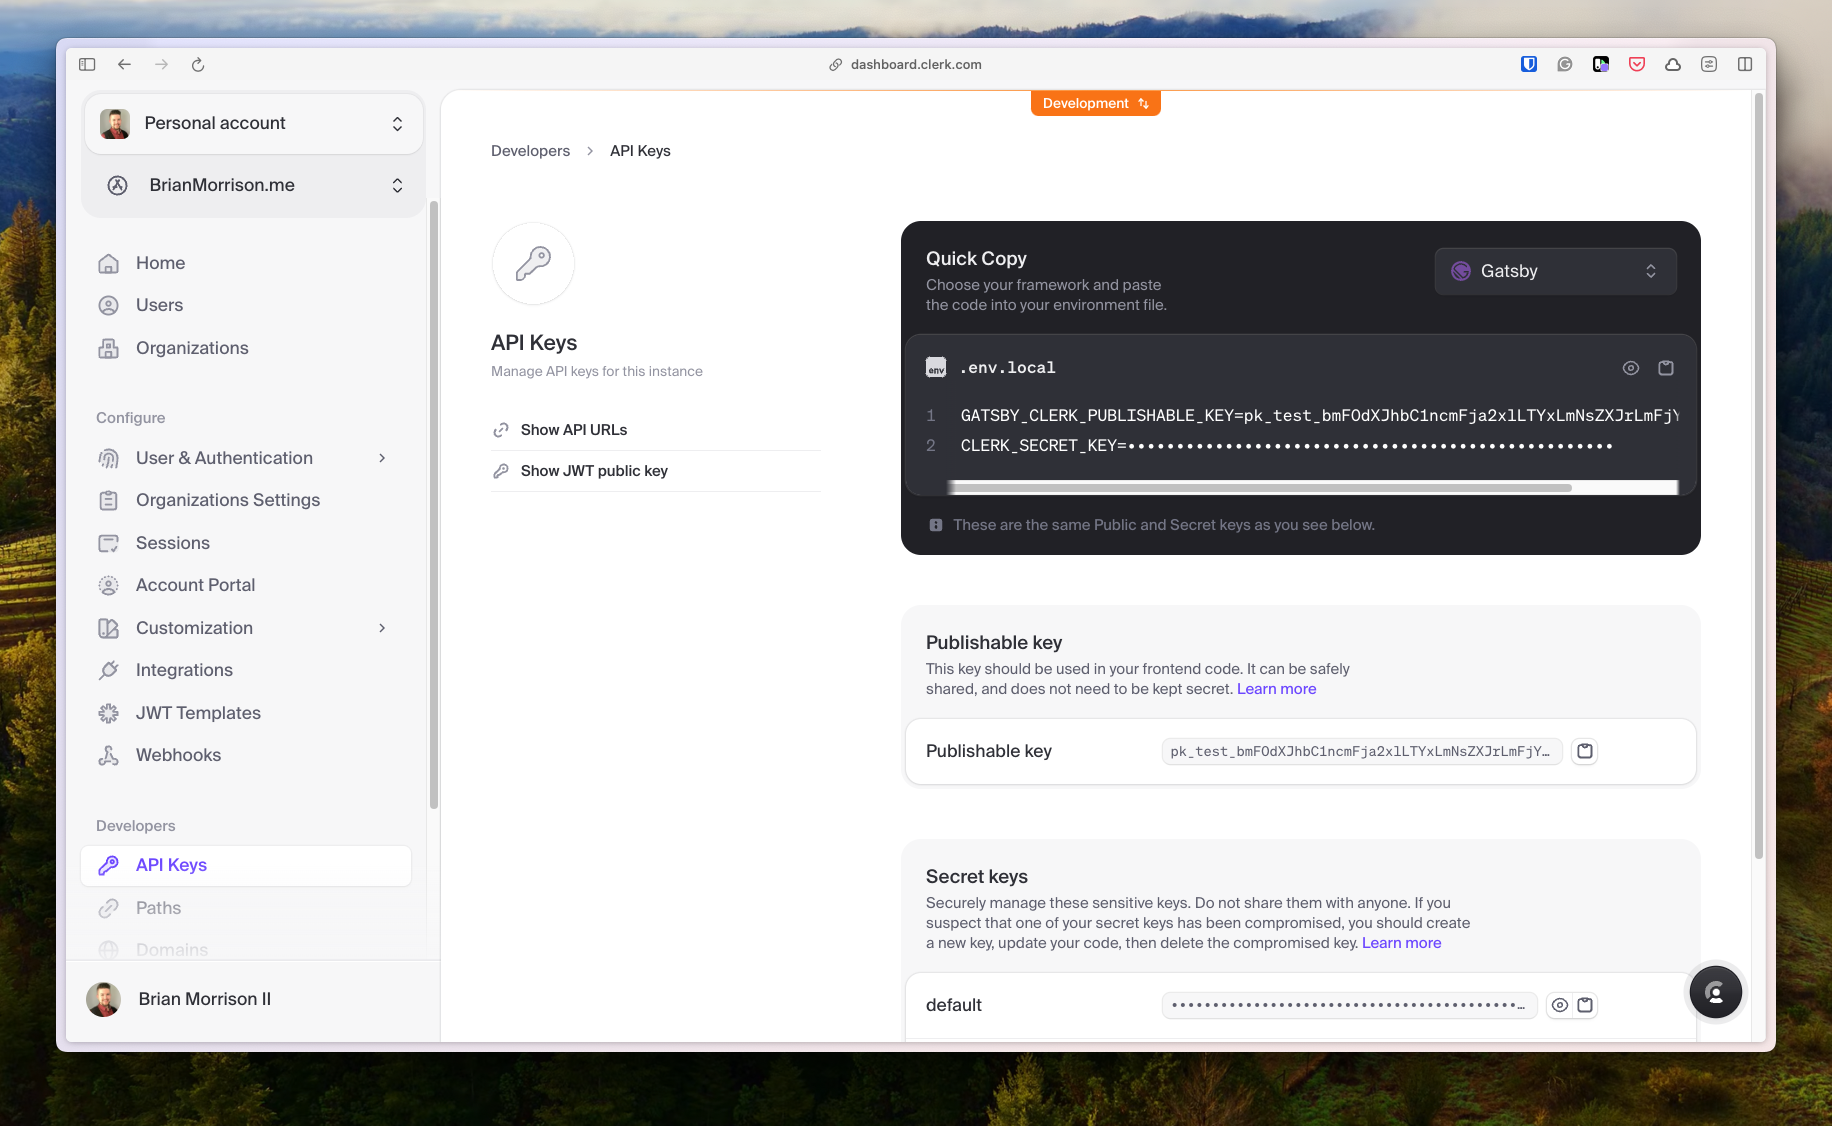
There are two keys that need to be added: a publishable key and a secret key. The publishable key ships with the front end, whereas the secret key is used on the backend. I just added these to my .env file for local testing.
Next up, I installed the Gatsby Clerk plugin with the following command.
npm i gatsby-plugin-clerkThen I added it to my plugins list in gatsby-config.js. Doing this wraps the application in the necessary context for Clerk to run properly, similar to adding ClerkProvider if you’ve ever done this with Next.js.
// gatsby-config.js

module.exports = {
  siteMetadata: {
    title: `Brian Morrison II`,
    siteUrl: `https://brianmorrison.me`,
    description: "Personal blog of Brian Morrison II, full stack developer & developer educator."
  },
  plugins: [
	  ...
    'gatsby-plugin-clerk',
    ...
  ]
}
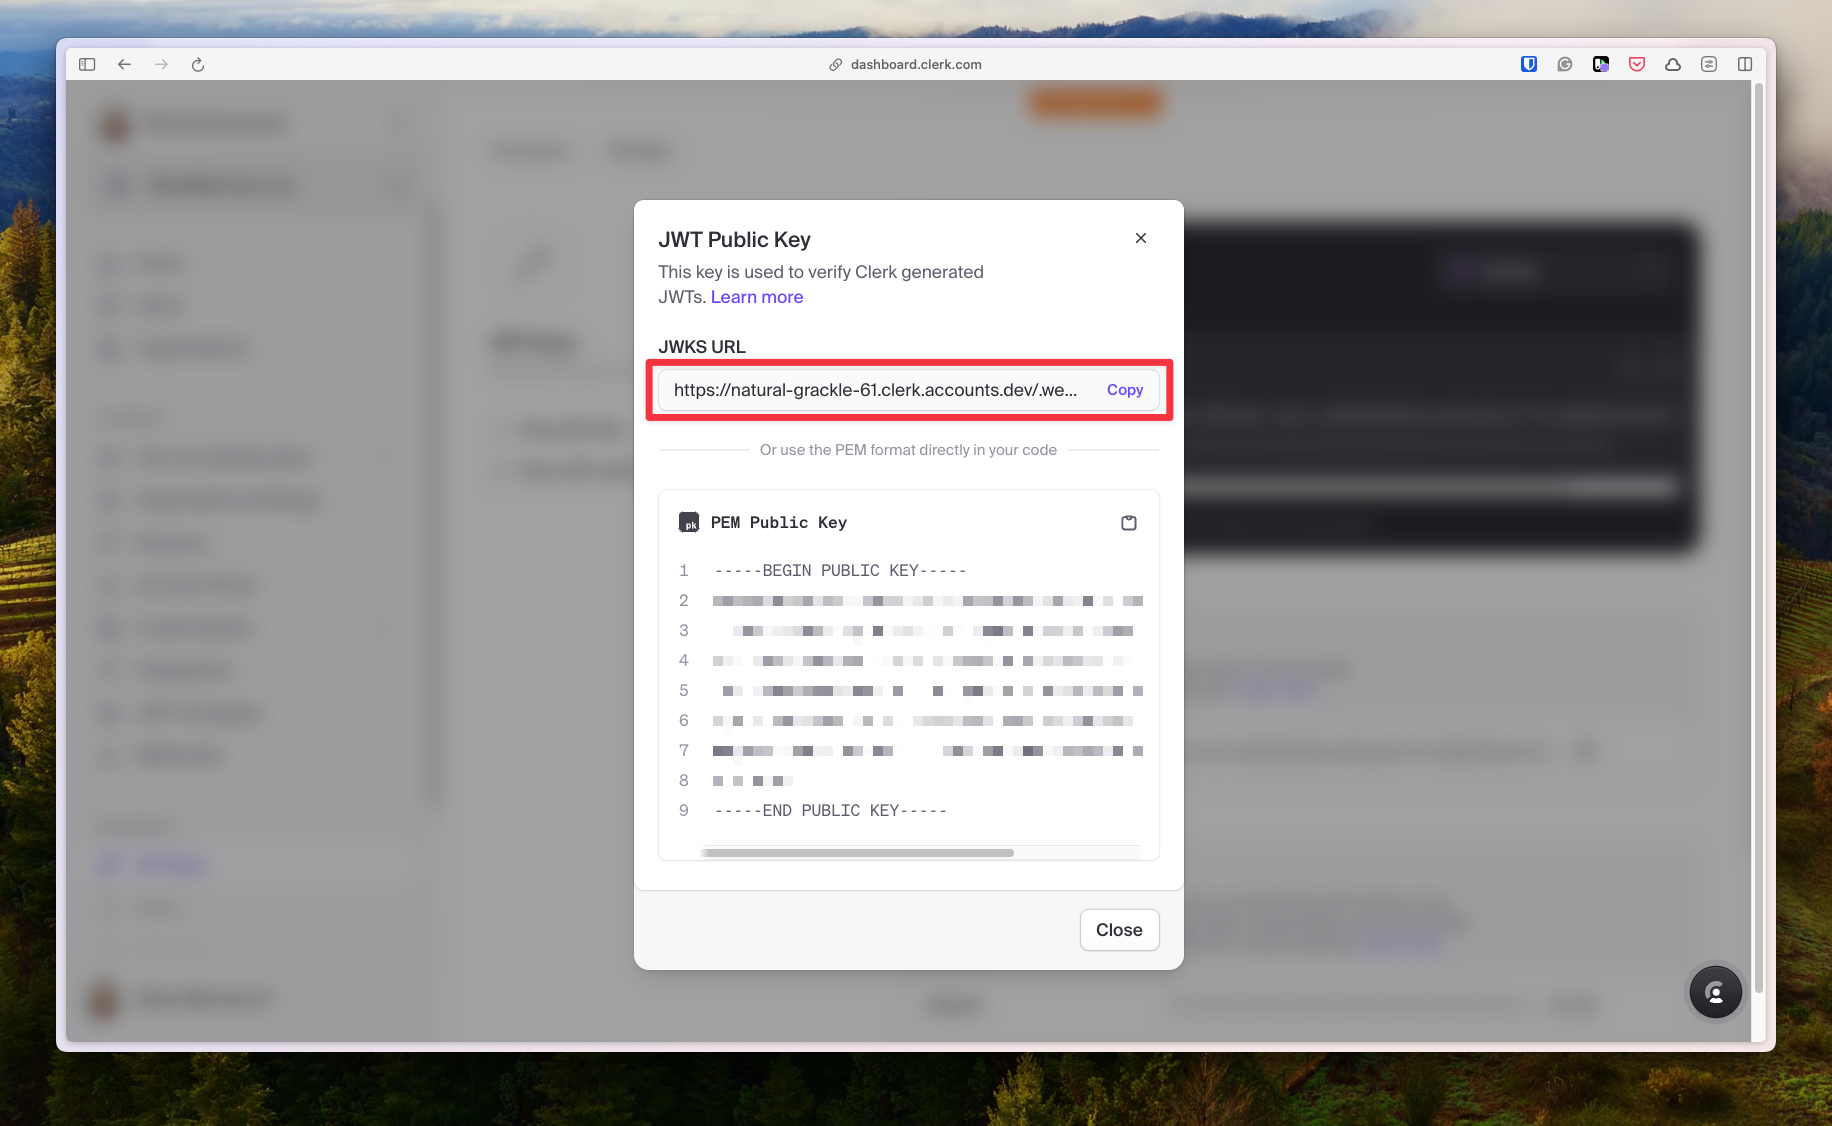
I can now use the Clerk components on my website, but I also needed to grab the JWKS URI to allow my requests to be authenticated on the backend. This is found by clicking the “Show JWT public key” button in the previous screenshot. This value is stored in my .env file was JWKS_URL.
Now by default, some of the info I need from the user is not included in the claims. Specifically, the full name of the user, profile image url, and the metadata I can use to verify admin status. I’m going to use the Public Metadata functionality of Clerk, which lets me add arbitrary JSON to a user object. By finding my user record in the Clerk dashboard and scrolling down to the bottom, I can add that JSON.

Now I can customize the session token by heading to “Sessions” from the sidebar, then “Edit” in the Customize session token section.

Customizing it like so adds the info to the claims, eliminating the need for me to hit the Clerk Backend API to pull this info each time a user request is made.
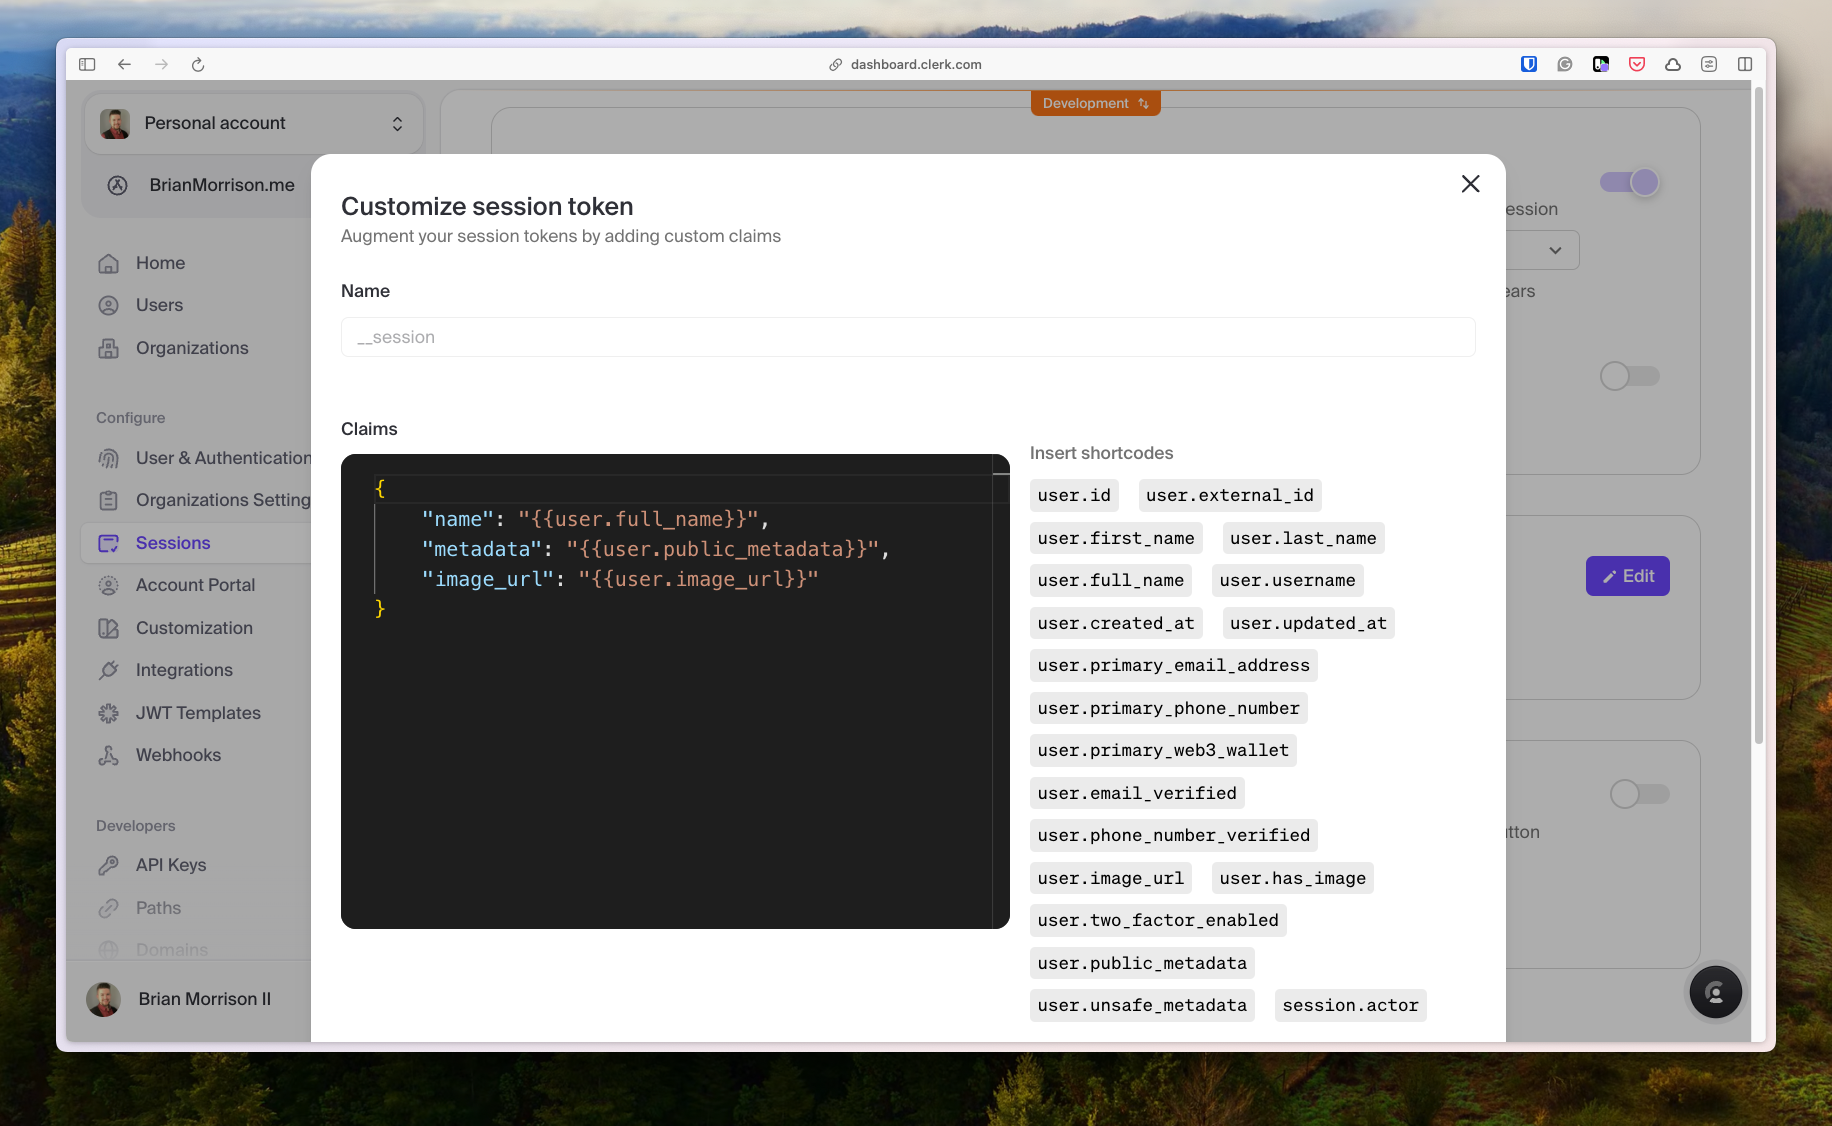
Now the claims available to me from my serverless function looks like this:
{
  azp: 'http://localhost:8888',
  exp: 1712182402,
  iat: 1712182342,
  image_url: 'https://img.clerk.com/eyJ0eXBlIjoicHJveHkiLCJzcmMiOiJodHRwczovL2ltYWdlcy5jbGVyay5kZXYvb2F1dGhfZ2l0aHViL2ltZ18yZVRGajVvWEY5NDlWaHhtaVVIekhXNXoxdUEifQ',
  iss: 'https://natural-grackle-61.clerk.accounts.dev',
  jti: 'e9d730ca796f6a9f95ba',
  metadata: { is_admin: 'true' },
  name: 'Brian Morrison II',
  nbf: 1712182332,
  sid: 'sess_2ebSK4wzSIaDrvkuObItsznm2e9',
  sub: 'user_2eTFj4C5N1hzq2k9qrep45KHtJk'
}
At this point, everything works locally! Now the challenge of pushing it out to the public comes in.
Updating the deploy pipeline
As mentioned earlier, I have two deployment pipelines. The first deploys the dev branch of my website and is executed manually. The second deploys main and runs automatically when changes are done to main.
Development
Updating deployment was pretty straightforward. There were a number of new environment variables that needed to be configured in a few places:
GitHub Actions
Since Actions is used during the build process, the only environment variable needed here was GATSBY_CLERK_PUBLISHABLE_KEY. In order to accommodate the two environments, I created an Actions secret called DEV_GATSBY_CLERK_PUBLISHABLE_KEY which is mapped into the build environment in the .github/workflows/deploy-dev.yaml workflow.
name: Deploy dev
on:
workflow_dispatch:
jobs:
deploy:
runs-on: ubuntu-latest
steps:
- uses: actions/checkout@v3
- uses: actions/setup-node@v3
with:
node-version: 18
- name: Install Netlify CLI
run: npm install -g netlify-cli
- name: Install deps
run: |
cd website
npm install
- name: Build
run: |
cd website
netlify build
env:
NETLIFY_AUTH_TOKEN: ${{ secrets.NETLIFY_AUTH_TOKEN }}
NETLIFY_SITE_ID: ${{ secrets.NETLIFY_SITE_ID }}
GATSBY_CLERK_PUBLISHABLE_KEY: ${{ secrets.DEV_GATSBY_CLERK_PUBLISHABLE_KEY }} # Here is where the key was added
- name: Deploy
run: |
cd website
netlify deploy --alias dev
env:
NETLIFY_AUTH_TOKEN: ${{ secrets.NETLIFY_AUTH_TOKEN }}
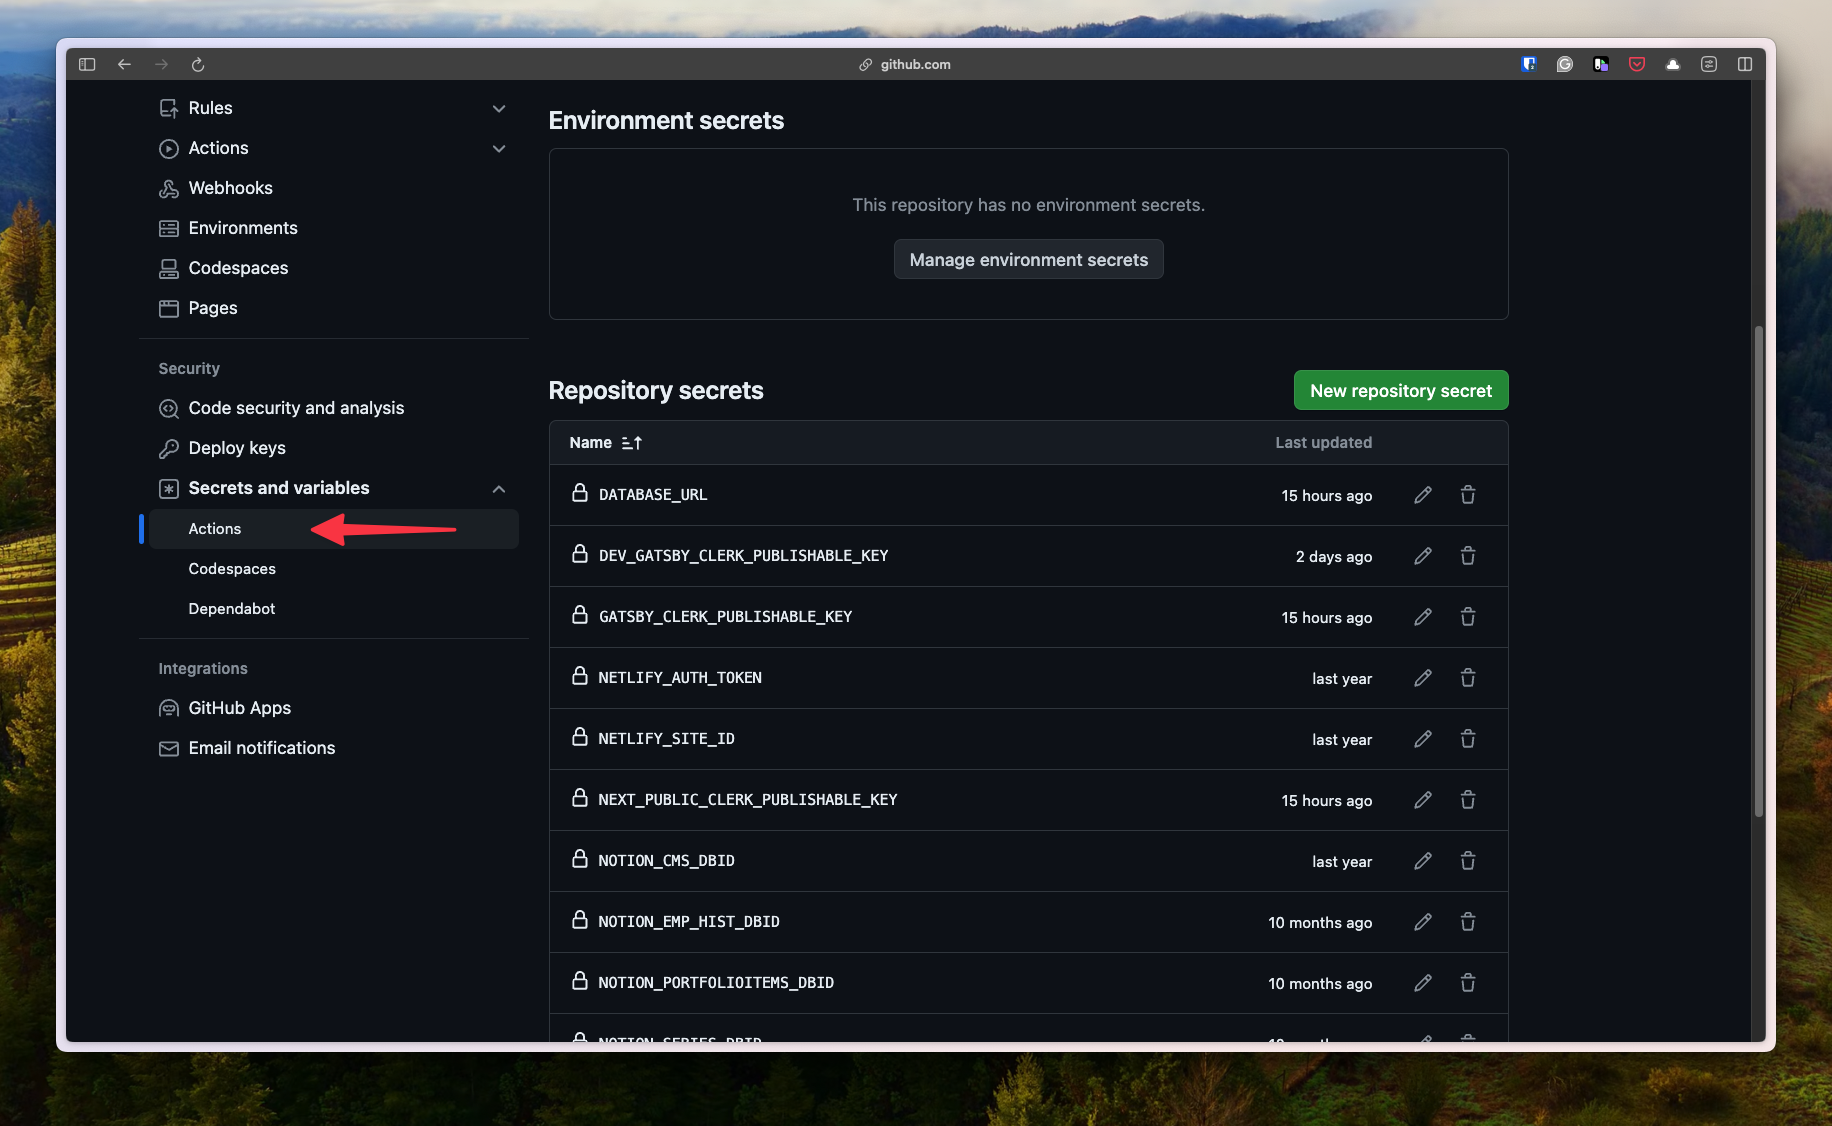
NETLIFY_SITE_ID: ${{ secrets.NETLIFY_SITE_ID }}This is added in the repository settings under “Secrets and variables” > “Actions”.
Netlify
Any secret environment variables need to be configured in Netlify, so the following were added there:
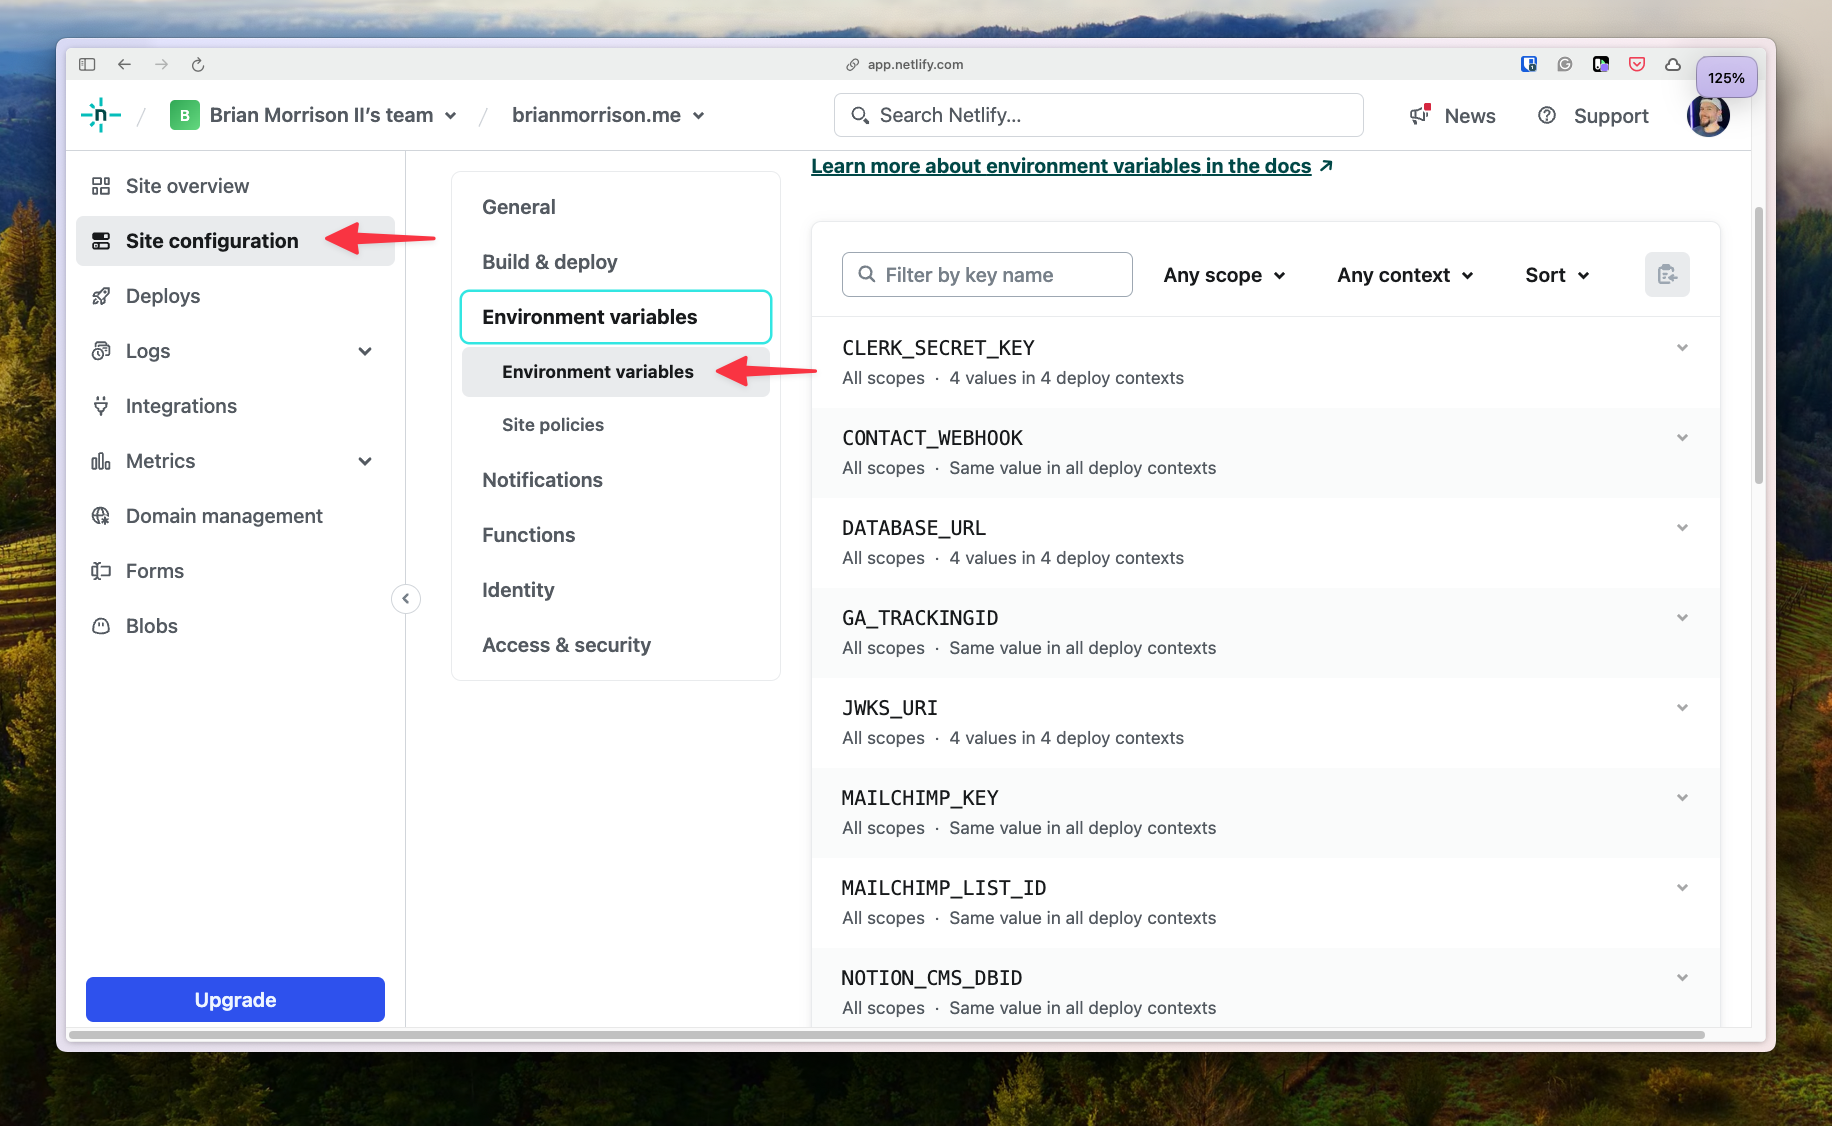
CLERK_SECRET_KEY- The secret key of my Clerk instance.DATABASE_URL- The connection string to thedevbranch in Neon.JWKS_URI- The JWKS URI for my Clerk instance.
These were added under “Site configuration” > “Environment variables” > “Environment variables”. Initially I set up the same variables for all deployment contexts, but that will change in the next section.
Production
The production deploy was a bit trickier to configure compared to dev.
Clerk
When an application in Clerk is created, it’s in development mode. This allows you to use the dev instances of the OAuth applications to quickly get up and running and test social sign in. When moving to production mode, you’ll need to configure your own OAuth apps in the providers you are using, as well as make some DNS changes.
Each provider is different, so instead of walking through how to set up each individually, you can find more info here:
- GitHub - https://clerk.com/docs/authentication/social-connections/github
- Google - https://clerk.com/docs/authentication/social-connections/google
After setting up OAuth apps in both of the providers and getting the required Client ID and Client Secrets, I set them up in Clerk under User & Authentication > Social Connections.
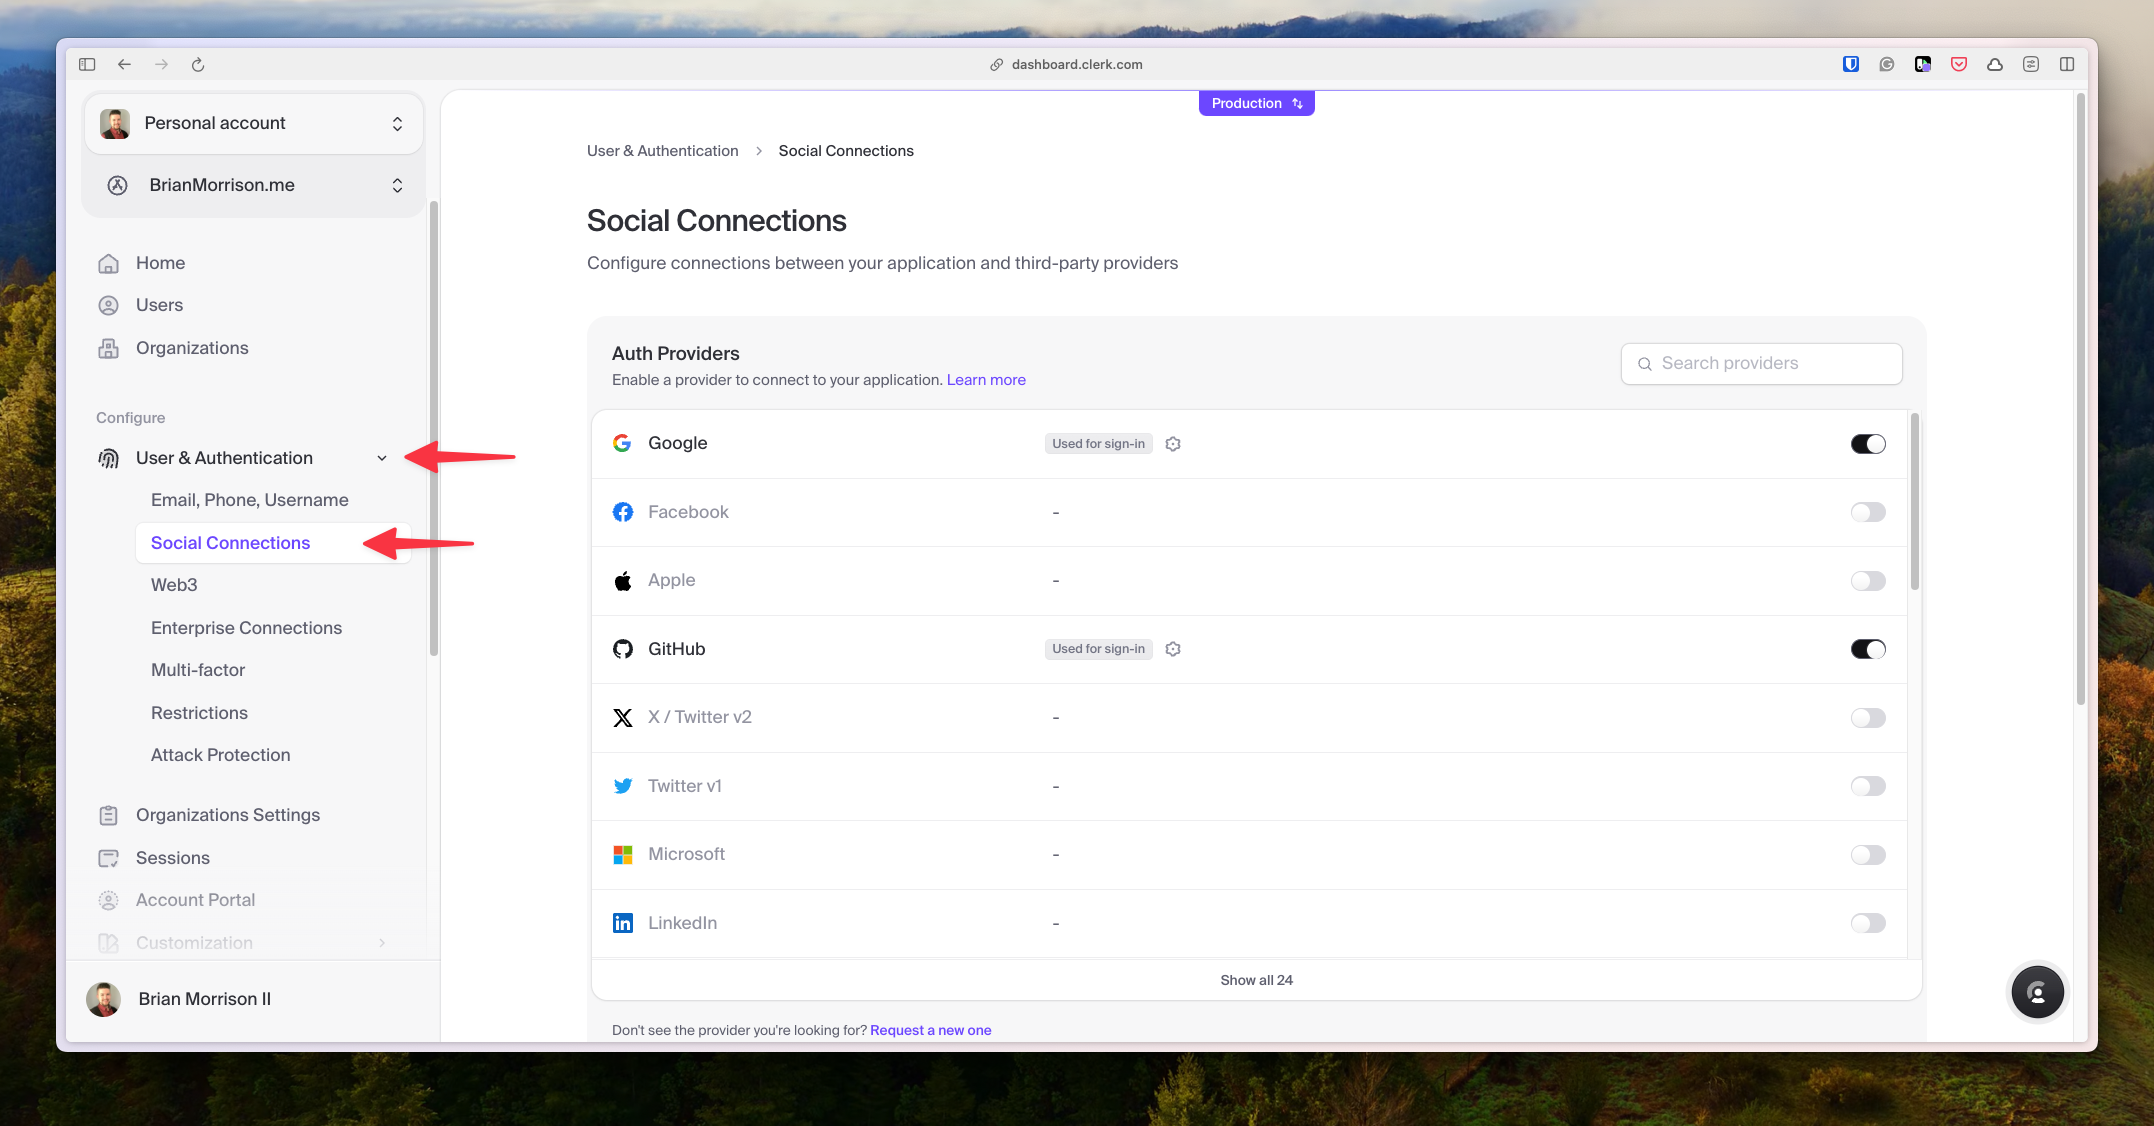
Clicking the cog next to each provider let me fill in the details.
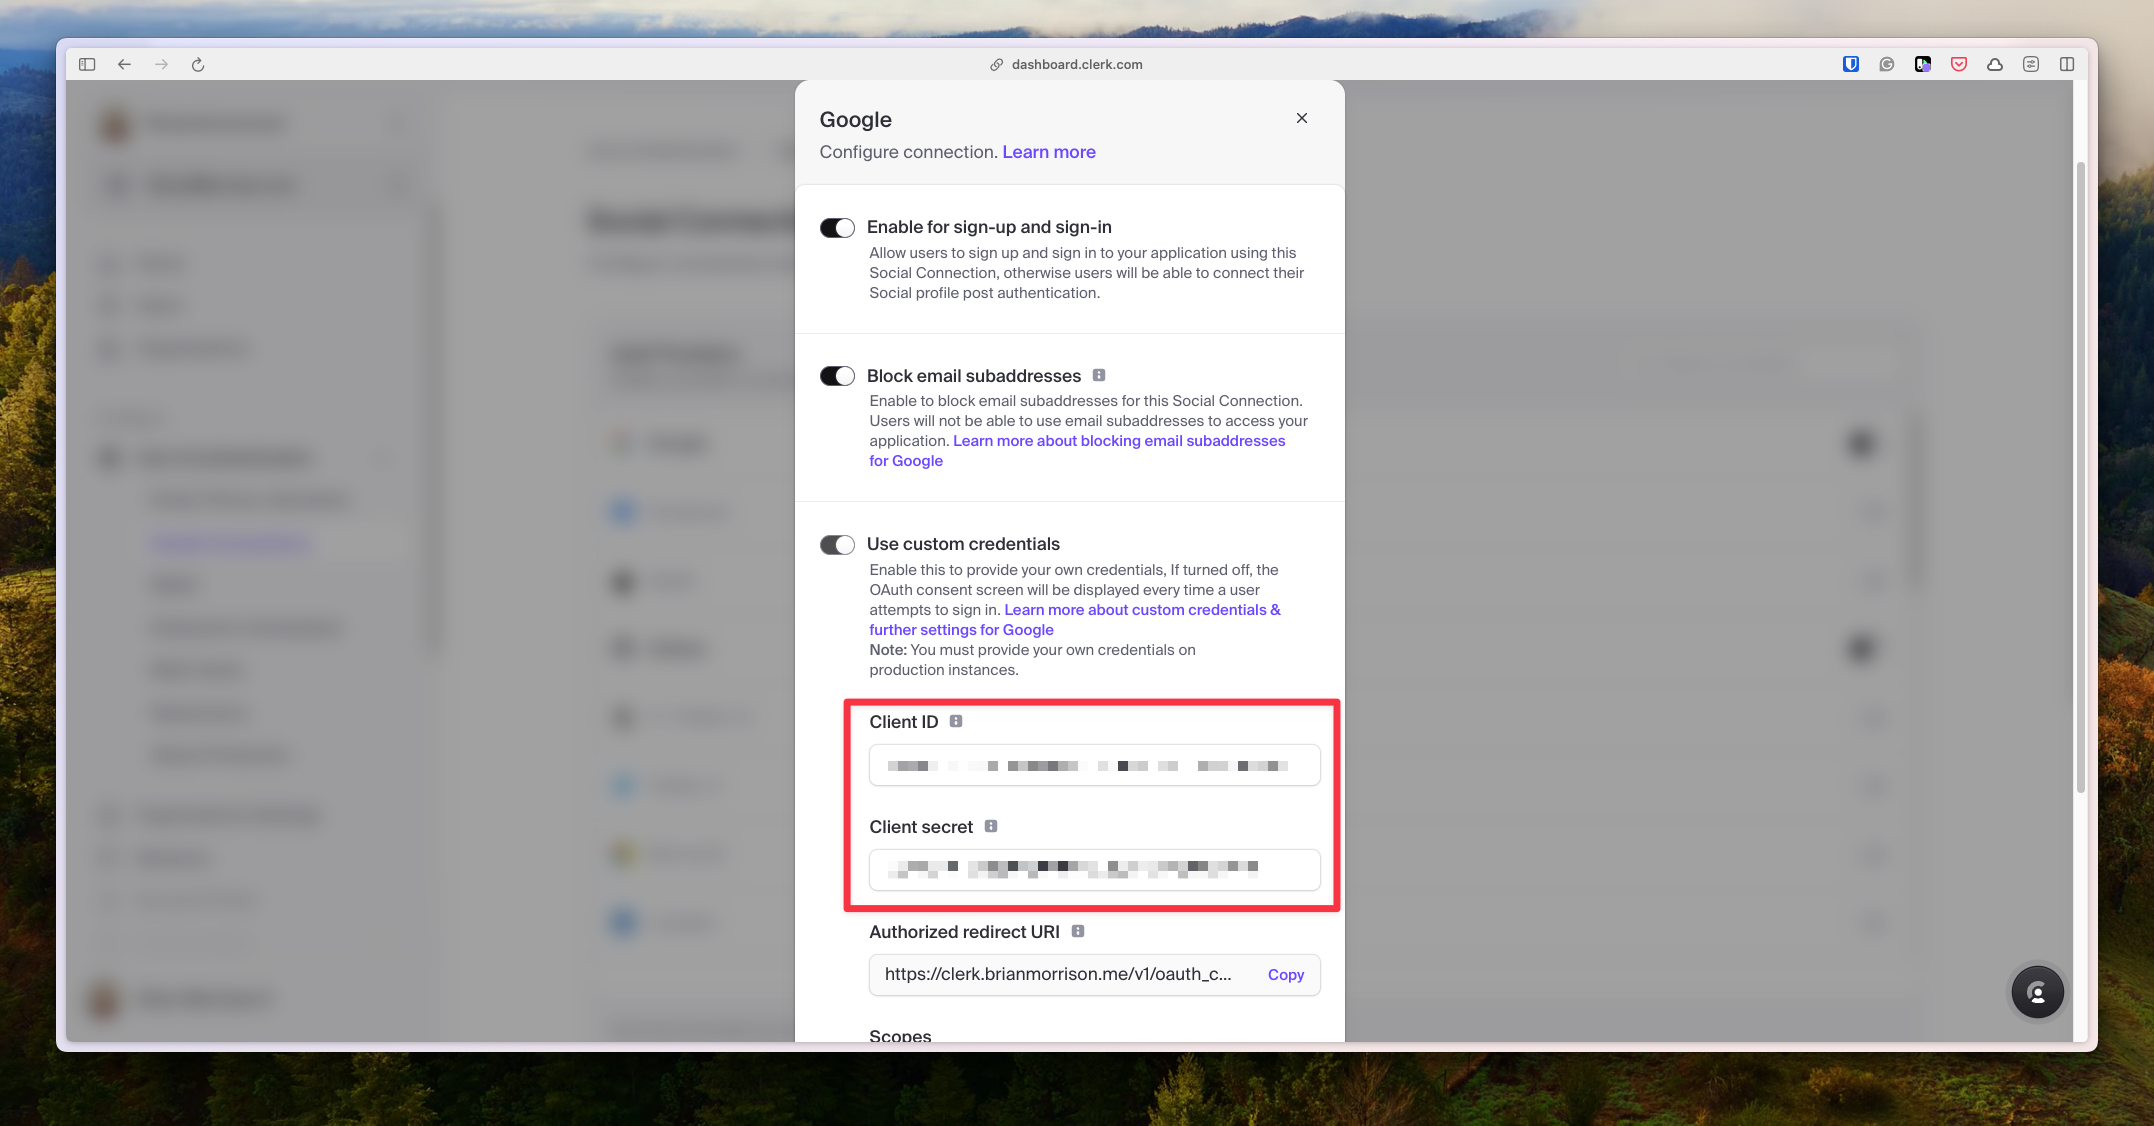
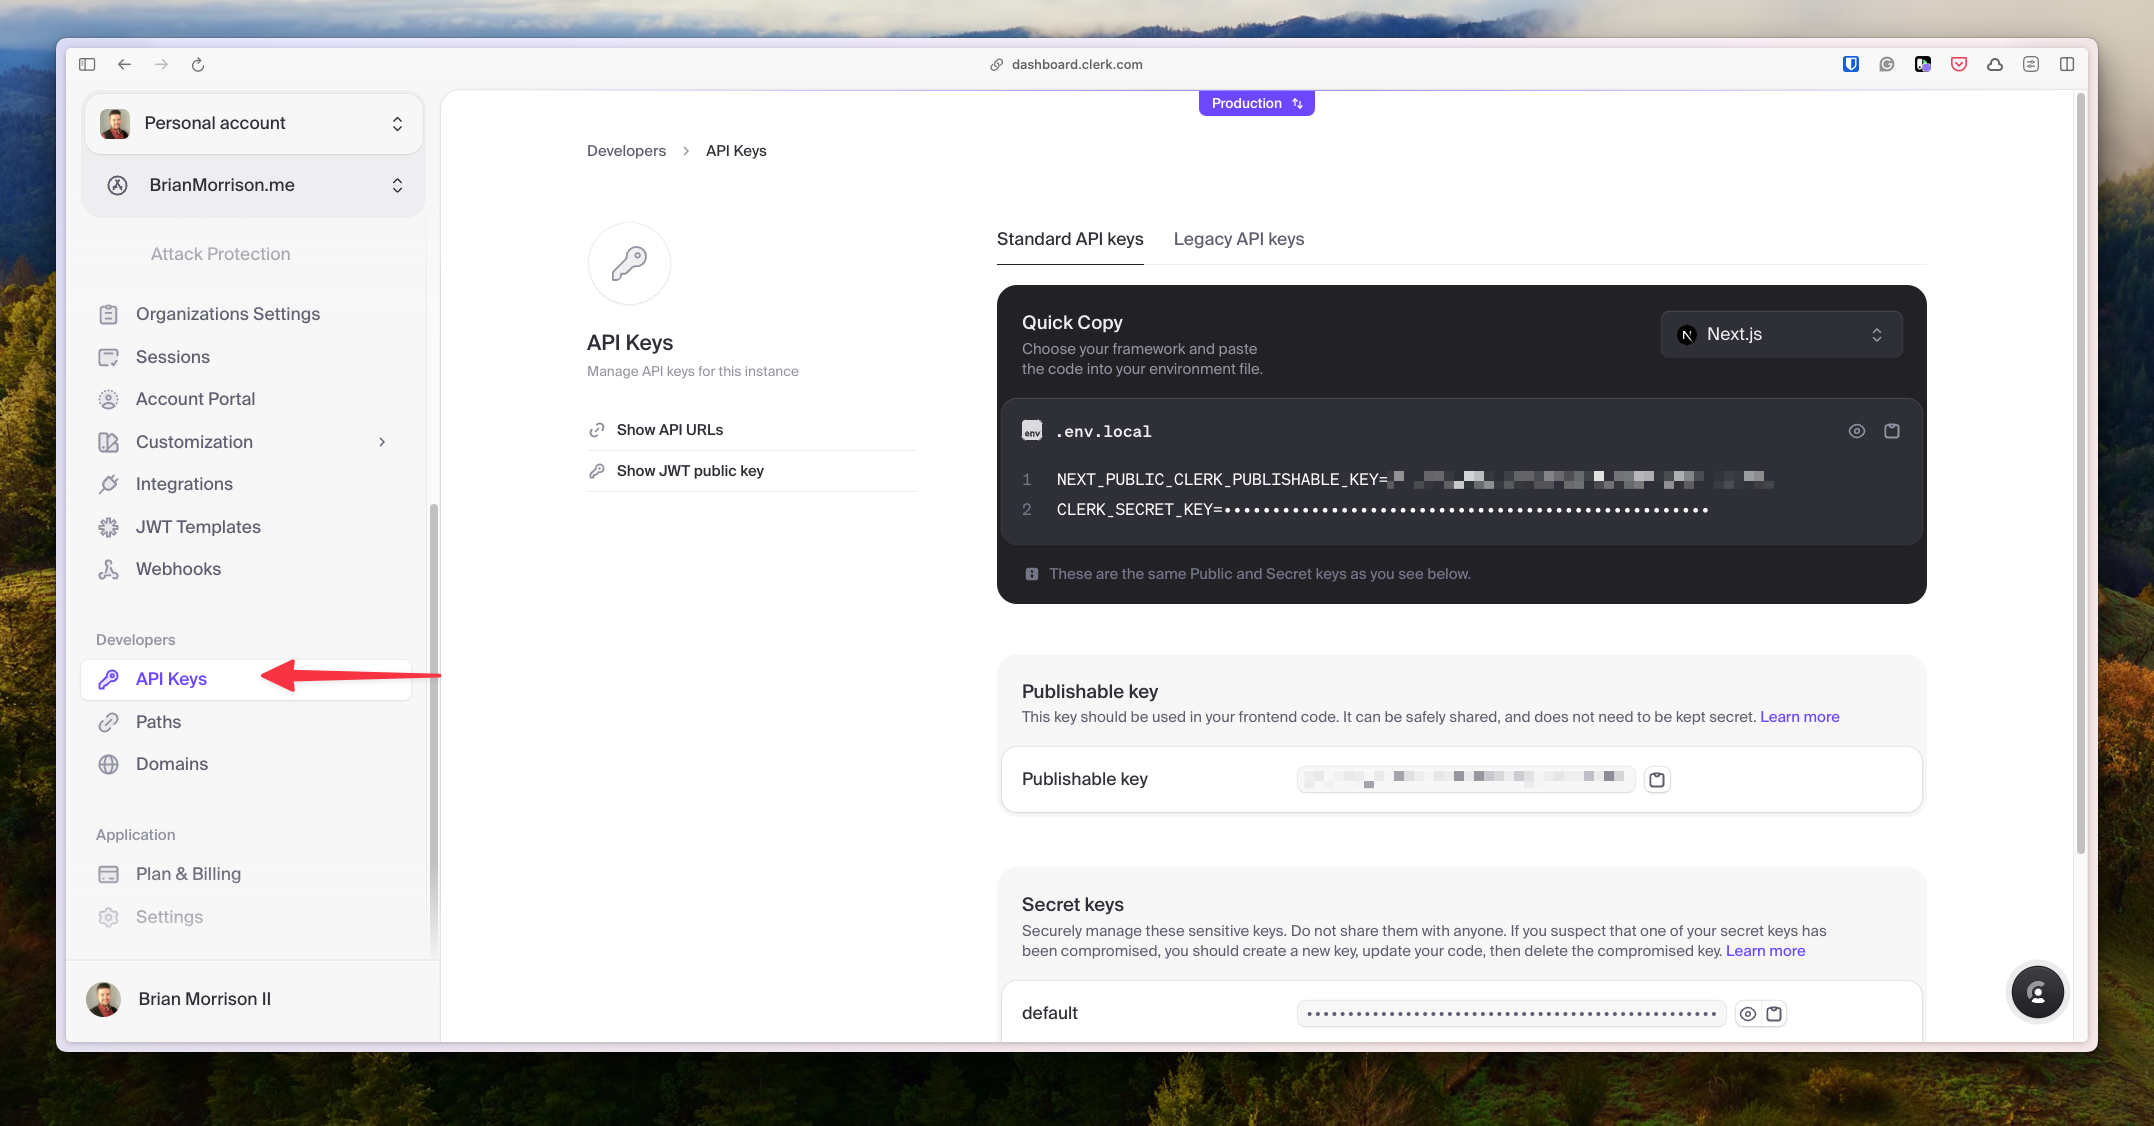
Finally, I needed to grab the publishable key, secret key, and JWKS URI, all of which are in the API Keys section. These will be used in the next few sections.
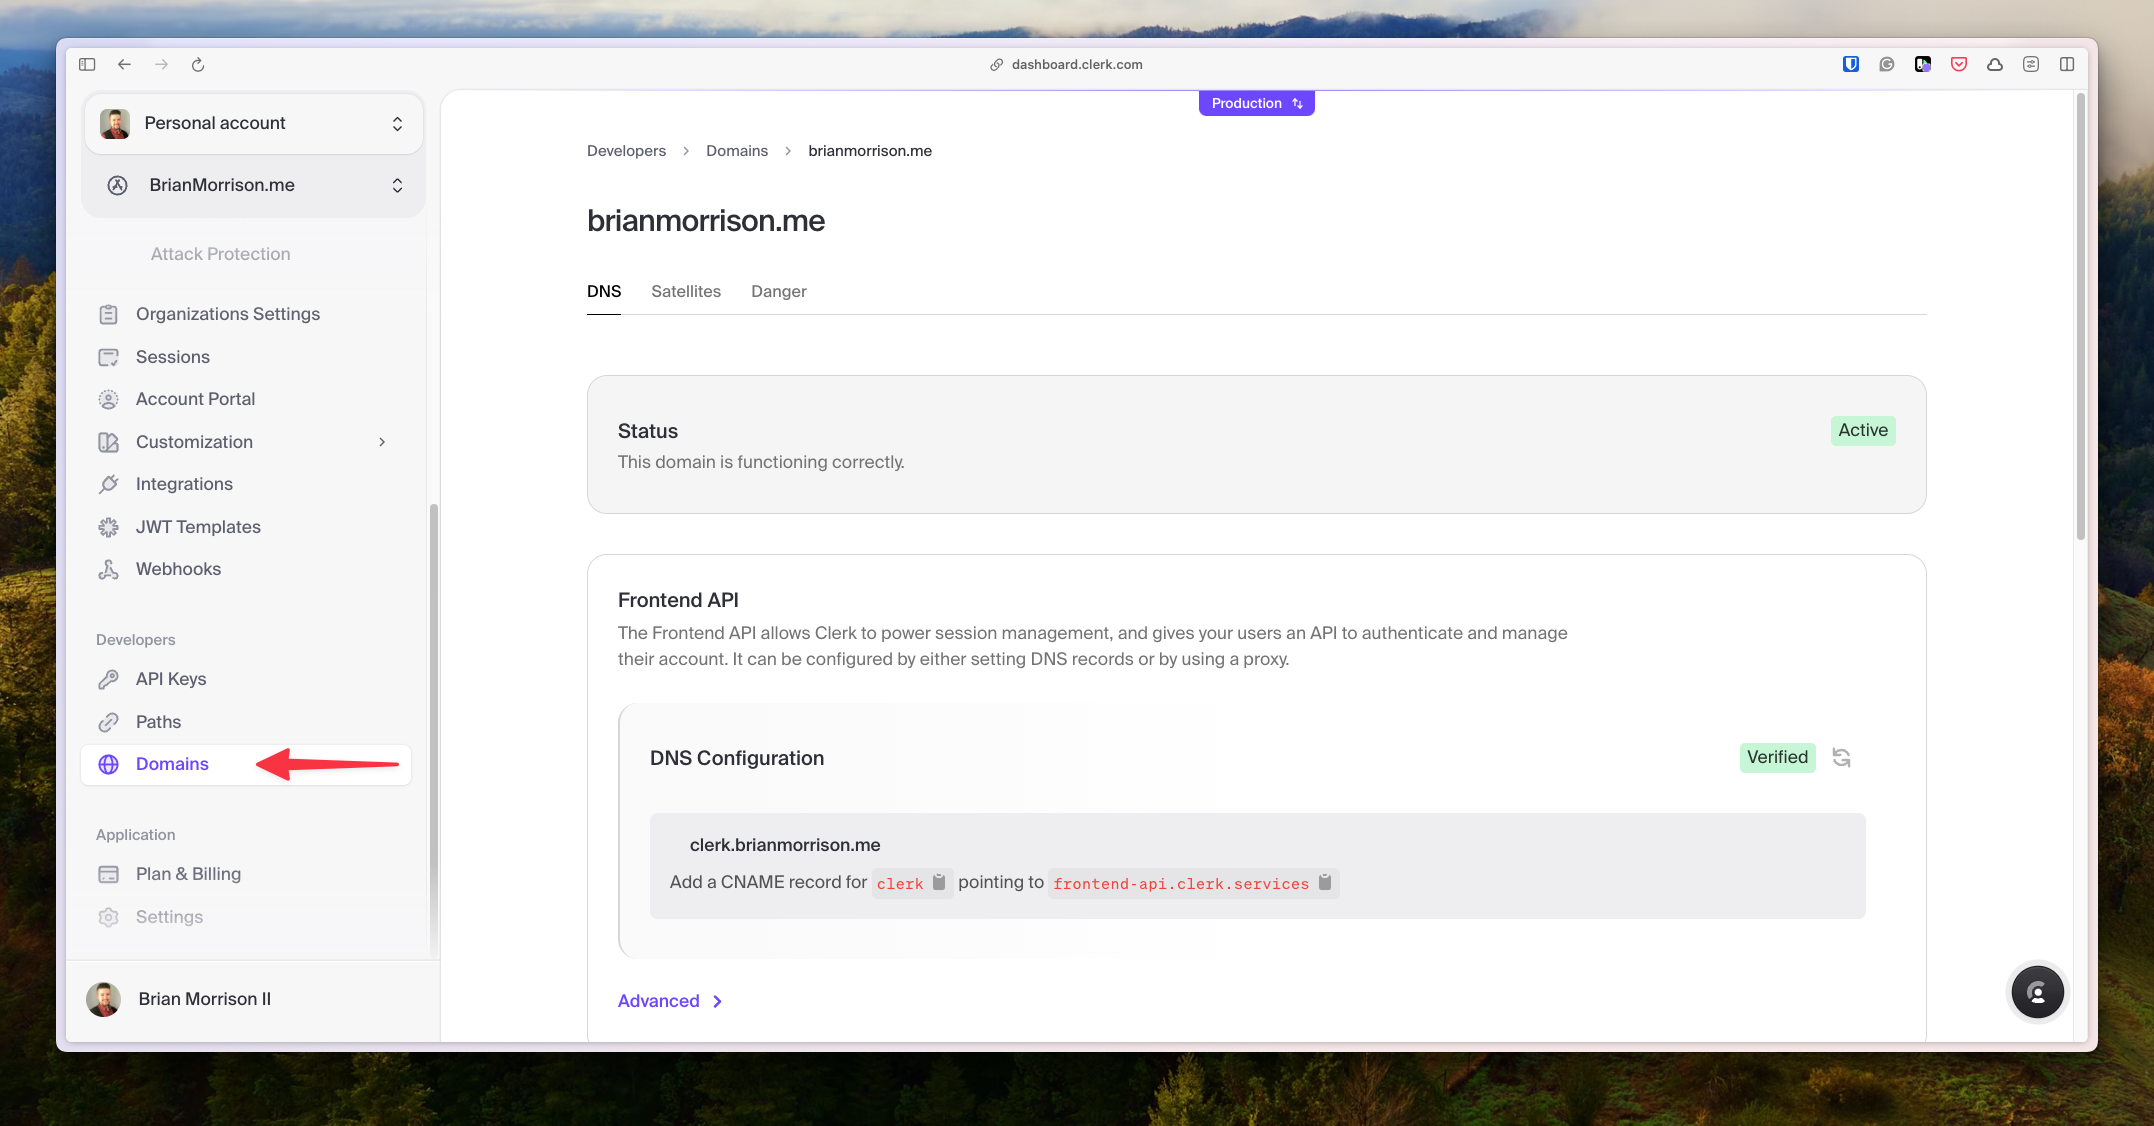
Next I needed to add a few DNS records to my registrar. Each registrar is very different, so I wont walk through the specifics, but all of the required records are detailed in the Domains section.
GitHub Actions
First off, I needed to apply any schema changes to the main branch in Neon, so I added the connection string for that branch to the DATABASE_URL Actions secret for the workflow. Then I added a new step into .github/workflows/deploy-prod.yaml to apply schema changes to the production branch in Neon.
name: Deploy prod

on:
  workflow_dispatch:
  push:
    branches:
      - main
    paths:
      - website/**.*

jobs:
  deploy:
    runs-on: ubuntu-latest
    steps:
      - uses: actions/checkout@v3
      - uses: actions/setup-node@v3
        with:
          node-version: 18
      - name: Install Netlify CLI
        run: npm install -g netlify-cli
      - name: Install deps
        run: |
          cd website
          npm install
      - name: Apply schema changes # This step was added
        run: |
          cd website
          npm run db:push
        env:
          DATABASE_URL: ${{ secrets.DATABASE_URL }}
      - name: Deploy
        run: |
          cd website
          npm run deploy:prod
        env:
          NETLIFY_AUTH_TOKEN: ${{ secrets.NETLIFY_AUTH_TOKEN }}
          NETLIFY_SITE_ID: ${{ secrets.NETLIFY_SITE_ID }}
          GATSBY_CLERK_PUBLISHABLE_KEY: ${{ secrets.GATSBY_CLERK_PUBLISHABLE_KEY }}
      - name: Create PostHog annotations
        run: |
          cd tools/posthog-annotator
          go mod tidy
          go run .
        env:
          PH_PROJECT_ID: ${{ secrets.PH_PROJECT_ID }}
          PH_API_KEY: ${{ secrets.PH_API_KEY }}
          NOTION_TOKEN: ${{ secrets.NOTION_TOKEN }}
          NOTION_CMS_DBID: ${{ secrets.NOTION_CMS_DBID }}
Now whenever this workflow runs, the database changes will be pushed into Neon automatically. I also added the GATSBY_CLERK_PUBLISHABLE_KEY Actions secret and am referencing the production publishable key in this workflow.
Netlify
The last step was to update the production version of the environment variables in Netlify. Navigating to the same section as detailed above, I can edit an environment variable and opt to use a different value for each deploy context.
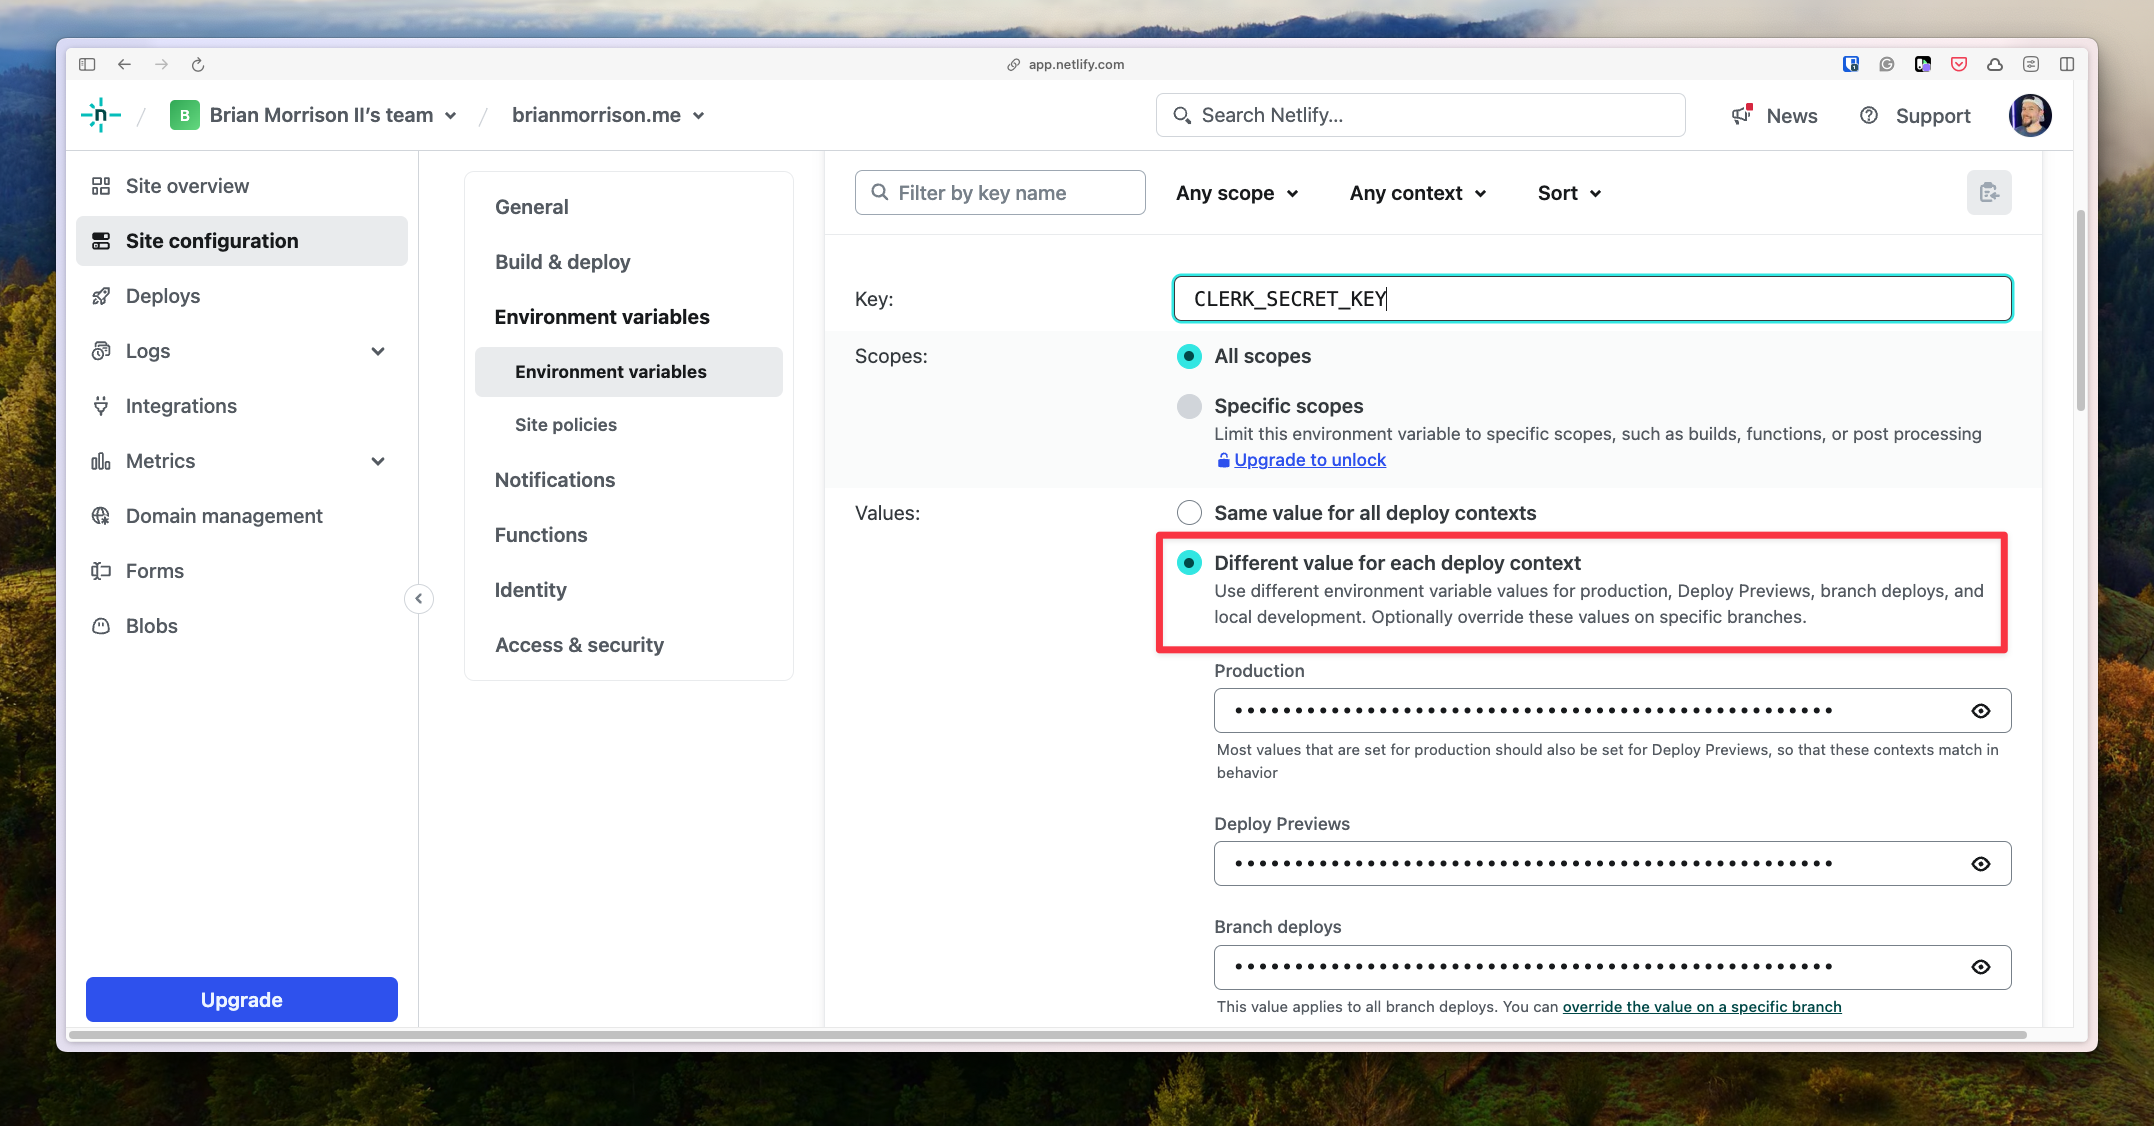
Updating the CLERK_SECRET_KEY, JWKS_URI, and DATABASE_URL made the production deploy of my website use the production resources.
The result
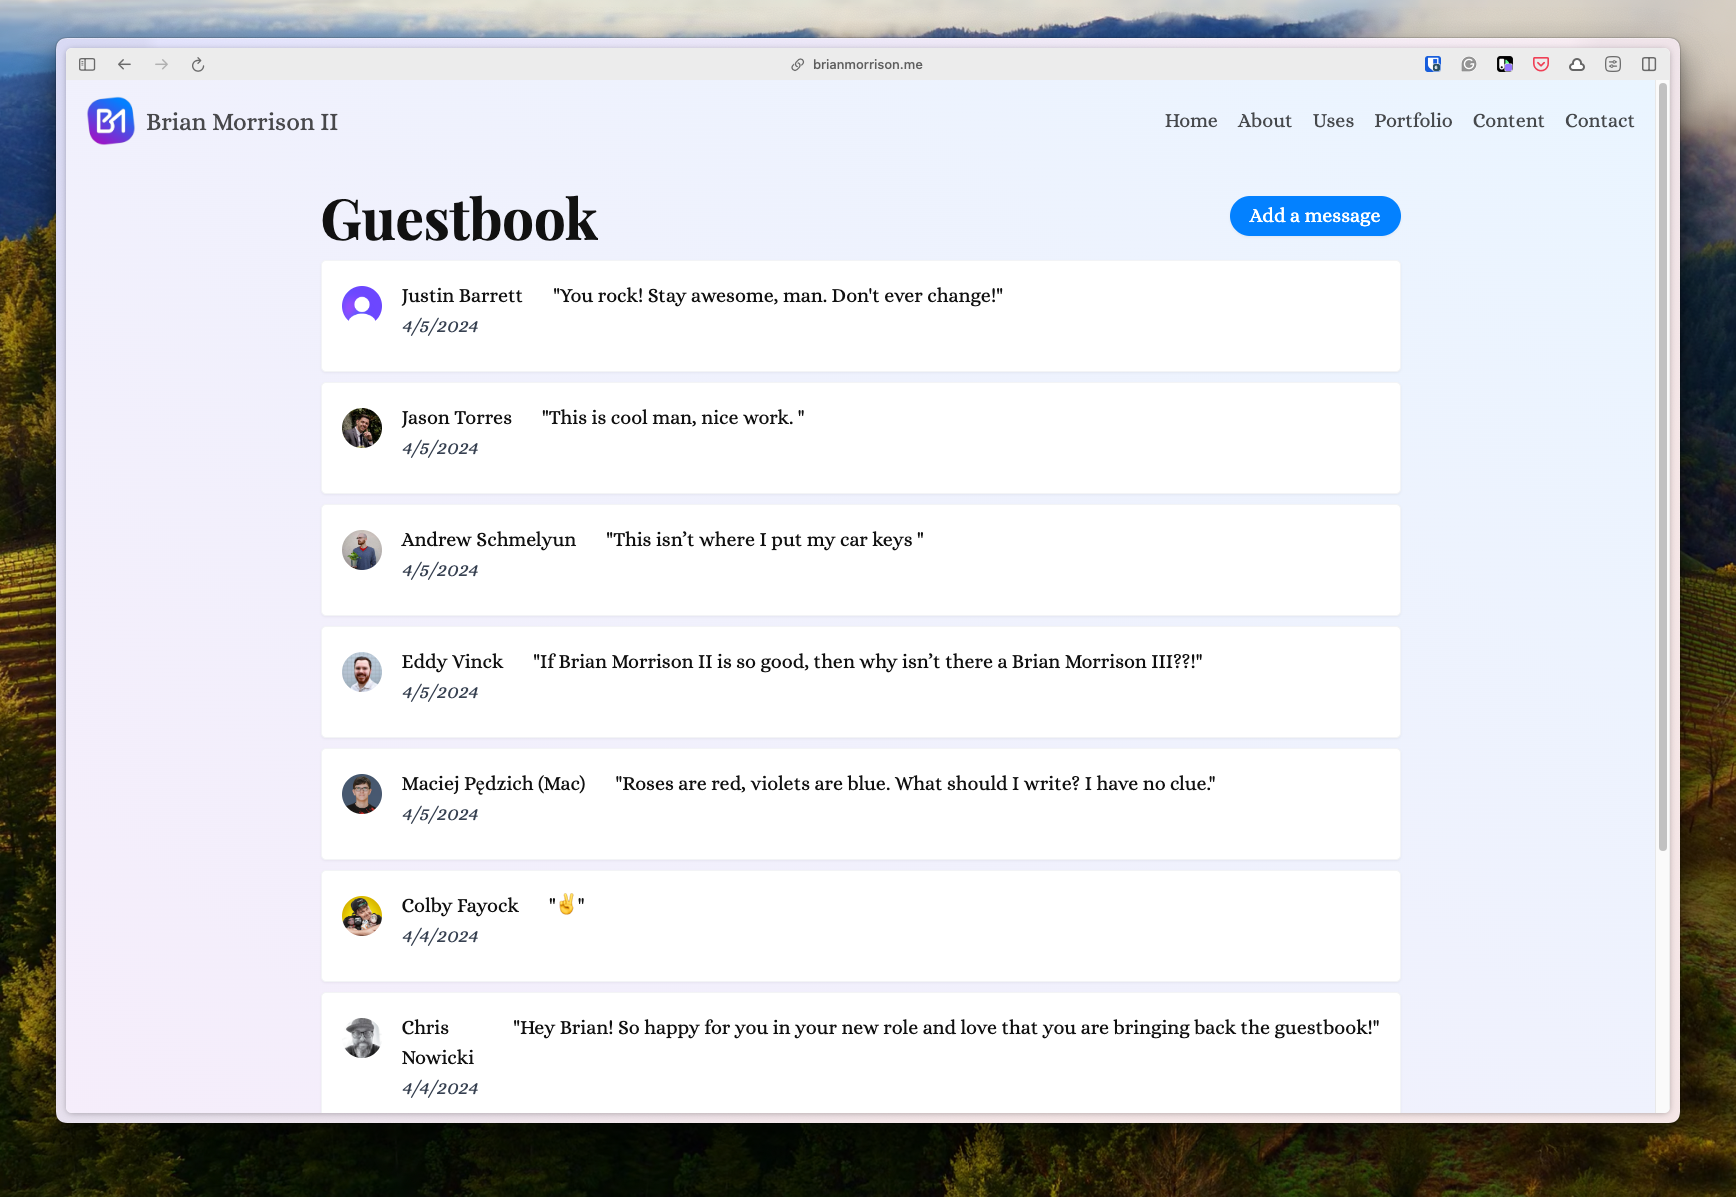
At the end of all this, I can now have random (yet signed in) people leave messages on my website for everyone to read!
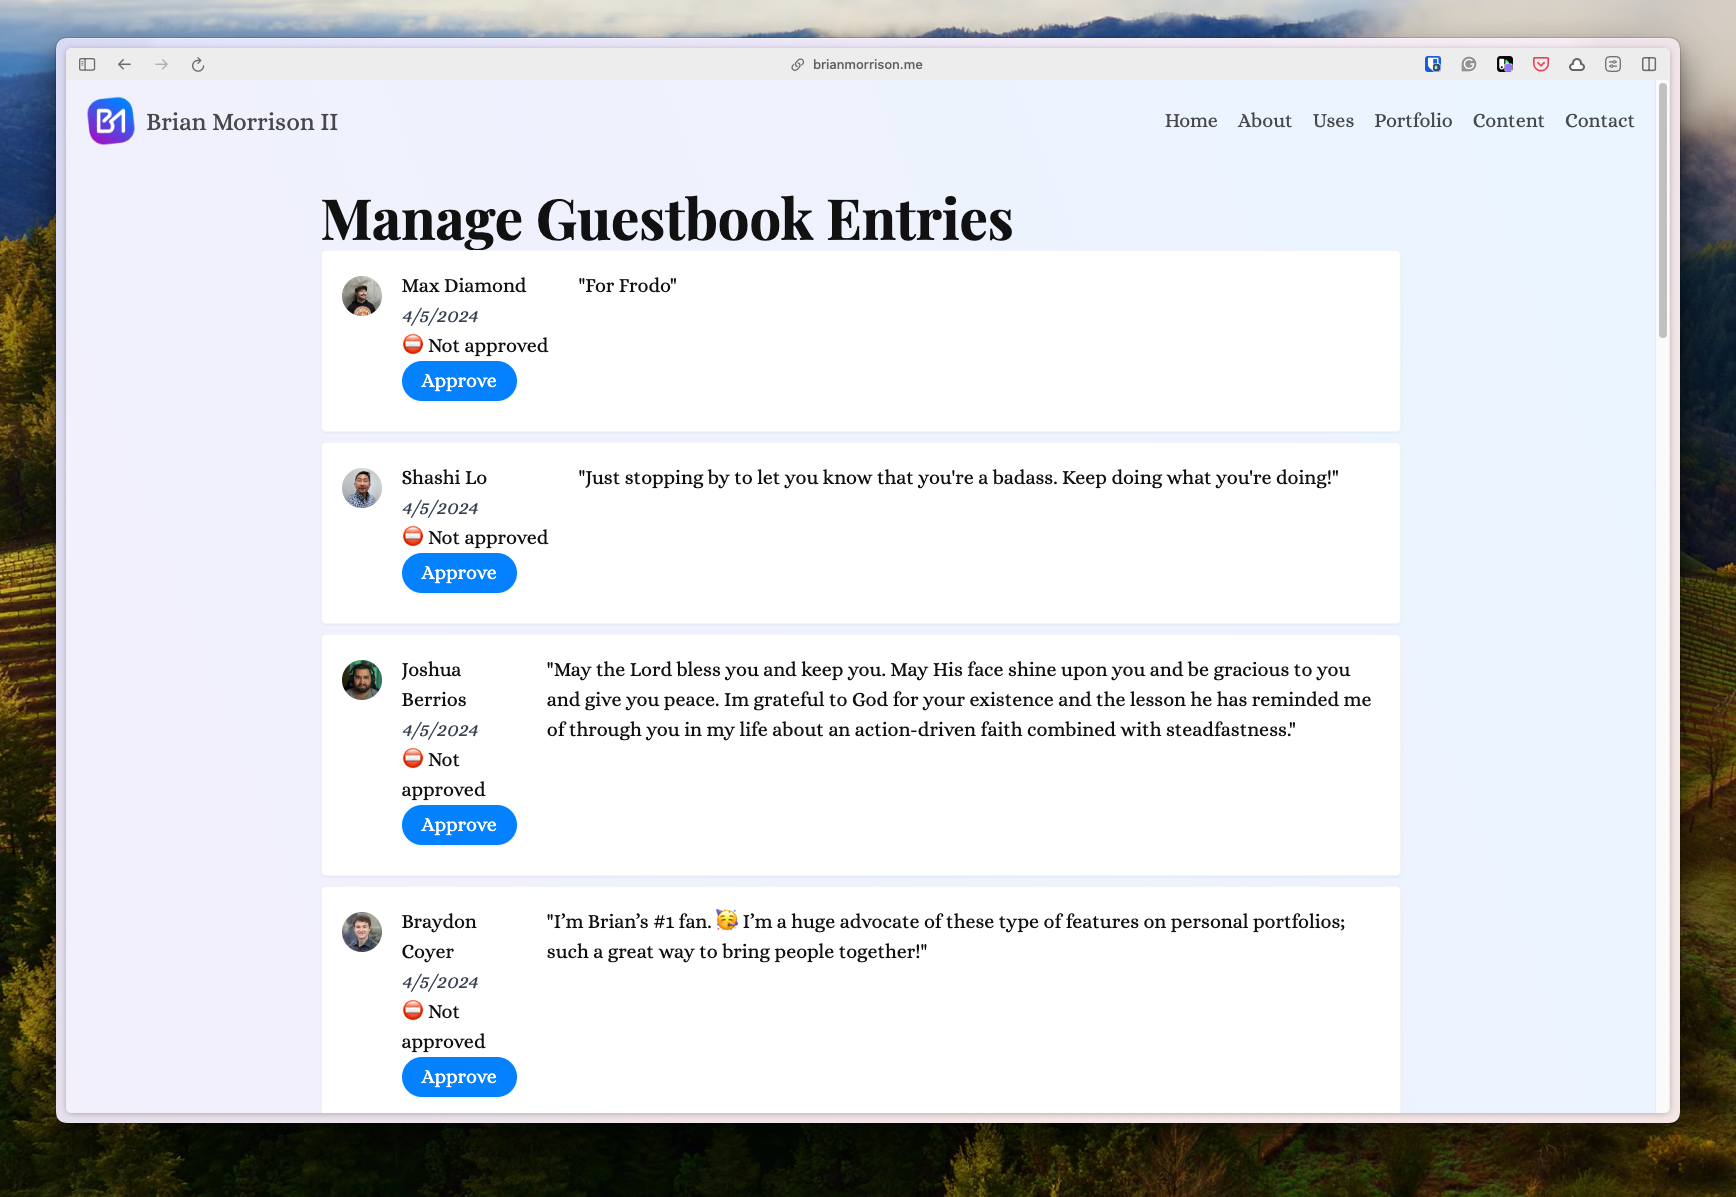
I can also manage entries to make sure nothing bad ends up on my site.
If you enjoyed this article, you might also like my friend Felix’s guide on adding a subscription wall to his blog with Clerk, ContentLayer, and Next.