It’s hard to believe that in a few short days, the old Diamond system of subclasses in Destiny will be no more. While it’s a welcome update for sure, It’s a tad bittersweet for me. Recreating the Diamond in GuardianForge was one of my favorite React components I’ve built so far. That said, I figure it’s a great time to walk through exactly how I did it.
Background
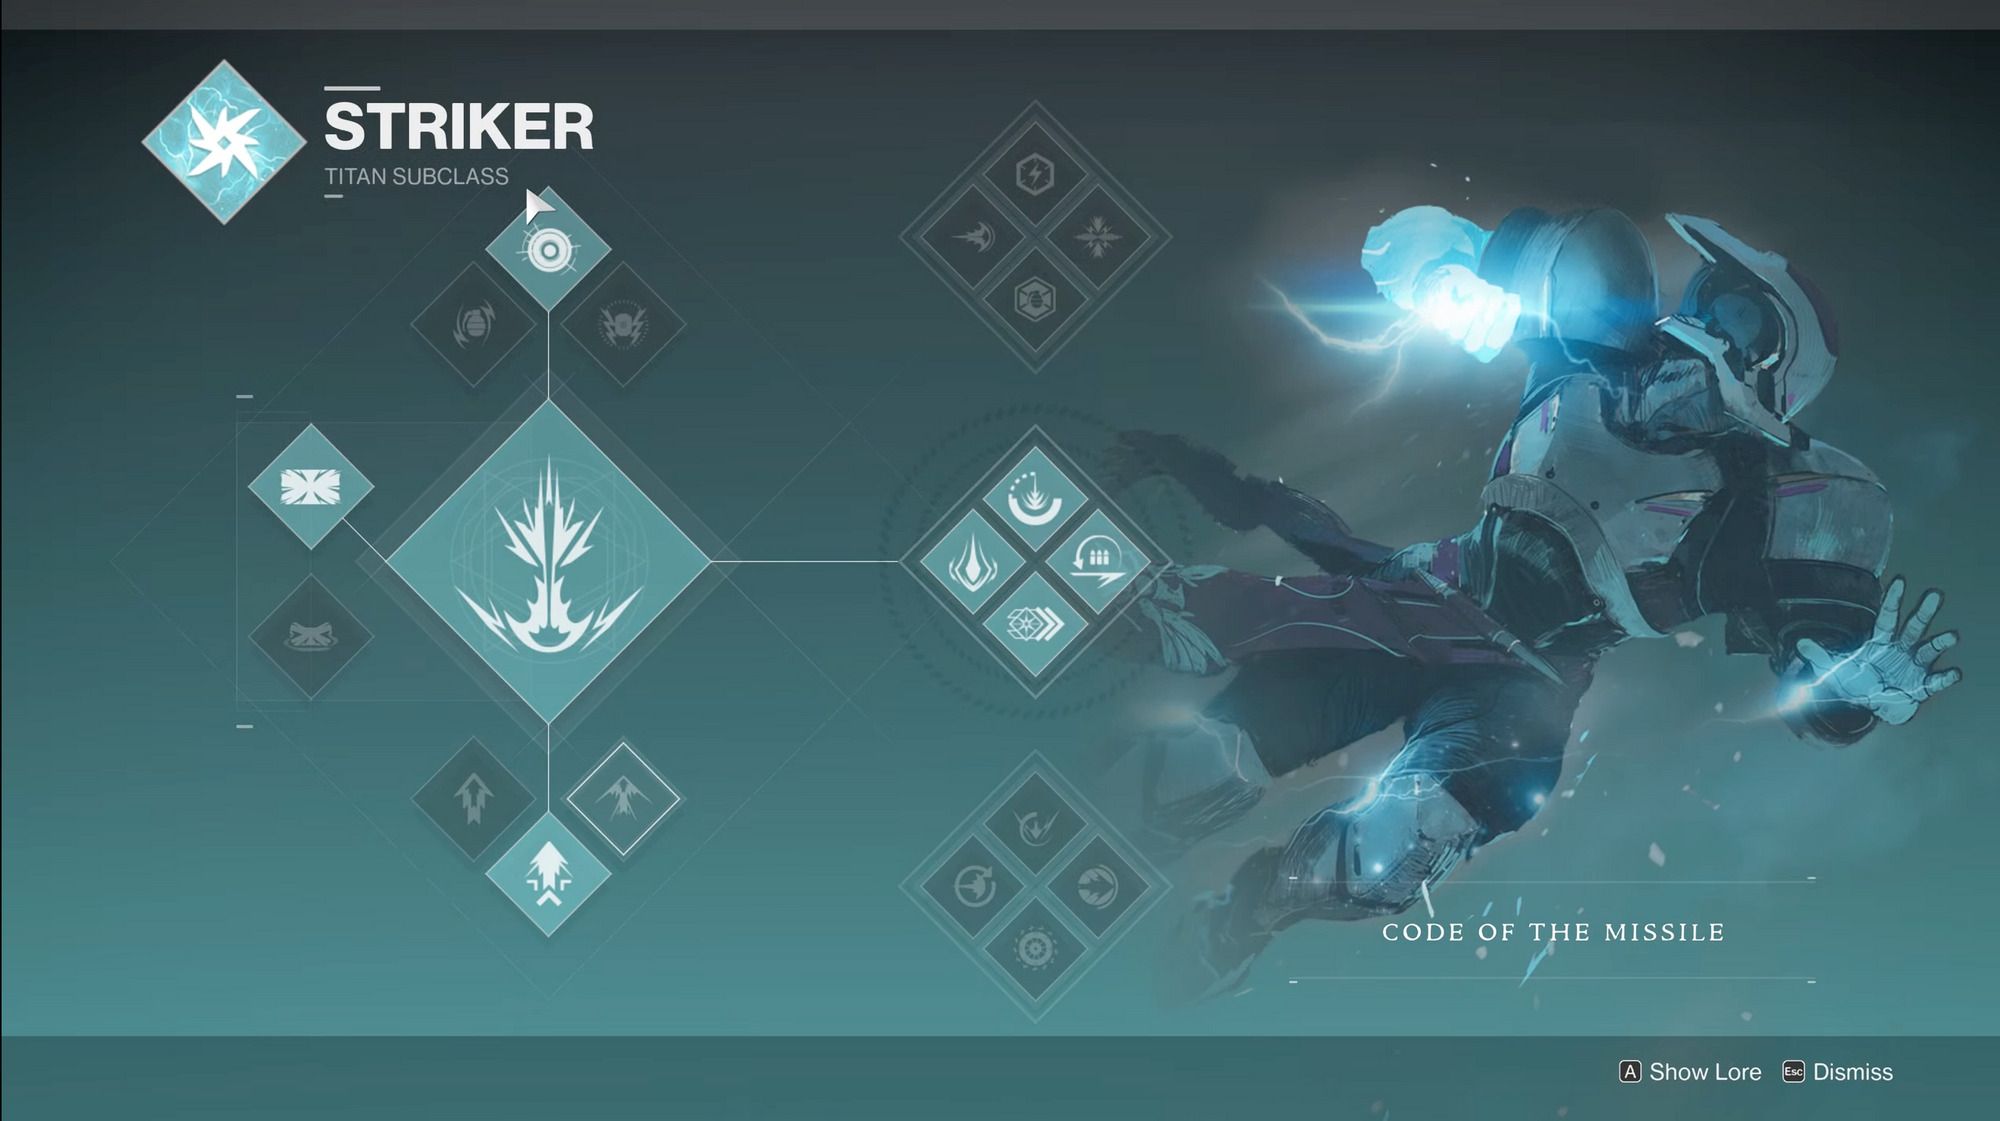
When Destiny 2 dropped, a new subclass system was introduced with preset perks and abilities based on the node that you selected. Each of the tree nodes had 4 abilities associated with them that slightly modified the way your Guardian played.
Building the component
What I wanted to do from the start was recreate this UI in Forge, but in a dynamic way. When I pull data from the Destiny 2 API, I restructure it in a way so the data makes more sense in the context of the app. Here is what is used by GuardianForge:
"superConfig": {
"bgUrl": "https://www.bungie.net/common/destiny2_content/screenshots/2958378809.jpg",
"characterIconUrl": "https://www.bungie.net/common/destiny2_content/icons/18271c5f07ee2b6fee985ae3d8c98f8a.png",
"grenade": {
"iconUrl": "https://www.bungie.net/common/destiny2_content/icons/3b515e2617bffe787c0246452153c105.png",
"name": "Pulse Grenade"
},
"movement": {
"iconUrl": "https://www.bungie.net/common/destiny2_content/icons/20908fe8f75e22c51e671e9bc59b7429.png",
"name": "Strafe Lift"
},
"specialty": {
"iconUrl": "https://www.bungie.net/common/destiny2_content/icons/340974e10bb9d66b62ed2b0c16c13377.png",
"name": "Towering Barricade"
},
"super": {
"iconUrl": "https://www.bungie.net/common/destiny2_content/icons/685c6dfff805f96371186527487e8440.png",
"name": "Fists of Havoc"
},
"damageType": 2,
"tree": 3,
"treeNodes": [
{
"iconUrl": "https://www.bungie.net/common/destiny2_content/icons/e830b703ce61734c0c30d76d300feede.png",
"name": "Thundercrash"
},
{
"iconUrl": "https://www.bungie.net/common/destiny2_content/icons/8dbf5577e35a541d34b8c1c4f3a85a67.png",
"name": "Ballistic Slam"
},
{
"iconUrl": "https://www.bungie.net/common/destiny2_content/icons/42d362d80b5c68ff248481e158b46371.png",
"name": "Impact Conversion"
},
{
"iconUrl": "https://www.bungie.net/common/destiny2_content/icons/f29e153cf76cd27ef74d3e4bae112b1c.png",
"name": "Inertia Override"
}
],
"treeTitle": "Code of the Missile"
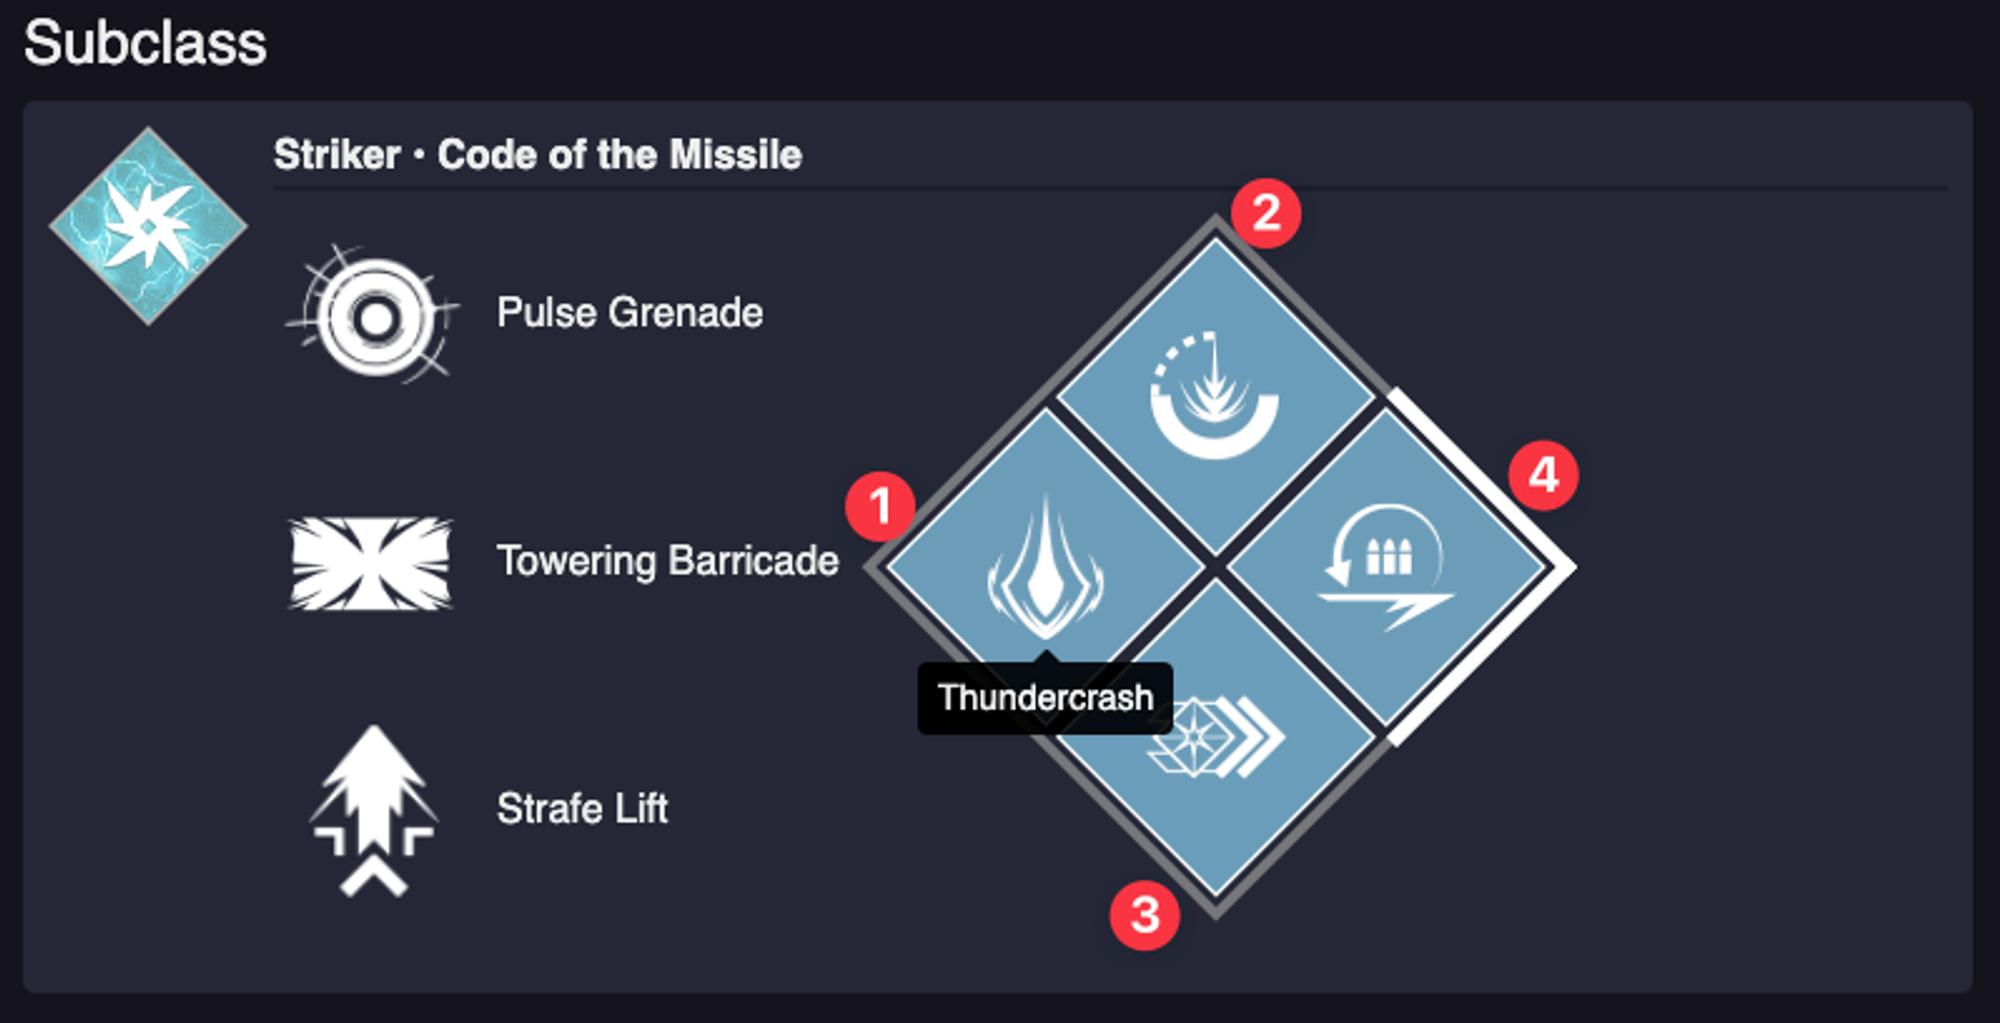
}And here is how it is rendered in the component. Hovering over an icon in the diamond shows its name, so you can see the leftmost perk in the diamond correlates with the first element of the treeNodes array, with each element being rendered in the order displayed in the image below.
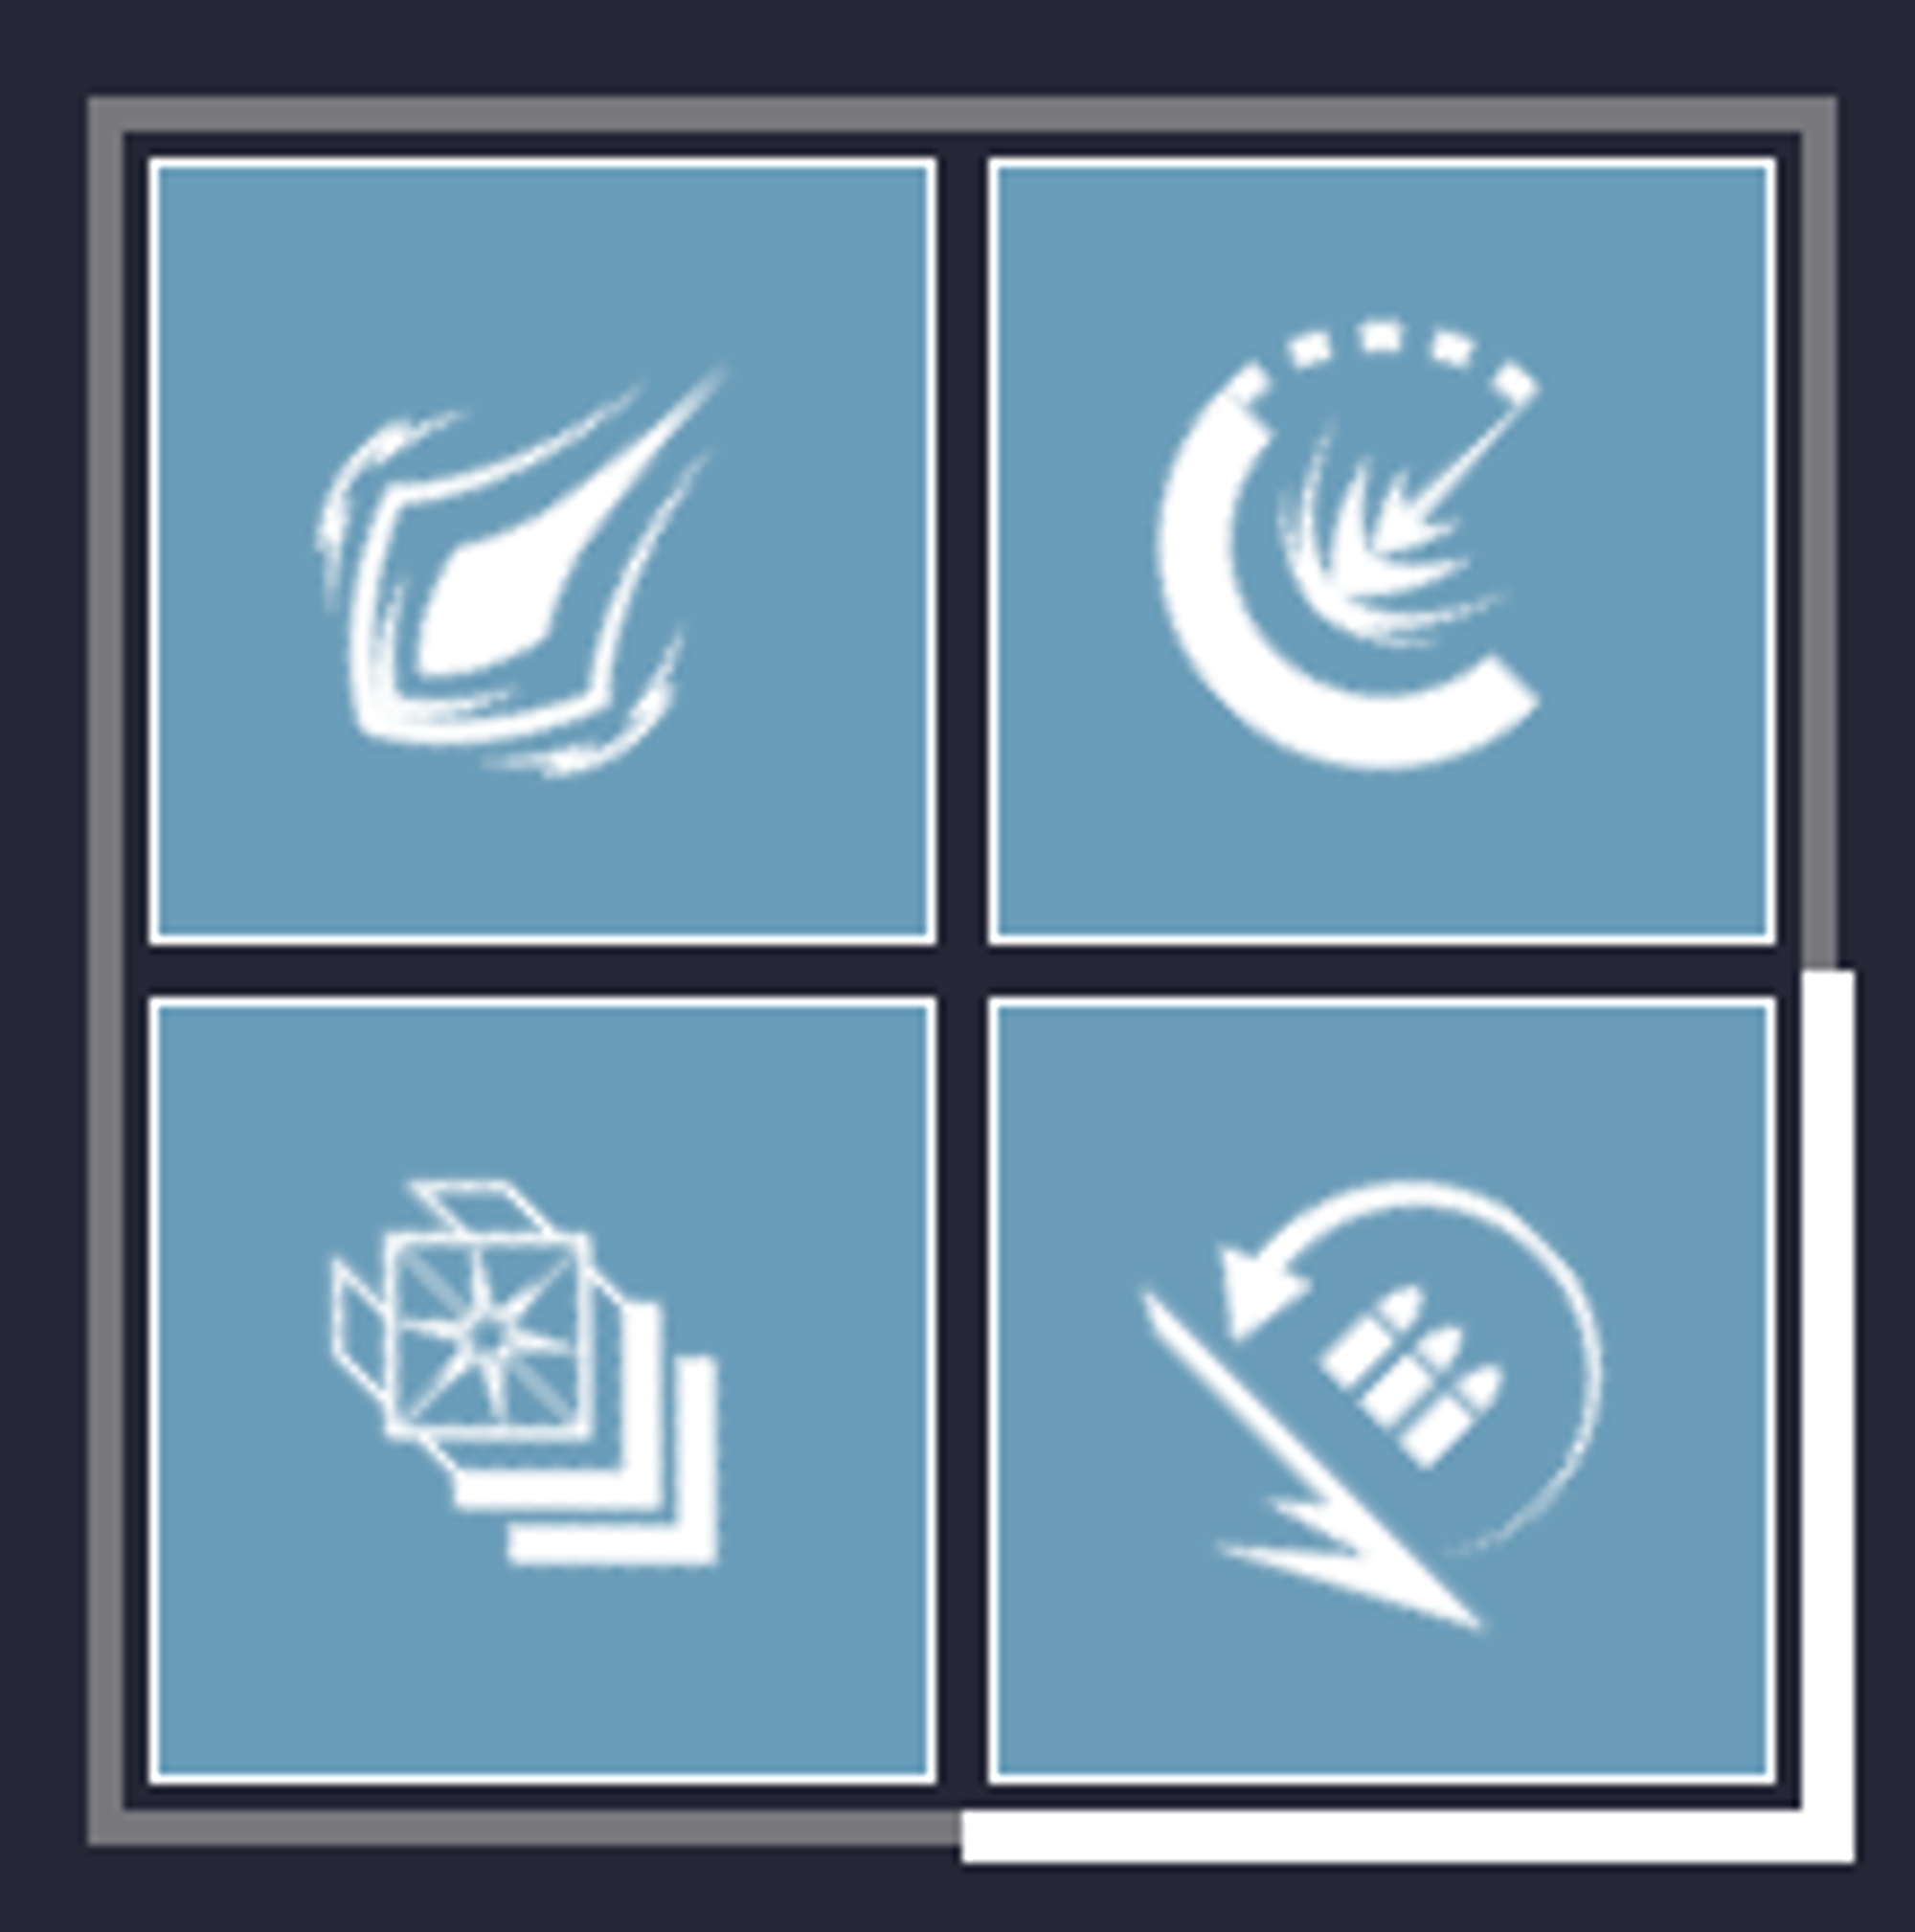
What you are seeing above is a CSS grid that is rotated 45 degrees counter-clockwise. If I remove the CSS that applies the rotation, it looks like this. You can also see that I apply a 45-degree clockwise rotation to the images that are rendered inside each node of the diamond. This makes the properly vertical when the rotation is applied to the surrounding grid.
.tree-diamond {
    transform: rotate(-45deg);
    display: grid;
    grid-template-columns: repeat(2, 1fr);
    grid-template-rows: repeat(2, 1fr);
    grid-column-gap: 0px;
    grid-row-gap: 0px;
    height: 200px;
    width: 200px;
    border: 4px solid rgba(150,150,150,0.7);
}
Each box inside the diamond is actually a flexbox with a bit of padding on it. Now one thing I wanted to do is use a thicker border to denote which subclass tree (top, middle, or bottom) is selected. This is why node 4 has a thicker border to the bottom and right of the flexbox.
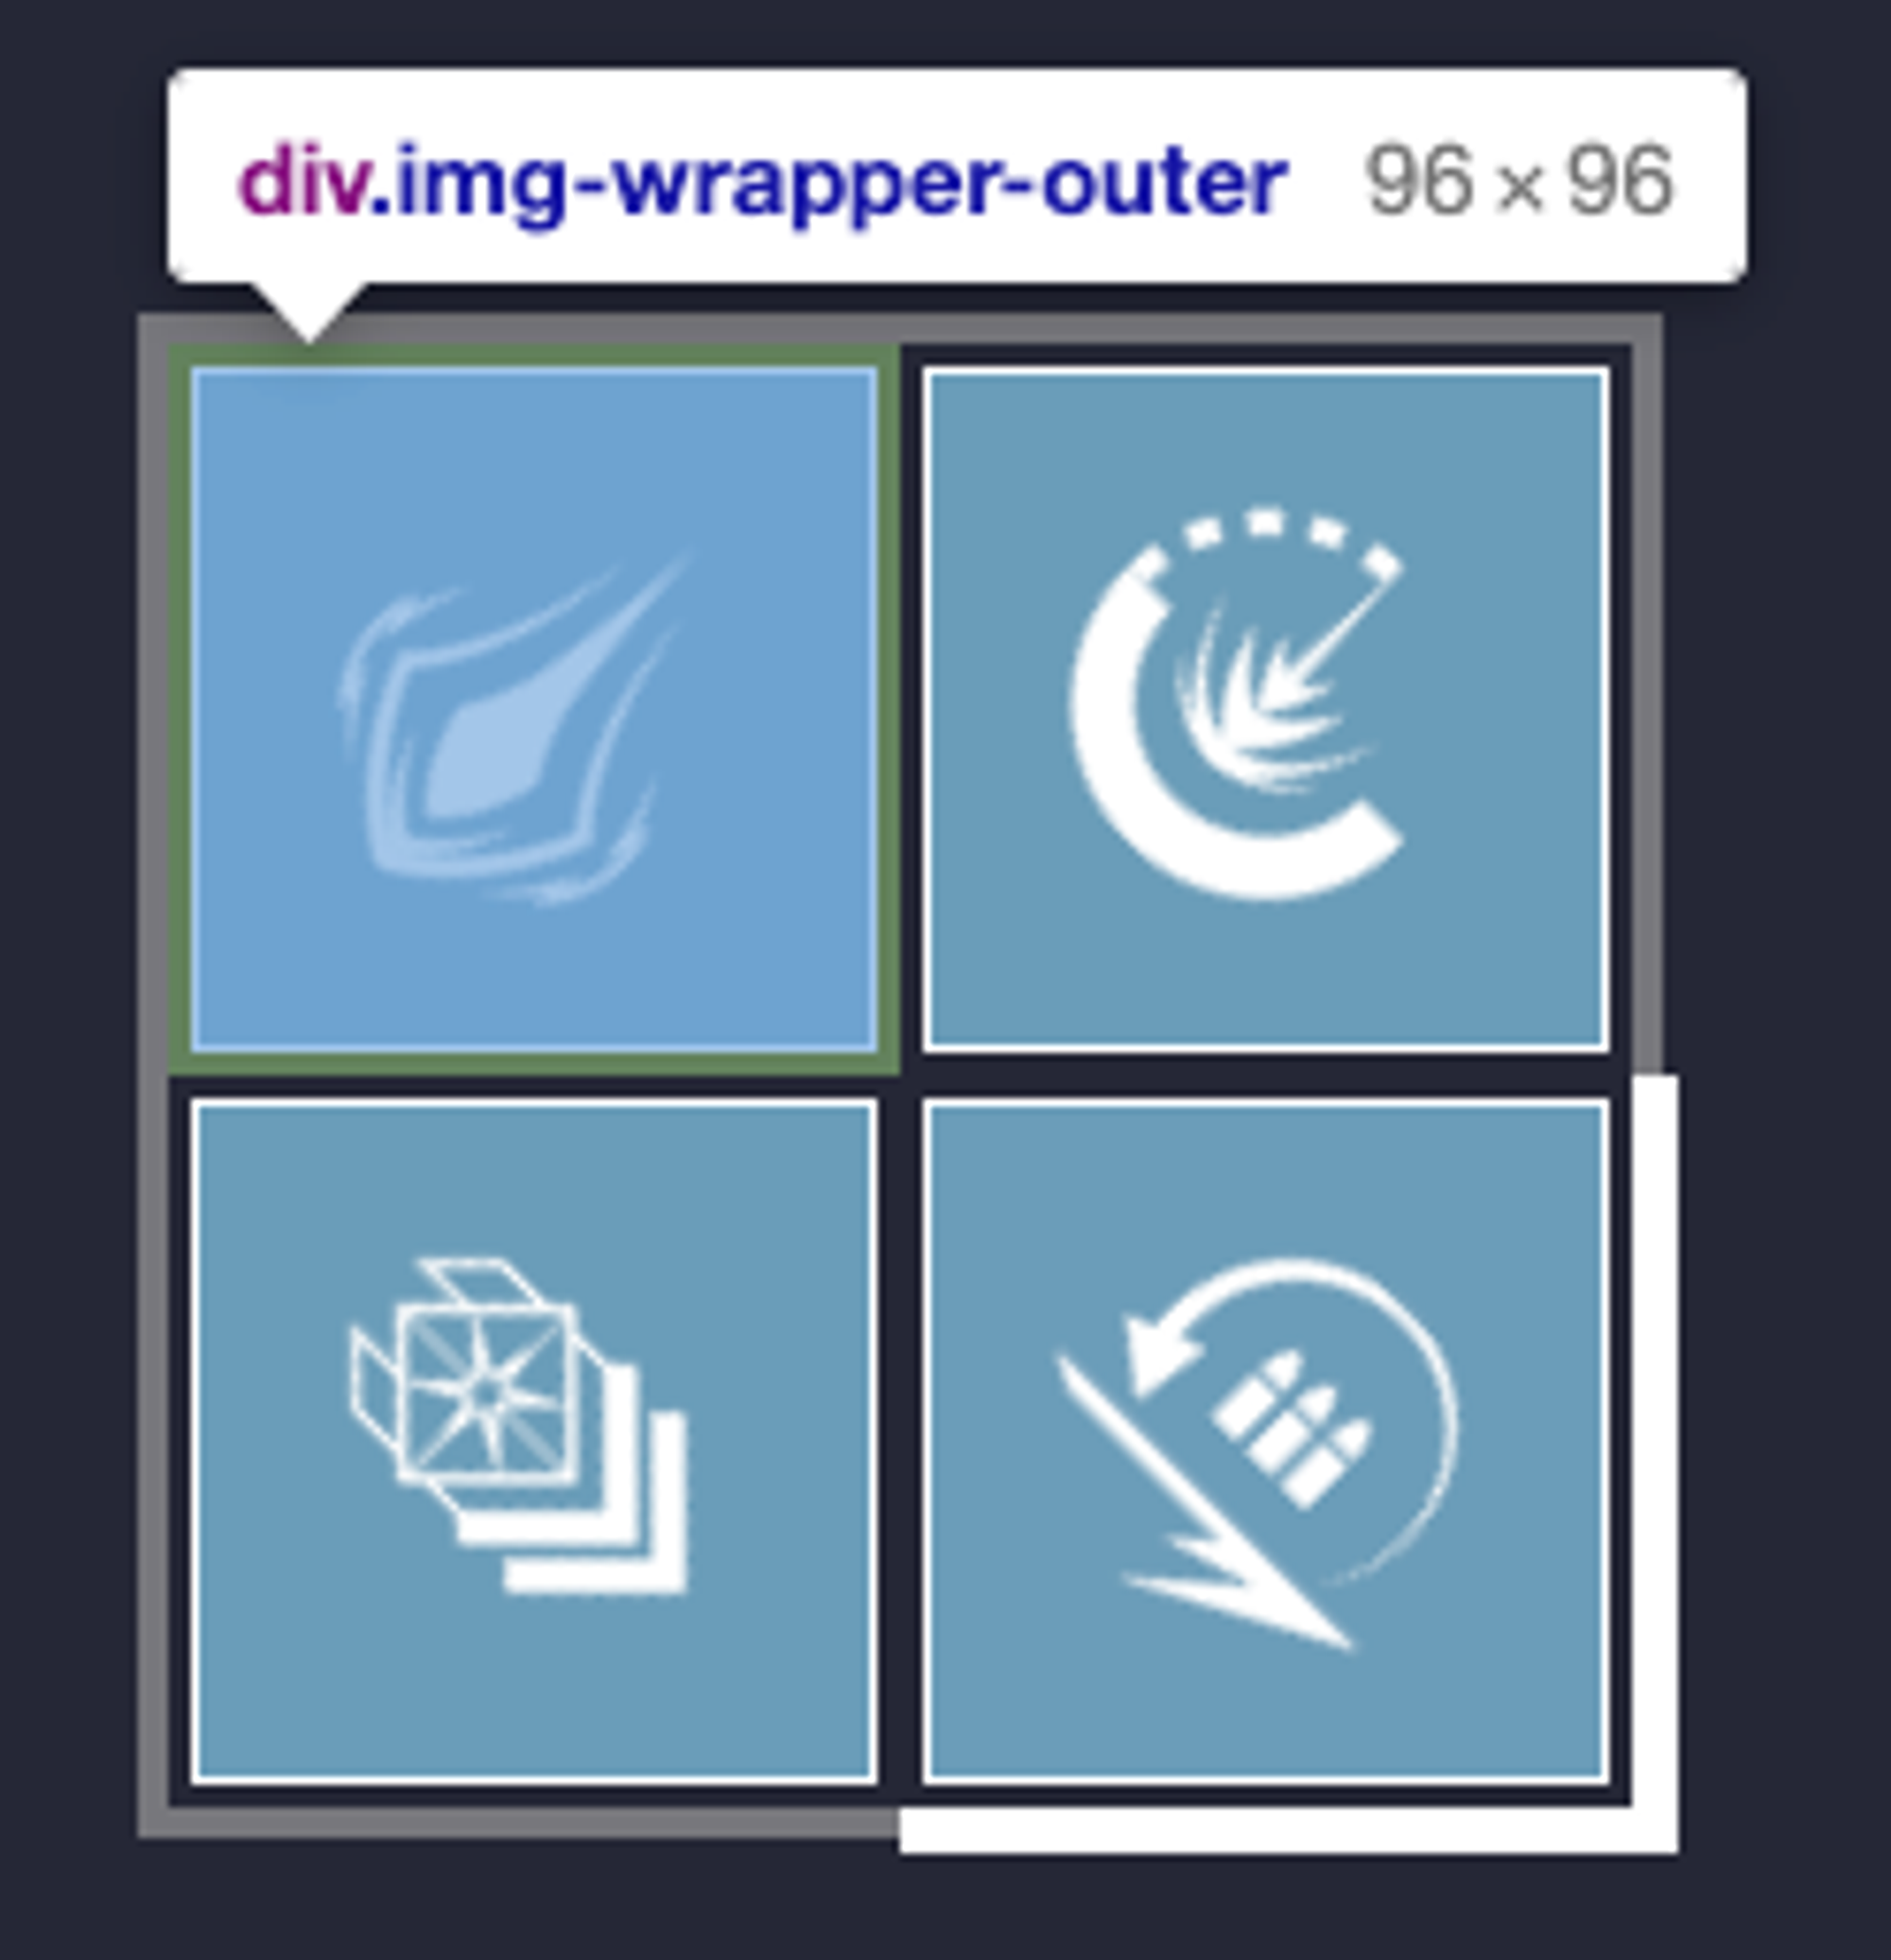
When the rotation is applied, notice how the box points to the right to show that the middle tree Striker subclass is applied. Here is another example, the bottom tree Sunbreaker class. Notice how the thicker border points downward.

So by applying all these techniques using the code below, the V2SuperTree component dynamically renders the correct element type, selected tree, and perks by using the data pulled from the Destiny 2 API.
function V2SuperTree(props: Props) {
  const { className, tree, affinity, hideName, onClick, selected } = props

  return (
    <Wrapper className={className}>
      {!hideName && <span>{tree.name}</span>}
      <div className={tree-diamond ${onClick ? 'tree-diamond-clickable' : ""} ${selected ? "tree-diamond-selected" : ""}}
        onClick={onClick ? () => onClick(tree) : undefined}>
        {tree.perks && tree.perks.map((p: any, idx: number) => (
          <div key={tree-${tree.pos}-${idx}} className={img-wrapper-outer ${tree.pos === idx ?img-wrapper-outer-${idx} : ""}}>
            <div className={img-wrapper img-wrapper-${affinity}}>
              <OverlayTrigger
                placement="bottom"
                delay={{ show: 250, hide: 400 }}
                overlay={<Tooltip>{ p.name }</Tooltip>}>
                <img src={p.icon.startsWith("http") ? p.icon :https://www.bungie.net${p.icon}} />
              </OverlayTrigger>
            </div>
          </div>
        ))}
      </div>
    </Wrapper>
  )
}
If you want to review the source you can find it in the public GuardianForge repo.