The API we’ve built so far in this series is only a single route, but that route is pretty robust for what it is. But do you really want everyone in the world to be able to add books to the database? Probably not. This is where authentication comes into play. By adding authentication, we can restrict usage of our API to only the people we want. Today we’ll be adding AWS Cognito into our API to prevent unauthorized access of our POST /books handler.
Setting Up Cognito
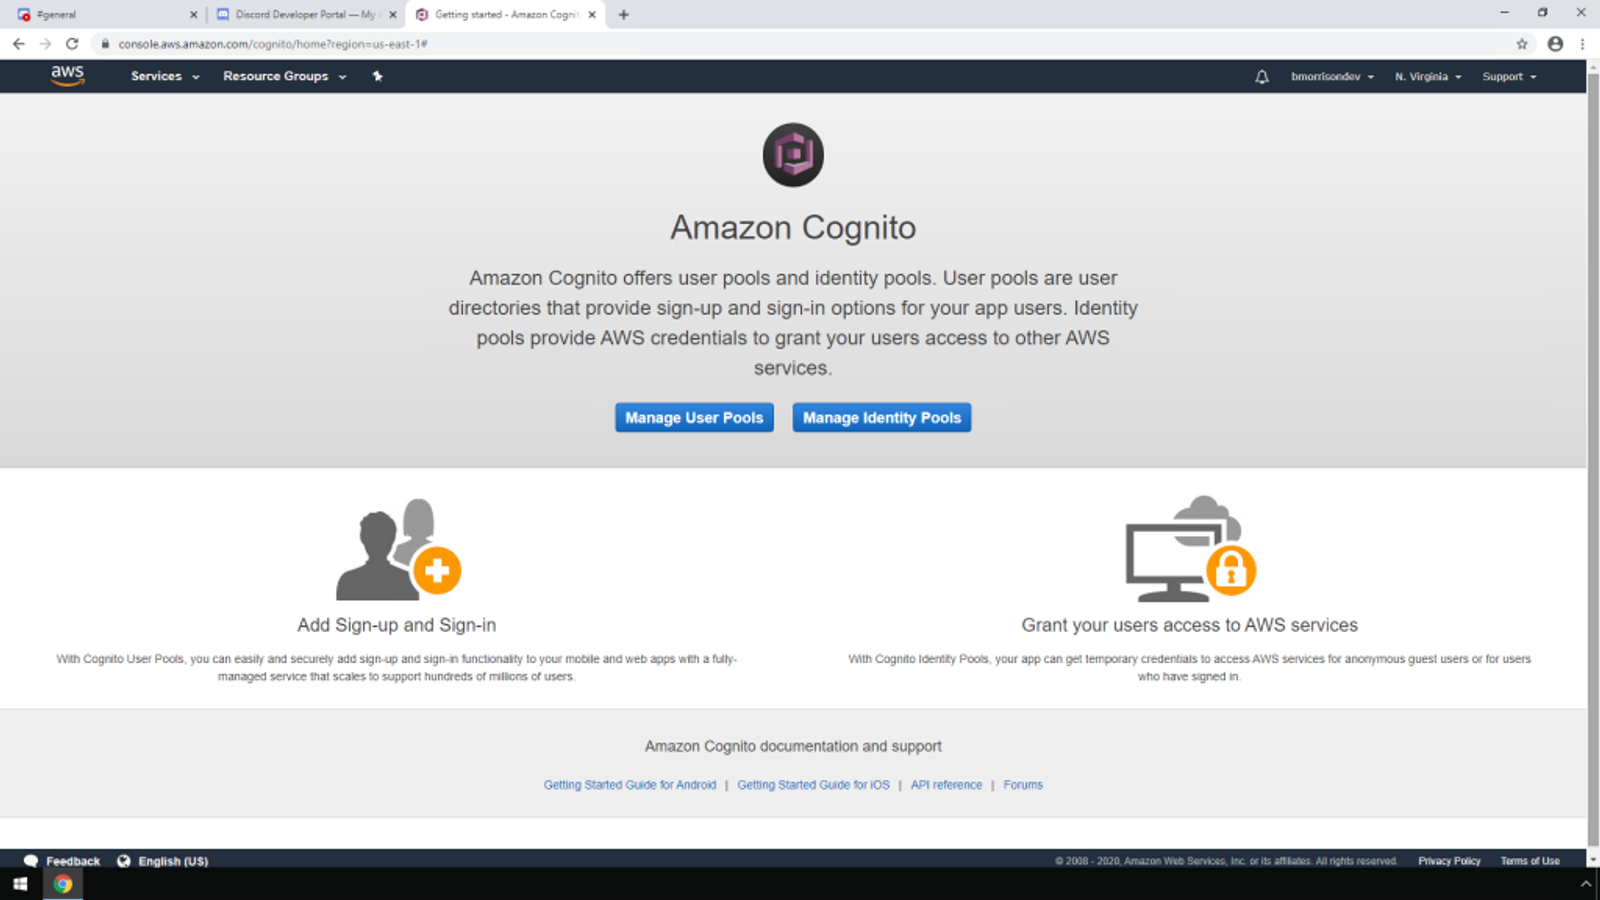
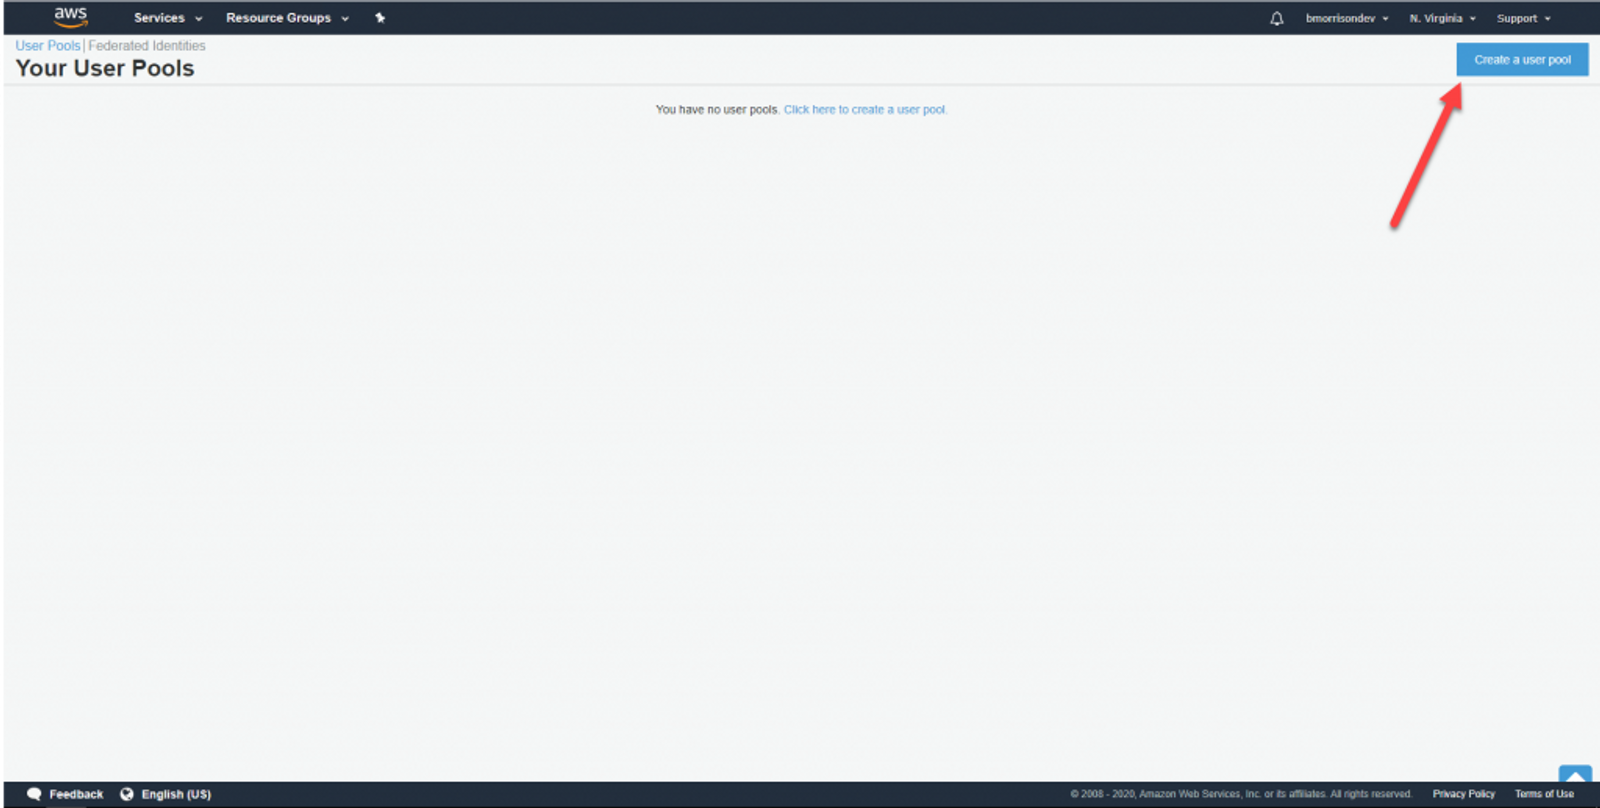
In the AWS Console, open up Service, then Cognito under Security, Identity, & Compliance. We need to create a User Pool to let our users sign in. Click on Manage User Pools, then Create a user pool in the upper right.
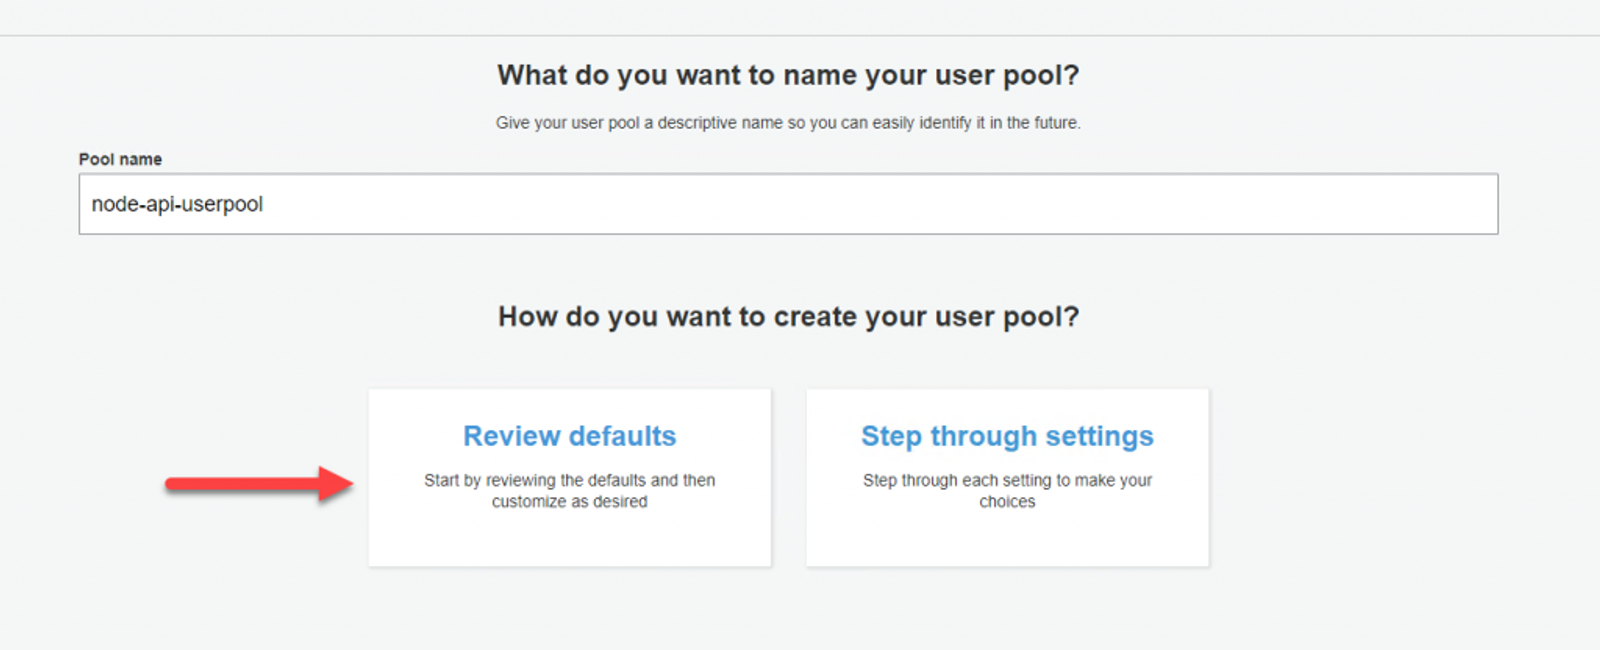
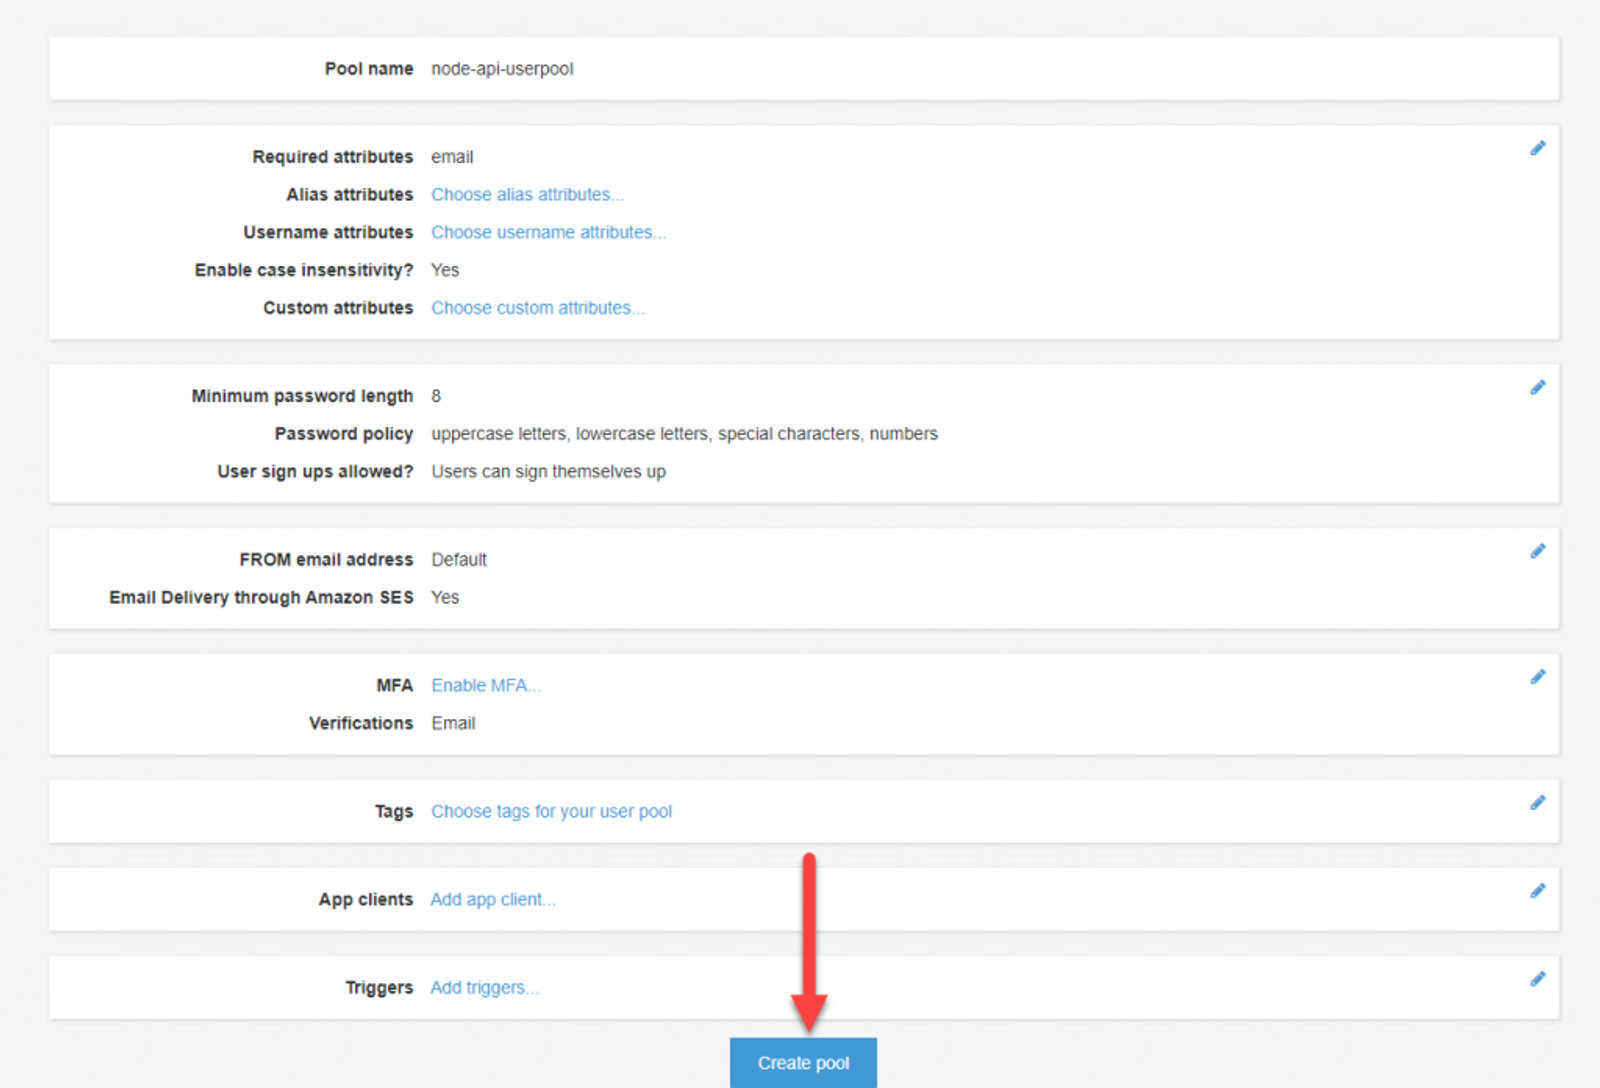
Give your User Pool a name. I named mine ‘node-api-userpool’. We can leave the other options set as defaults, so click Review defaults, then Create pool.
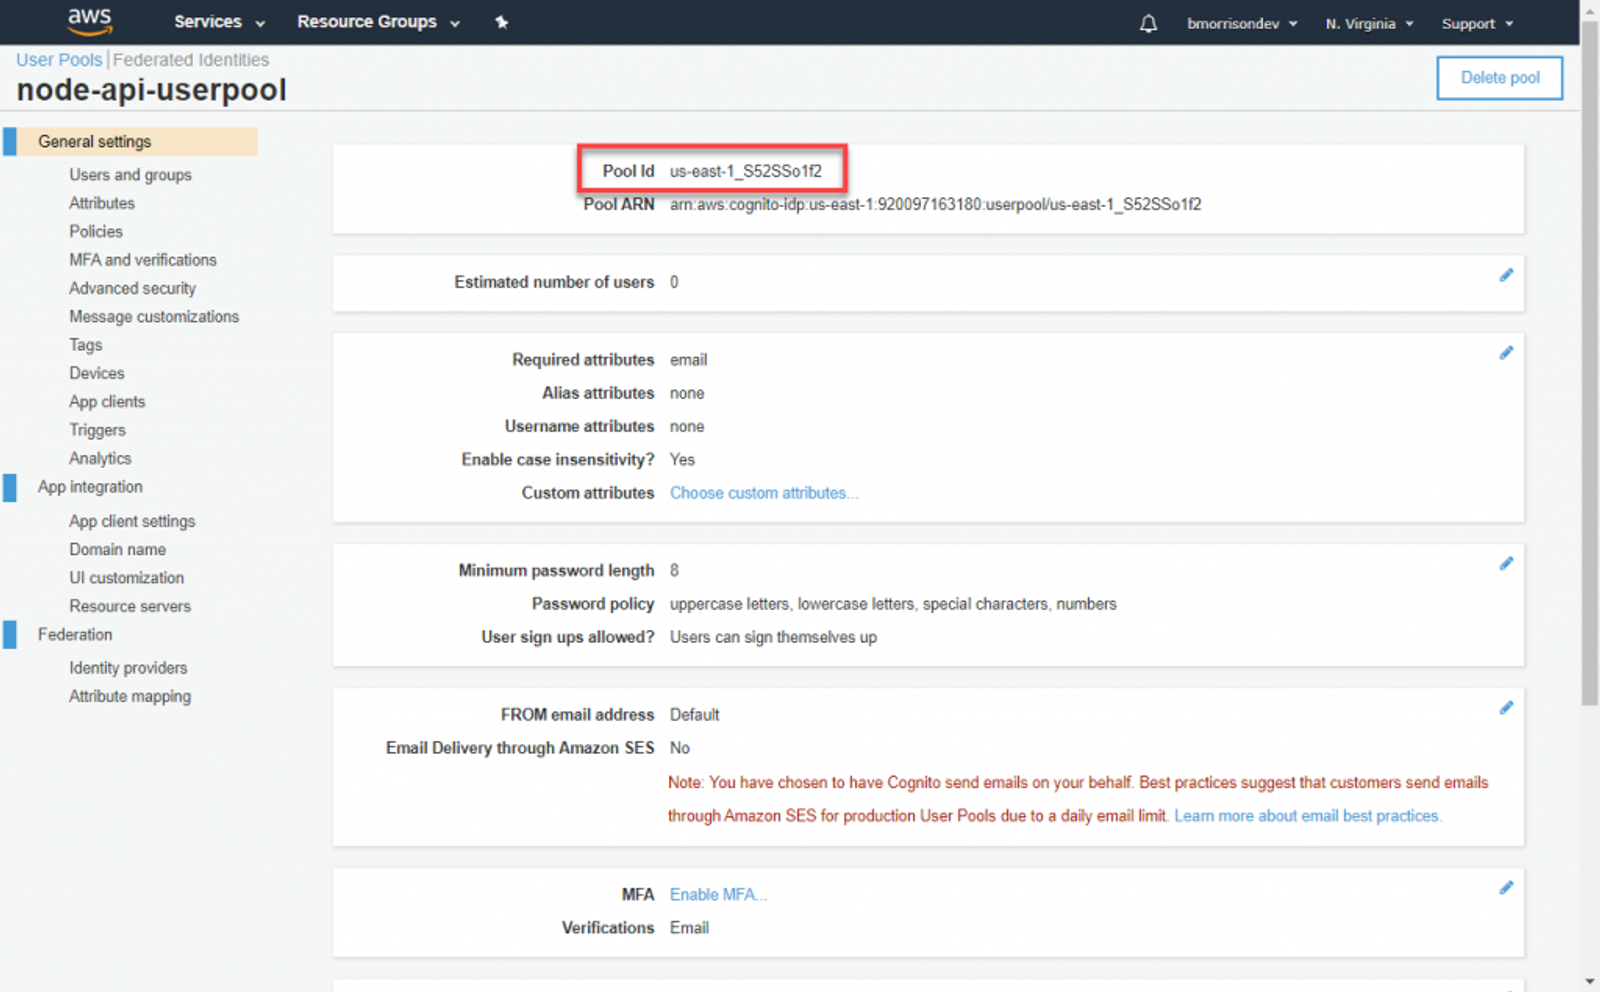
Before moving forward, lets grab the Pool Id and add it to our environment variables. We’re going to need this when setting up the API.
And our current .env should look like this.
AWS_ACCESS_KEY_ID = "AKIA5MOQQQ6WKFDB5WB3"
AWS_SECRET_ACCESS_KEY = "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"
AWS_DEFAULT_REGION = "us-east-1"
COGNITO_USER_POOL_ID = "us-east-1_S52SSo1f2"
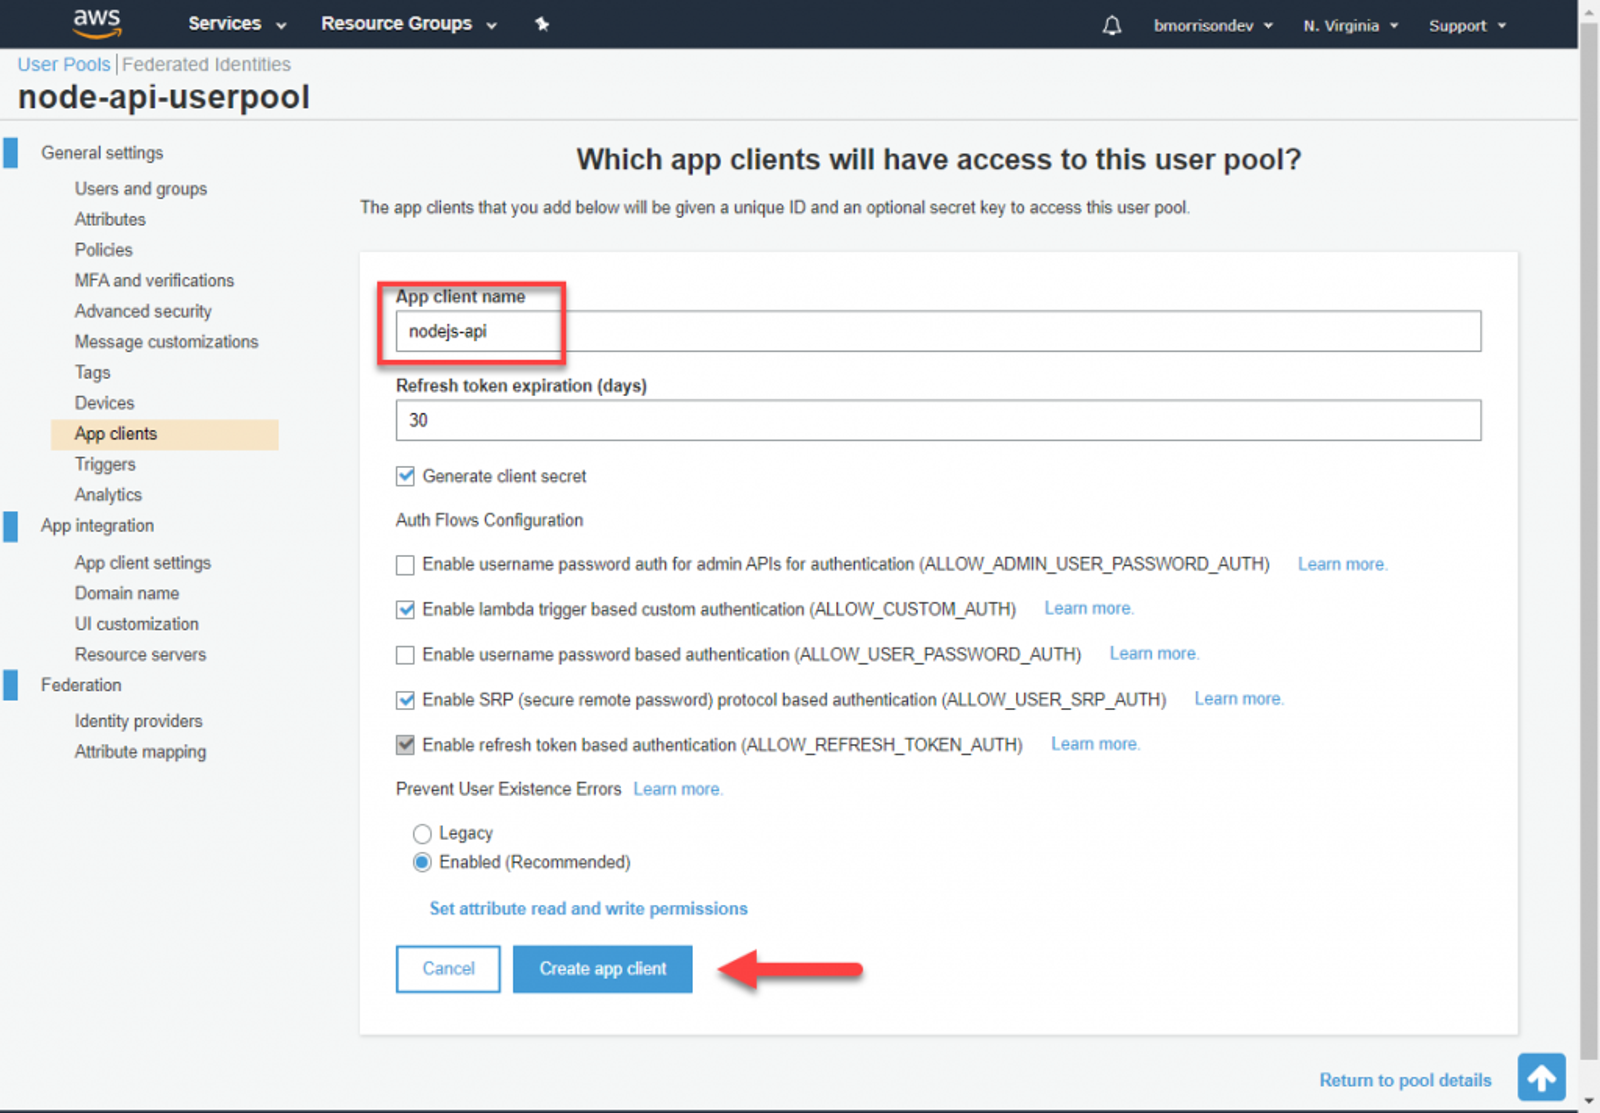
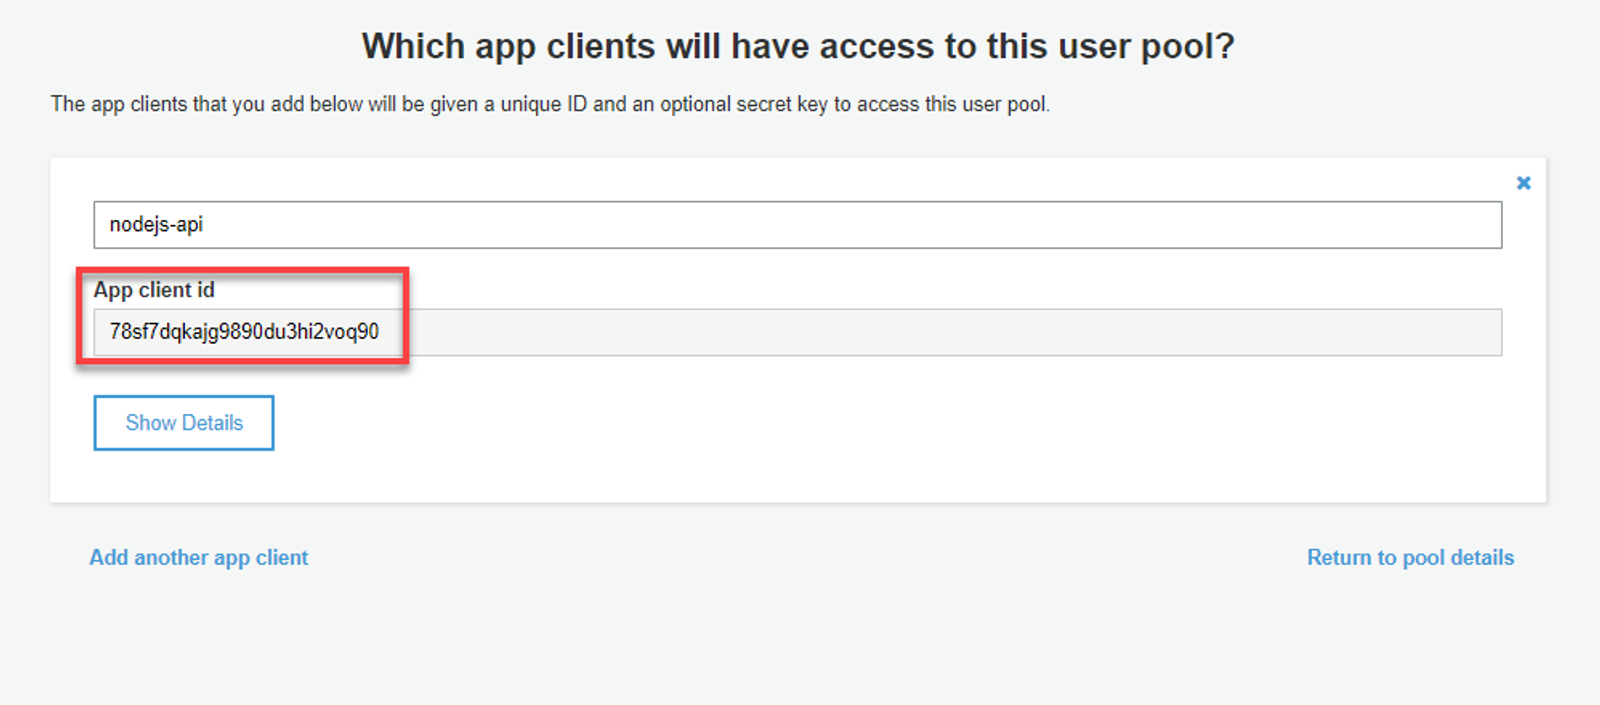
From here we need to create an App client to identify our API when making auth requests to Cognito. Click on App clients in the left side and create a new App client. I named mine ‘nodejs-api‘, you can accept the rest of the defaults and click Create app client. On the next view, note the App client id. We’re going to need this when creating our sign in URL.
Lets make sure to add these fields to our .env file before moving forward.
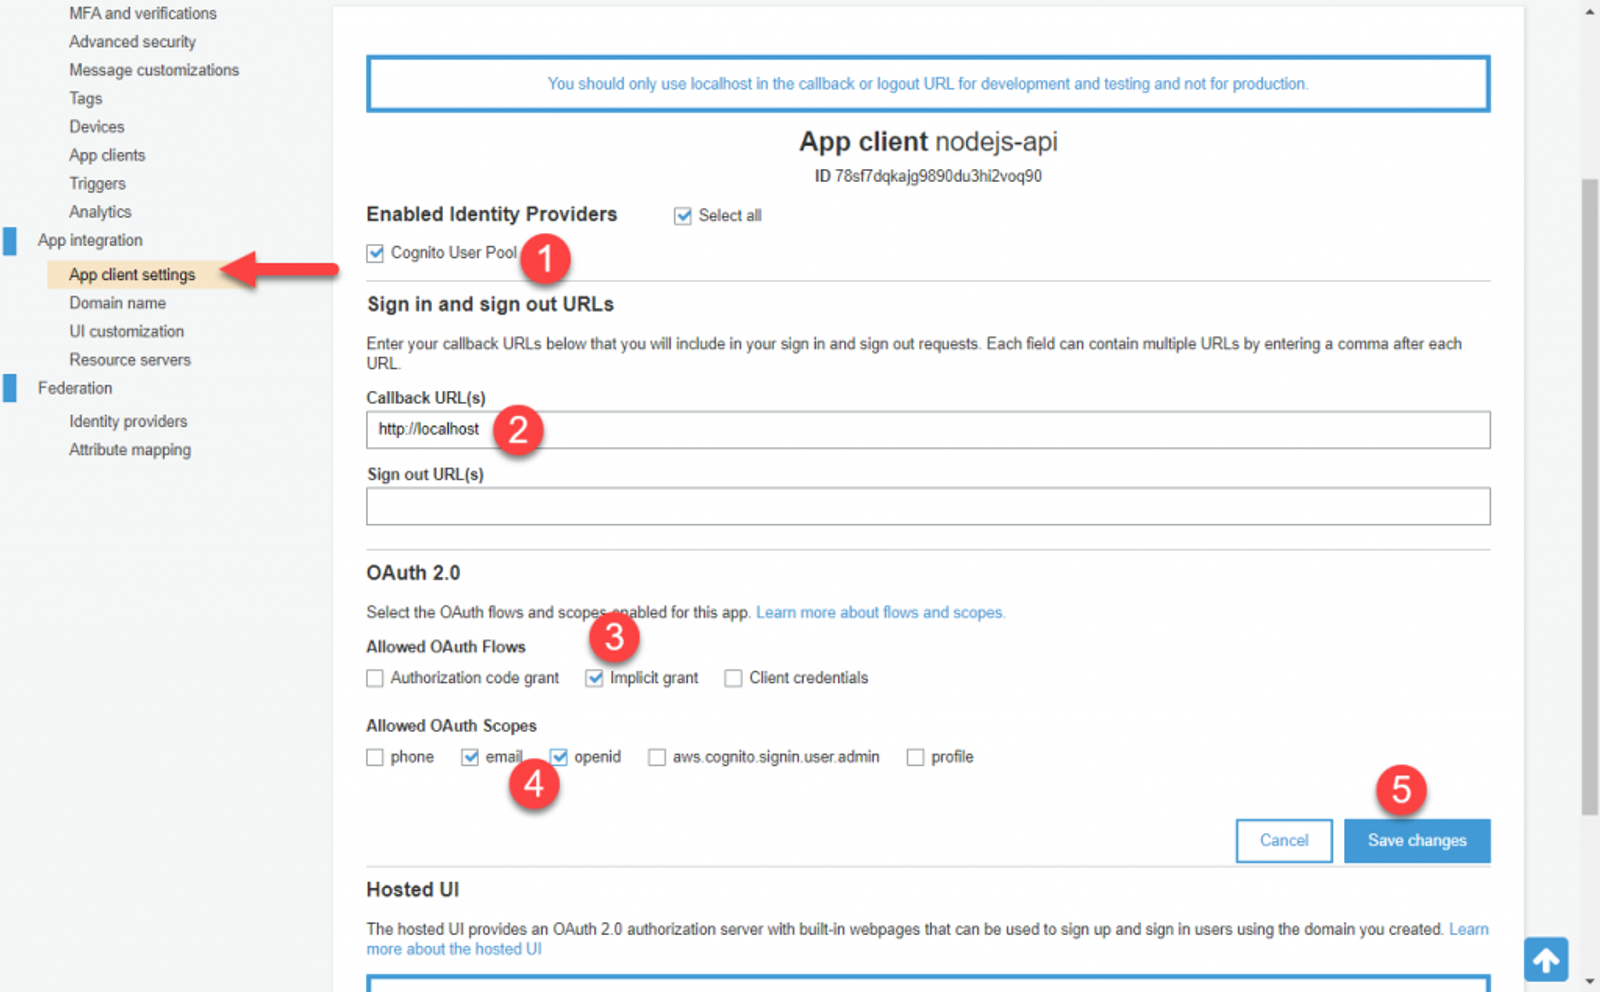
Now we need to setup Cognito to provide us the right kind of token when a user signs in. Head to App client settings and do the following;
- Check Cognito User Pool
- Enter ‘http://localhost‘ in Callback URLs
- Under Allowed OAuth Flows, check Implicit Grant
- Under Allowed OAuth Scopes, check email & openid
- Save changes
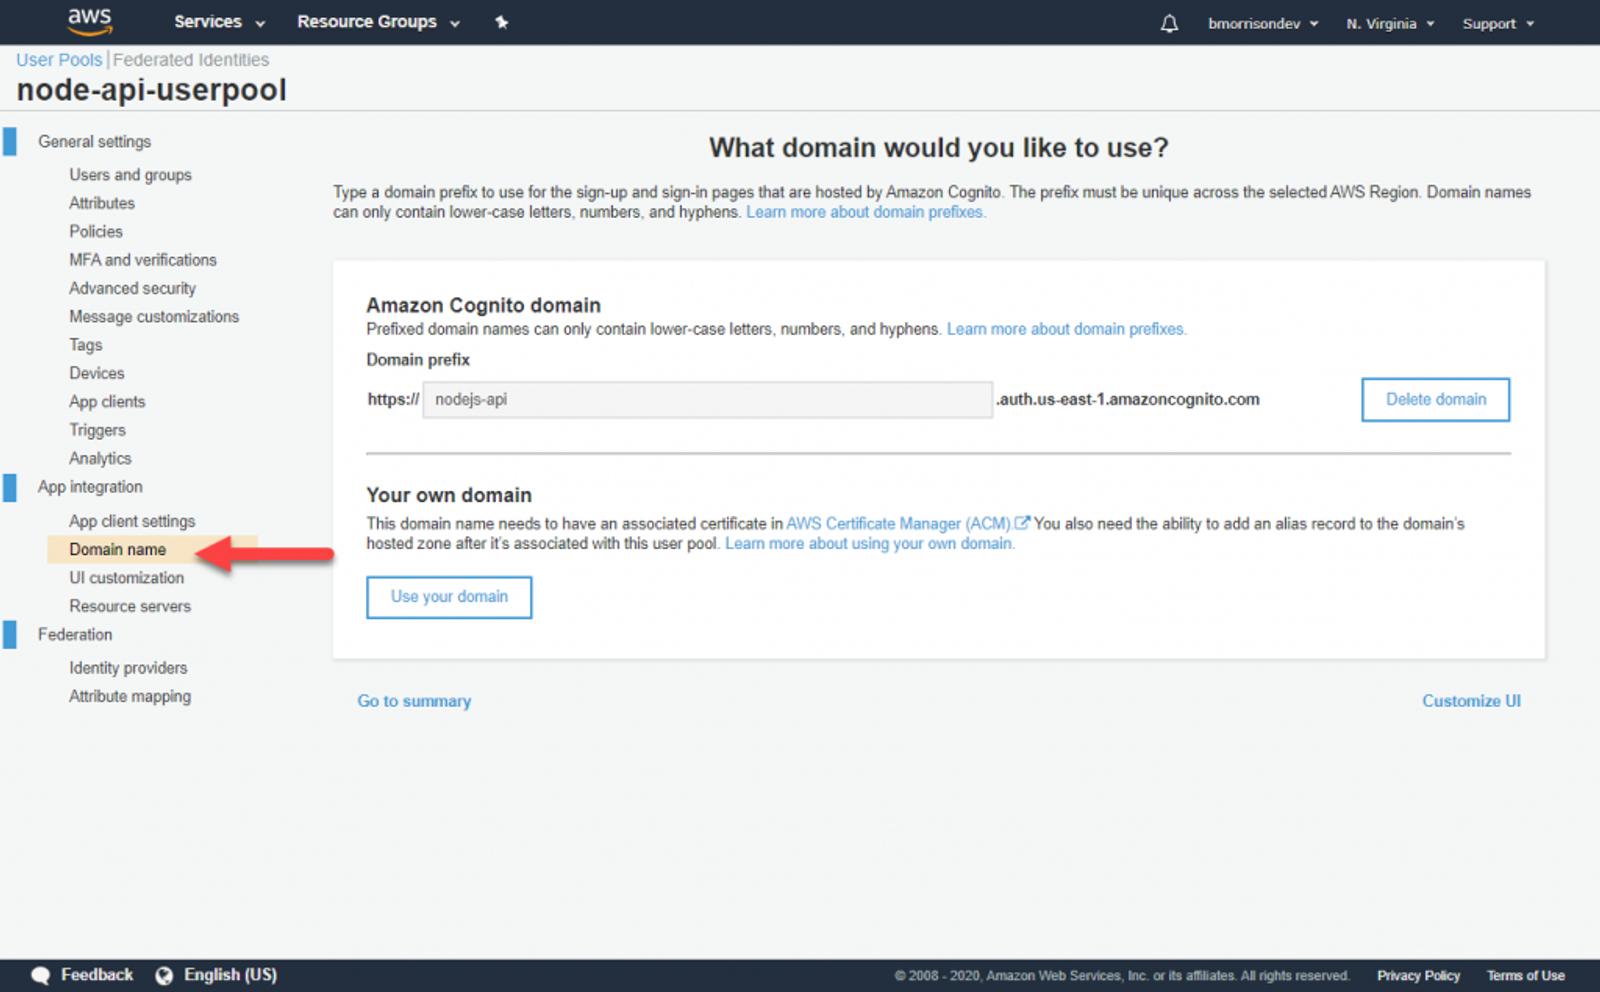
The next thing we need to do is specify a domain we can use to sign in. Cognito has a set of built in UI forms that will be used by users. Go to Domain name and specify a Domain prefix. I named mine ‘nodejs-api‘. Take note of what you specify as we’ll need to use this in the next section.
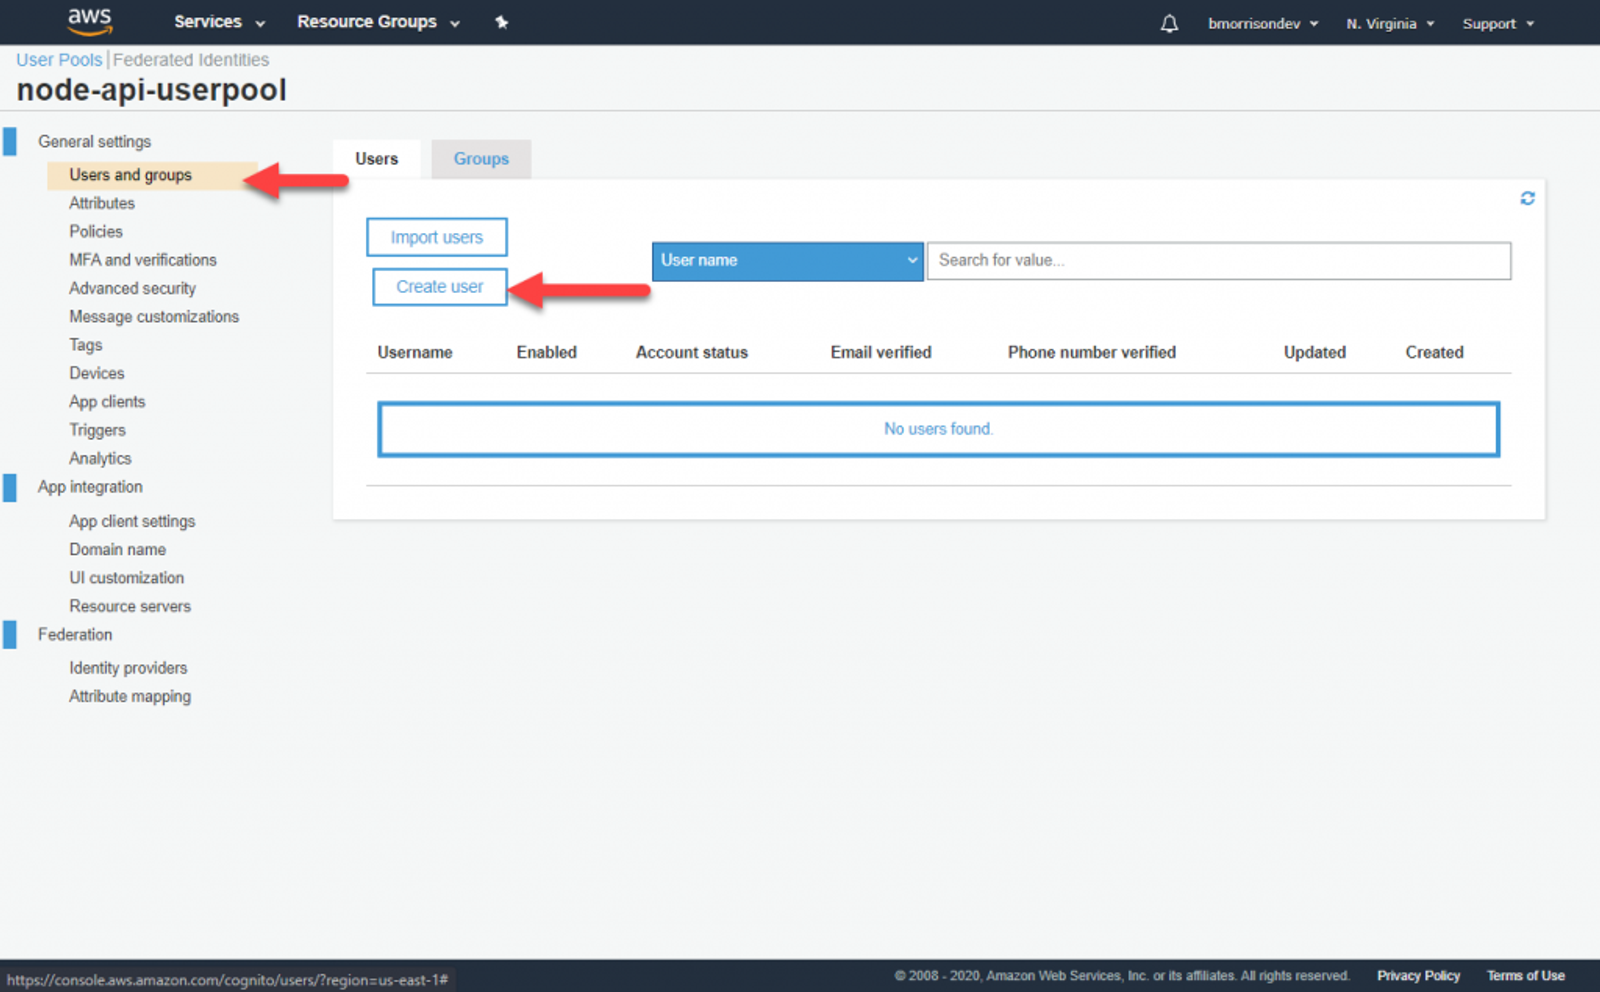
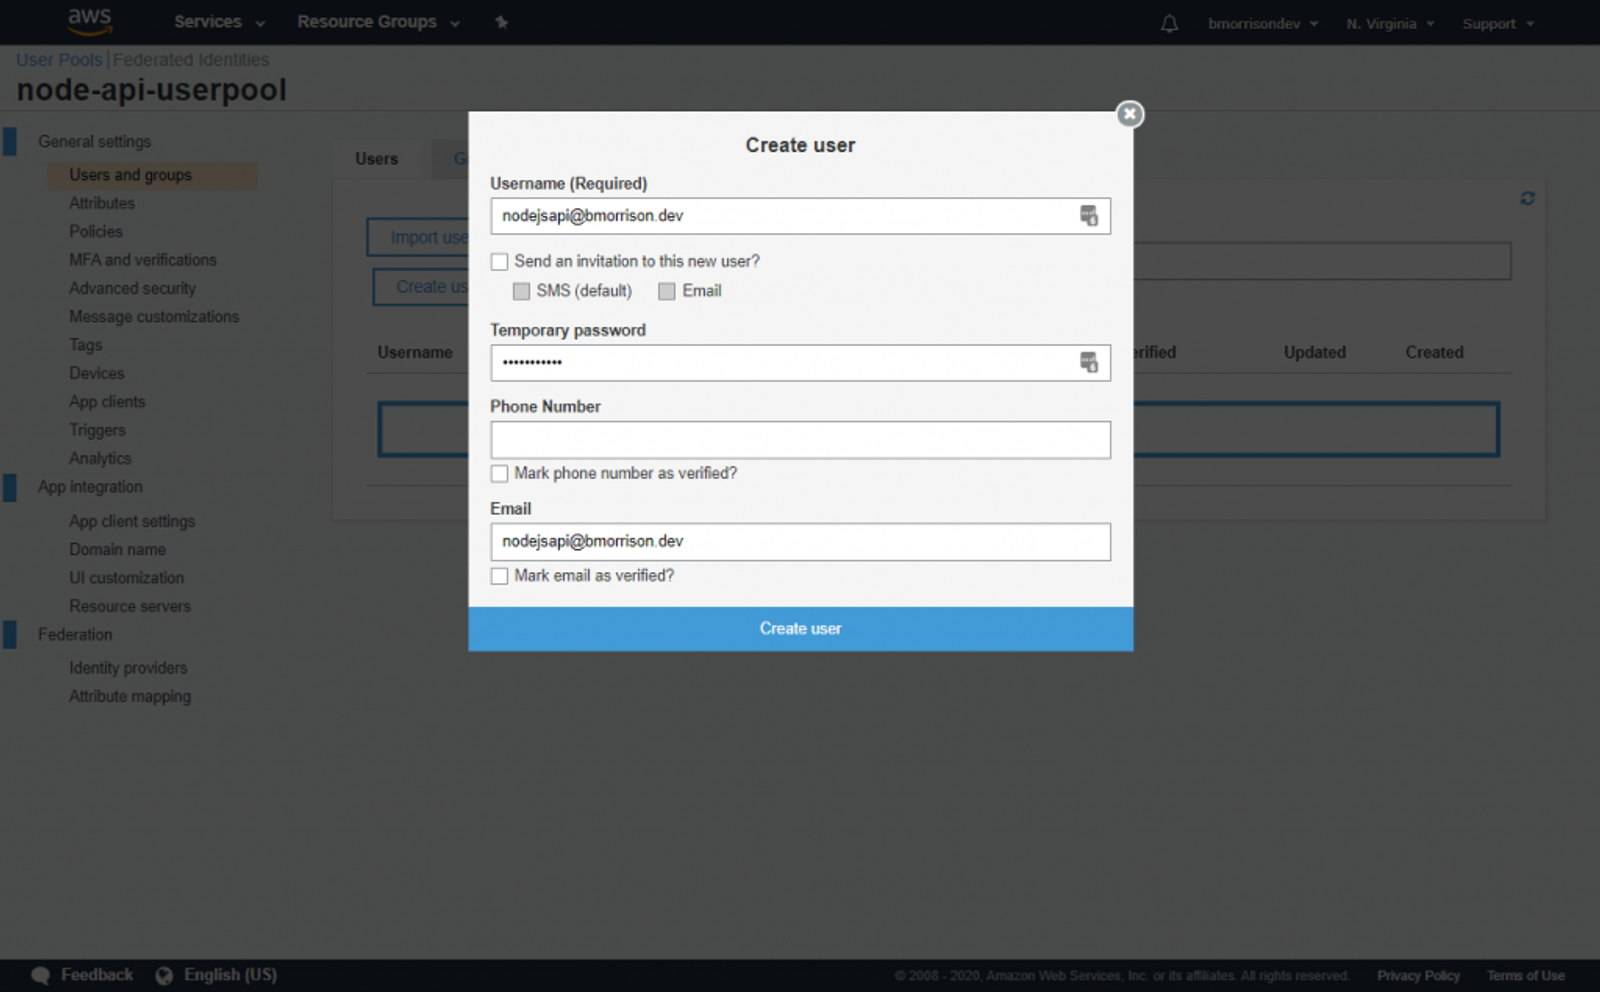
Finally, lets create a user. Go to Users and groups and click Create user. Fill out the fields like I’ve demonstrated below.
Once your user is created, lets test signing in.
Signing In
You’ll need to create a URL to sign in based on the values you put into Cognito. If you followed along, it should be something like this.
https://{YOUR_AUTH_DOMAIN}.auth.us-east-1.amazoncognito.com/oauth2/authorize?response_type=token&client_id={YOUR_CLIENT_ID}&redirect_uri=http://localhost
Put that into the browser to be presented with this page. You’ll then enter the credentials for the user you just created.
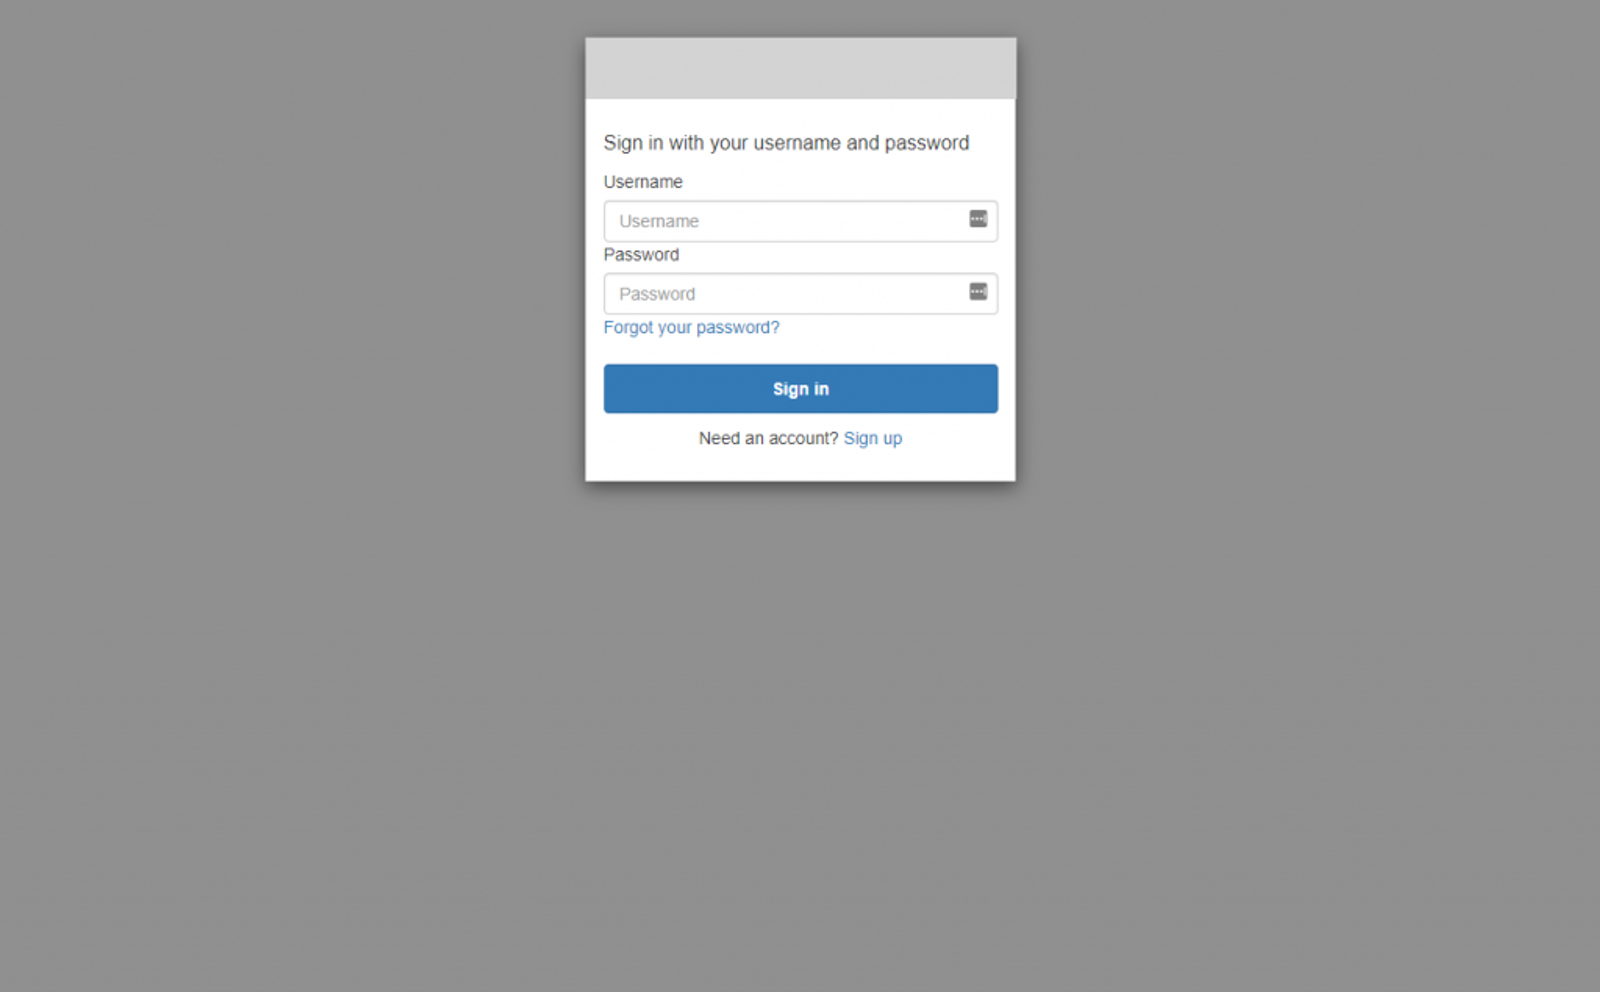
Sign in and update the password if asked. You might think you did something wrong since you got the This site can’t be reached page, but this is because we specified http://localhost as the callback URL. You likely don’t have anything running on there, but don’t worry, the important part is in the address actually. Copy that URL down and break it apart based on the first hash mark and the following ampersands, you should see this.
    http://localhost/

    #id_token=eyJraWQiOiJQQ3NoWGFOOERsbmhTd3lsWmxBXC9kV1VnTENMa1pEaVwvNEpJRVFCcXdoaGs9IiwiYWxnIjoiUlMyNTYifQ.eyJhdF9oYXNoIjoidXNBTE9NMmphNnJNVUhMVW8zUU04QSIsInN1YiI6Ijg4ZTY4MjdlLTFjZjYtNDEyNi1hNmU2LTZiZjA0OGZjMjgxOSIsImF1ZCI6Ijc4c2Y3ZHFrYWpnOTg5MGR1M2hpMnZvcTkwIiwiZXZlbnRfaWQiOiI3NjQ3NGMwZi05YmI0LTQyMDQtYmY1Yy1jYTQ1Mzg2N2EwYTEiLCJ0b2tlbl91c2UiOiJpZCIsImF1dGhfdGltZSI6MTU5MjM1ODg3NCwiaXNzIjoiaHR0cHM6XC9cL2NvZ25pdG8taWRwLnVzLWVhc3QtMS5hbWF6b25hd3MuY29tXC91cy1lYXN0LTFfUzUyU1NvMWYyIiwiY29nbml0bzp1c2VybmFtZSI6Im5vZGVqc2FwaUBibW9ycmlzb24uZGV2IiwiZXhwIjoxNTkyMzYyNDc0LCJpYXQiOjE1OTIzNTg4NzUsImVtYWlsIjoibm9kZWpzYXBpQGJtb3JyaXNvbi5kZXYifQ.a3UyjpKWT3Dyy7m8orMuL0gm7NzJc2x0HRd2yqlf0oRo-nGYyCXchpgt63YWYnY54Dj9ihI6Vz7tixT1UcmFUfFsyMgjt4L1GDtcaJIbcviSVKvV4SFNR42fNKtwWxI_WUzI29V4pOQrLF1ZTOSYKMynzQI8o-Dk0IOjA-Q9MyXTsAbOM1jx19500LFAwjkSonUzA0x0thE5zyaYqjwevW0Z69VC3THssE8h1xpotXTeH2r1y7NQmJ8xRi18nvUPQeJAZB1NiWSf-jQgyGPRVdvN3AMc1szzzclVYZHGwzjqwrA0QnmGJUxXOwKFAbFOHNutsWHIUDW_bYEZieYNLg

    &access_token=eyJraWQiOiJnaHNyRDMySkRQWWRXa1dieURVb0dQeGhYdXlmXC9OWTY3N25rMERvZnJFaz0iLCJhbGciOiJSUzI1NiJ9.eyJzdWIiOiI4OGU2ODI3ZS0xY2Y2LTQxMjYtYTZlNi02YmYwNDhmYzI4MTkiLCJldmVudF9pZCI6Ijc2NDc0YzBmLTliYjQtNDIwNC1iZjVjLWNhNDUzODY3YTBhMSIsInRva2VuX3VzZSI6ImFjY2VzcyIsInNjb3BlIjoib3BlbmlkIGVtYWlsIiwiYXV0aF90aW1lIjoxNTkyMzU4ODc0LCJpc3MiOiJodHRwczpcL1wvY29nbml0by1pZHAudXMtZWFzdC0xLmFtYXpvbmF3cy5jb21cL3VzLWVhc3QtMV9TNTJTU28xZjIiLCJleHAiOjE1OTIzNjI0NzQsImlhdCI6MTU5MjM1ODg3NSwidmVyc2lvbiI6MiwianRpIjoiYzIzYzA4ODQtNDliYi00YmI4LTlmYWItMmZkMjIwNDk1YTQ0IiwiY2xpZW50X2lkIjoiNzhzZjdkcWthamc5ODkwZHUzaGkydm9xOTAiLCJ1c2VybmFtZSI6Im5vZGVqc2FwaUBibW9ycmlzb24uZGV2In0.Znuc_qA3JL5zDVcG0s5CgY4tQyeE826X1L_RJ0Fj4A2iZjddkVMXNkm25Xibg1Sz4R7YXs_VLhzmagrsS5uNFQr5BptgxVDHEzvVFWvYfmH2Z_fdZXXEZlqyomvyMs_zawRI71hVaoQ1Snp1B-PiSskPH_ZqG_HtetF0kmM2ifGEYlSQR4e74BHlZ8DCPsbCbG2fahsXHt-il4AipcuyNhReguLiyToXbHXqfpRmTZY5FYpJztI64S2Vp_6Si9Nt-gz8d1-eYFQFfDxZTU5G8dxq2RGFy4o-Kza1jKZevRTuAP6VecPBhXJhqgsGZ4G6OBc4QmNtQVjZwle82v6DqA

    &expires_in=3600

    &token_type=Bearer
Lets break down what each of these values are used for;
- id_token – contains identifying information about the user
- access_token – the authentication token we can use to authetnicate against our API using Cognito
- expires_in – the time in seconds when these tokens will expire and no longer be valid
- token_type – the type of token that was returned
The access_token is what we’re mostly interested in. Using this, we can pass it to our API which will validate it with Cognito. Now that we have our tokens though, we can setup the API to accept them.
Adding the Cognito-Express Middleware
We’re going to use a package called Cognito-Express, which streamlines most of the heavy lifting of validating our tokens with Cognito. Open a terminal and run npm install cognito-express. Once the install is finished, add a new file to the root of the project called auth.js and add this code to it.
const CognitoExpress = require('cognito-express')
// Setup CognitoExpress
const cognitoExpress = new CognitoExpress({
region: process.env.AWS_DEFAULT_REGION,
cognitoUserPoolId: process.env.COGNITO_USER_POOL_ID,
tokenUse: "access",
tokenExpiration: 3600
})
exports.validateAuth = (req, res, next) => {
// Check that the request contains a token
if (req.headers.authorization && req.headers.authorization.split(" ")[0] === "Bearer") {
// Validate the token
const token = req.headers.authorization.split(" ")[1]
cognitoExpress.validate(token, function (err, response) {
if (err) {
// If there was an error, return a 401 Unauthorized along with the error
res.status(401).send(err)
} else {
//Else API has been authenticated. Proceed.
next();
}
});
} else {
// If there is no token, respond appropriately
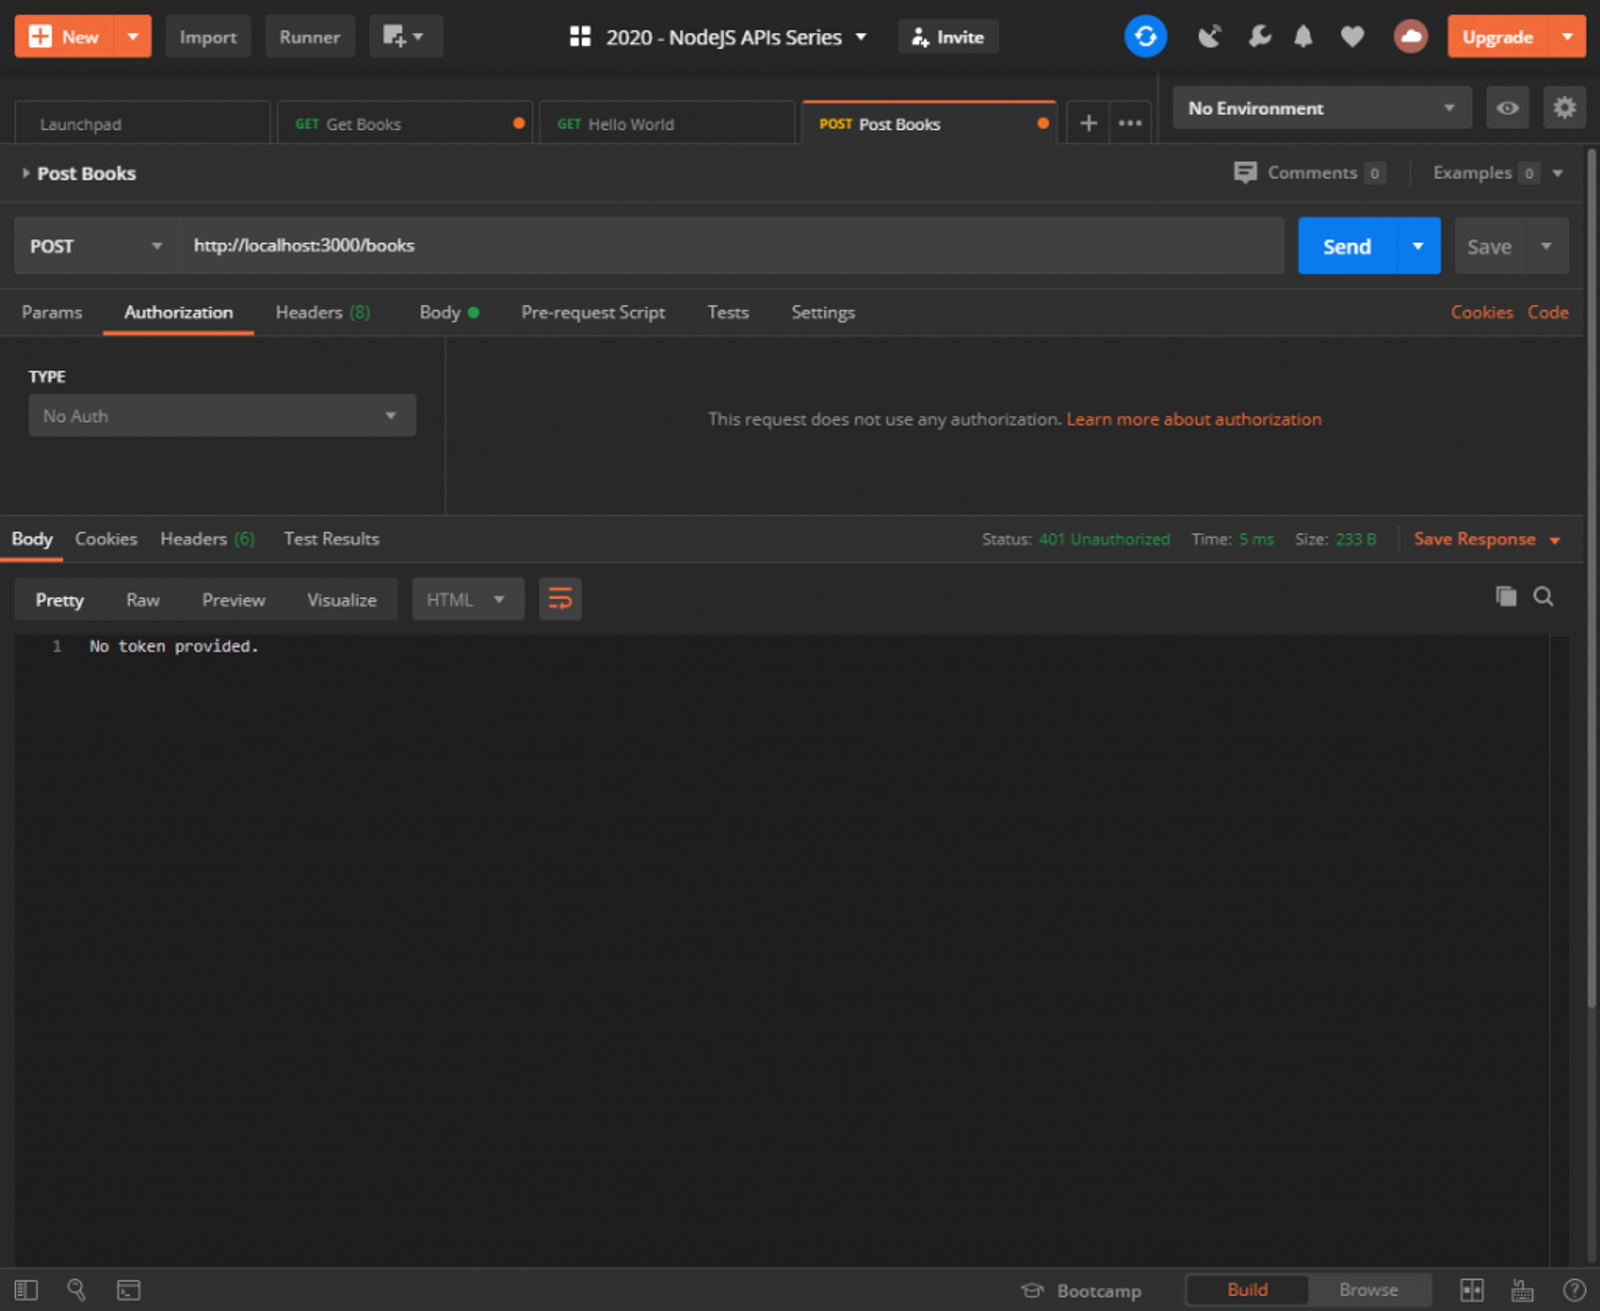
res.status(401).send("No token provided.")
}
}
Now go into books.js and update the middleware portion of the POST call to contain our auth middleware we created.
// Import the middleware near the top of the file
const { validateAuth } = require('../auth')

// Update the middleware to use validateAuth. I can use the spread operator (...) to include the validators as well.
router.post('/', [validateAuth, ...validators.postBooksValidators], async (req, res) => {
  // ... code removed for brevity
}
Testing with Postman
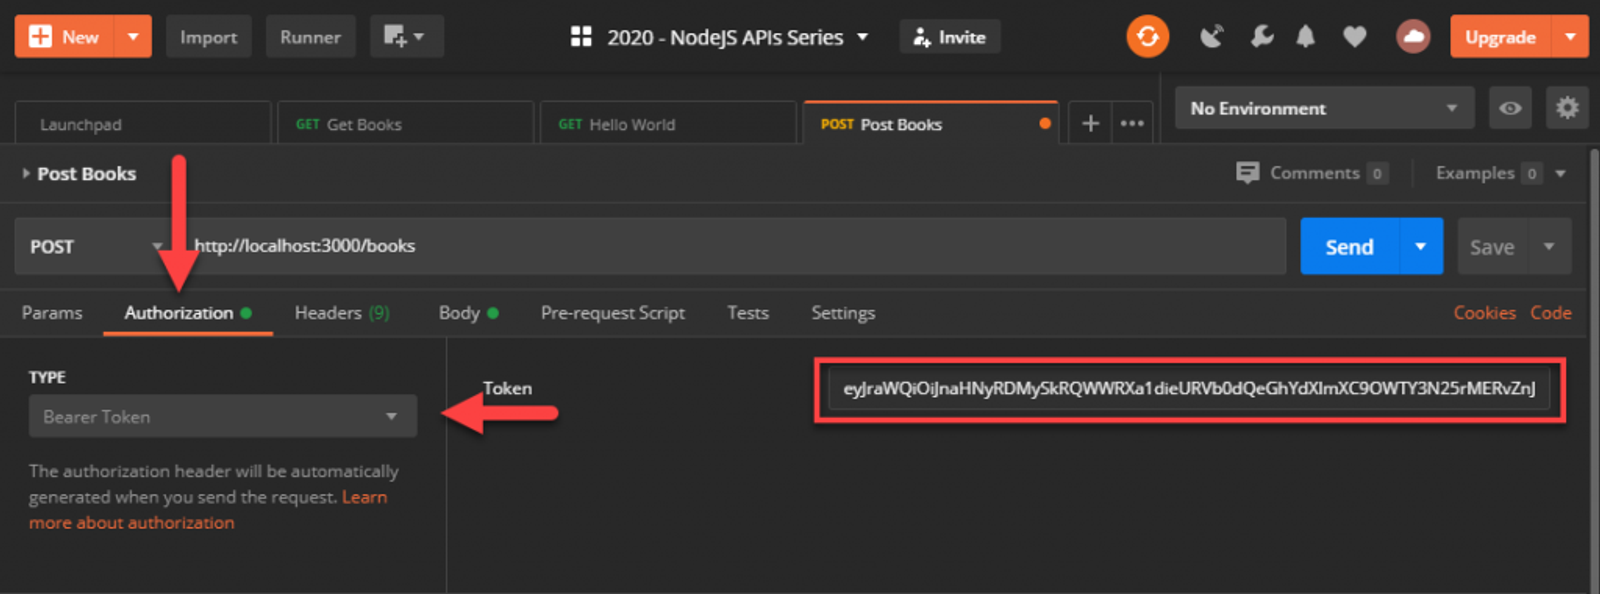
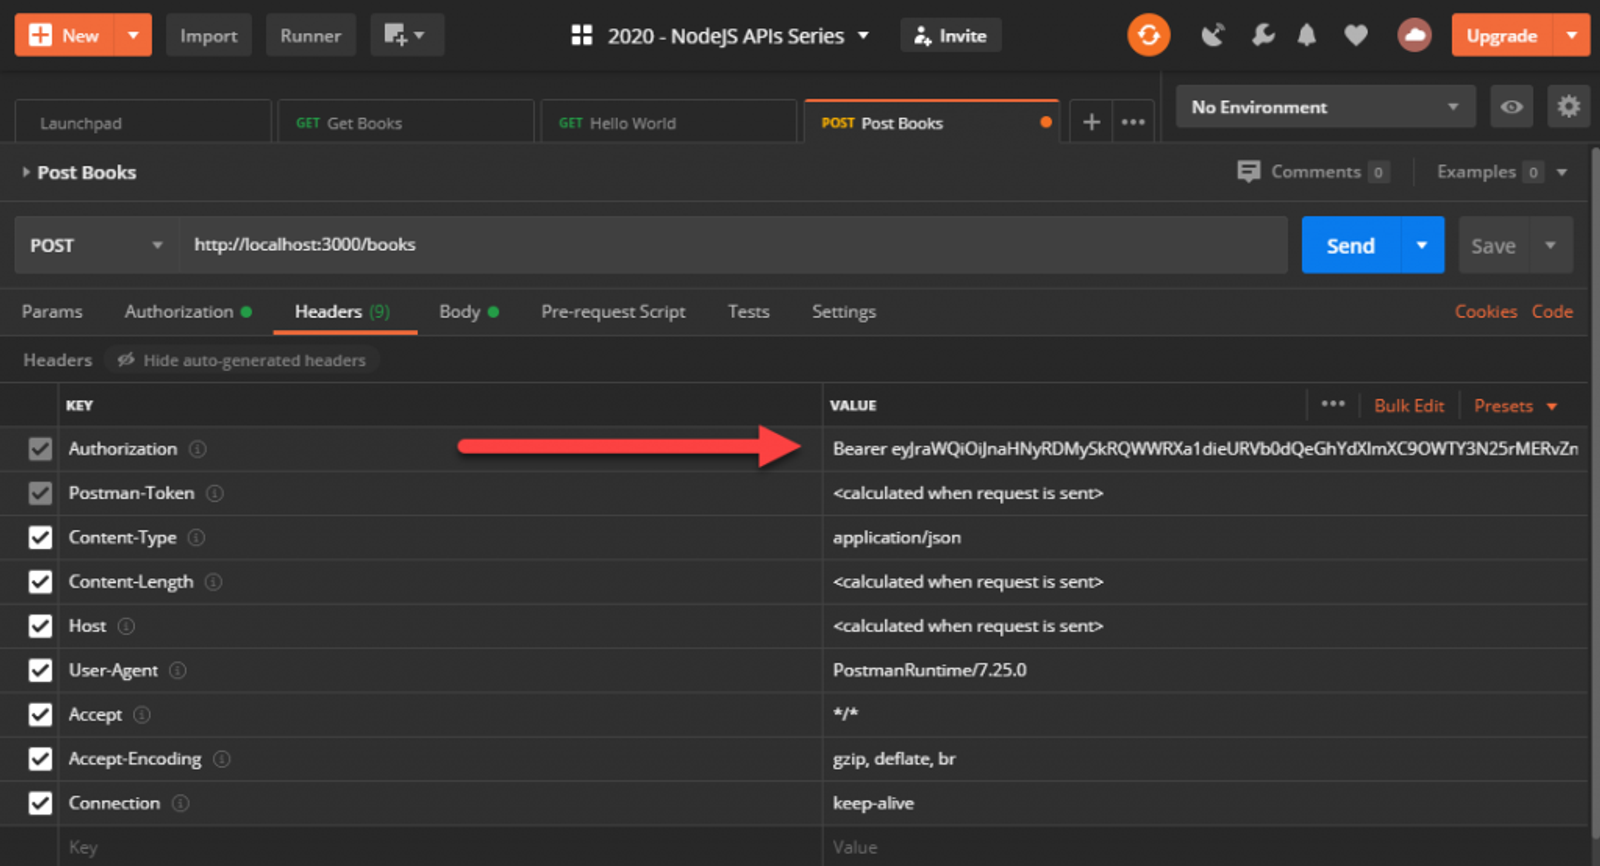
Back in Postman, update the POST /books request and add the authentication header by going to the Authorization tab, changing the type to Bearer Token, and adding your access_token into that field. Now if you check the headers, Postman will have inserted the Authorization header in for us.
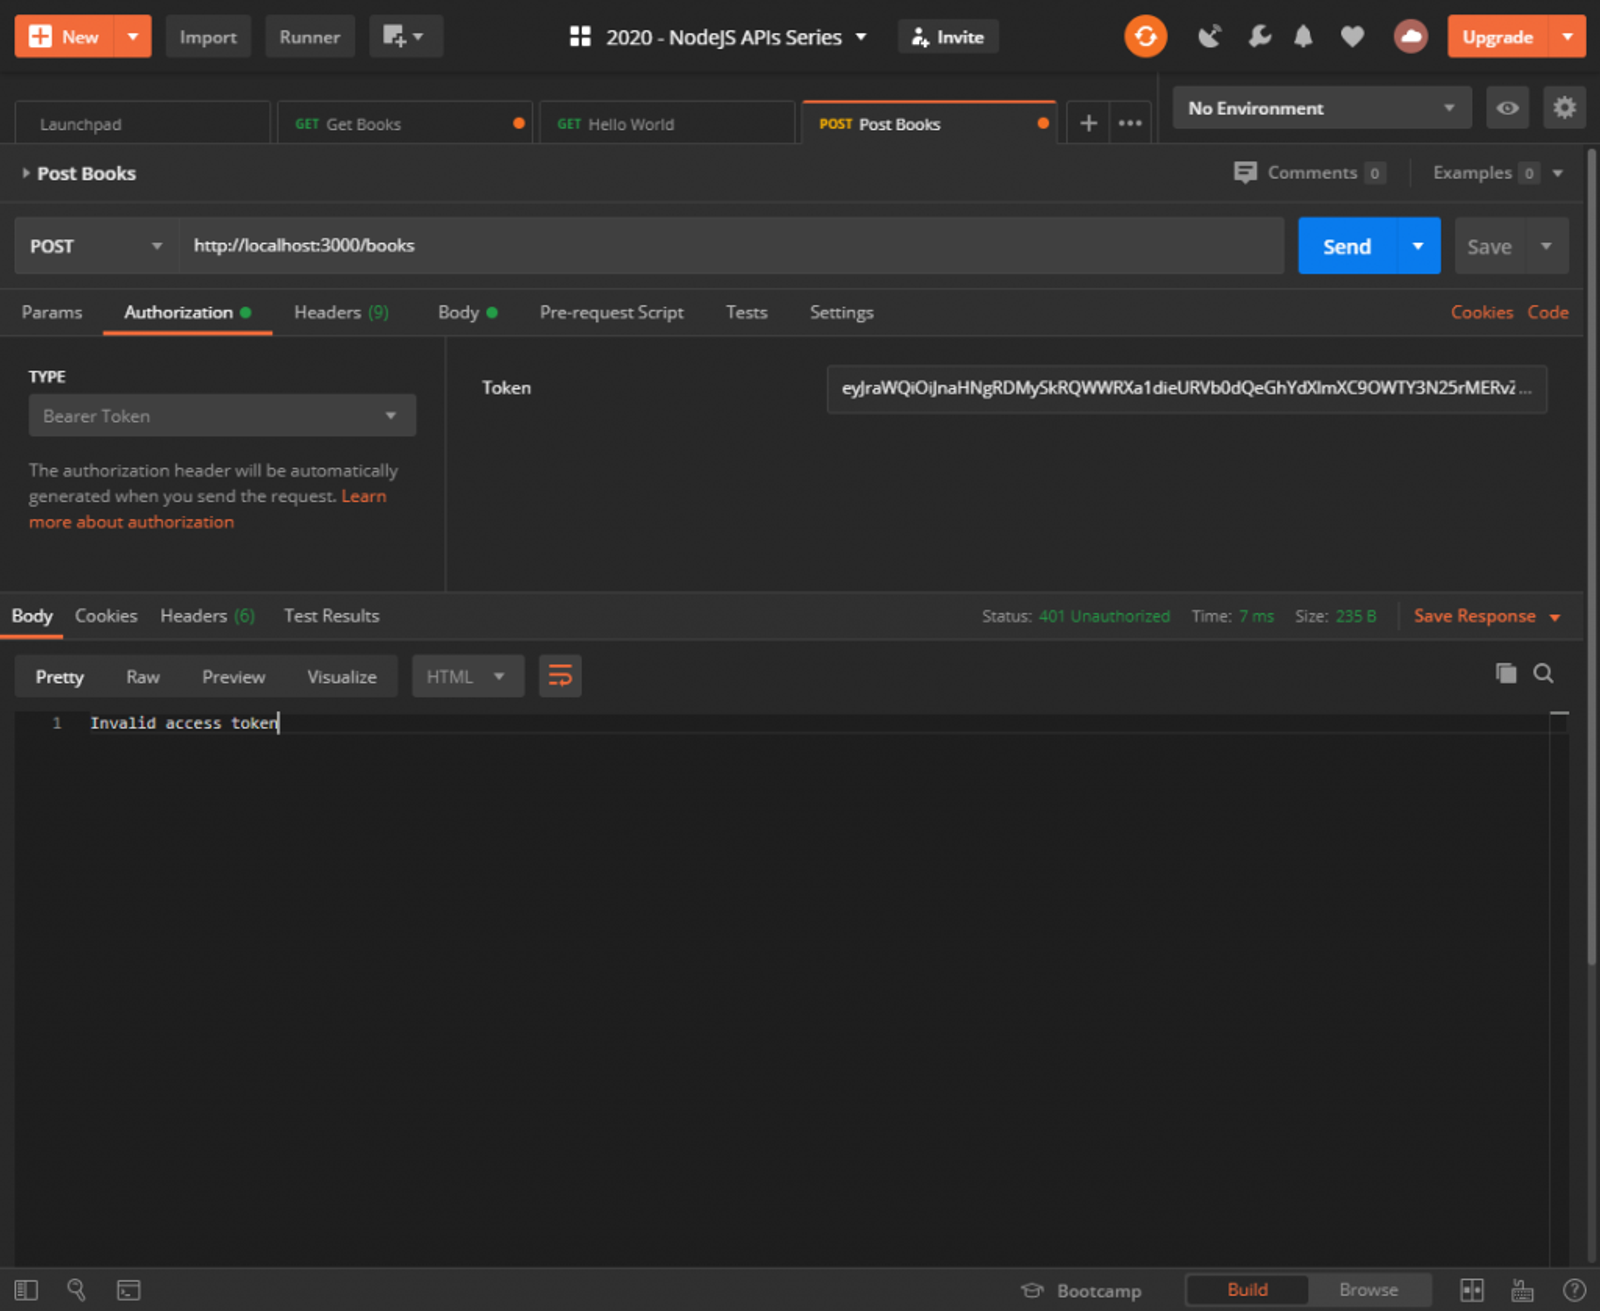
Send the request and it should work just as it did before. If you remove the token, or mistype it, you’ll get an appropriate response with a 401 Unauthorized status.
Also, since we only added our middleware on the POST handler, GET /books will work without a token at all! Feel free to test that for yourself.
Remember, the tokens expire after an hour so you’ll need to refresh them manually. This demonstrates at a very basic level how Cognito can be used to generate auth tokens. In a production scenario, you’d want a UI to handle the authentication using the Authorization code grant so you can get refresh tokens which allow you to refresh the users’ access_token after an hour without prompting them to log in again.
My next article will complete the series by uploading our API into AWS Elastic Beanstalk.